Using the Rear Seat Audio Controls
Using the Radios Dual Zone Source | Using the Factory XM Radio Tuner |
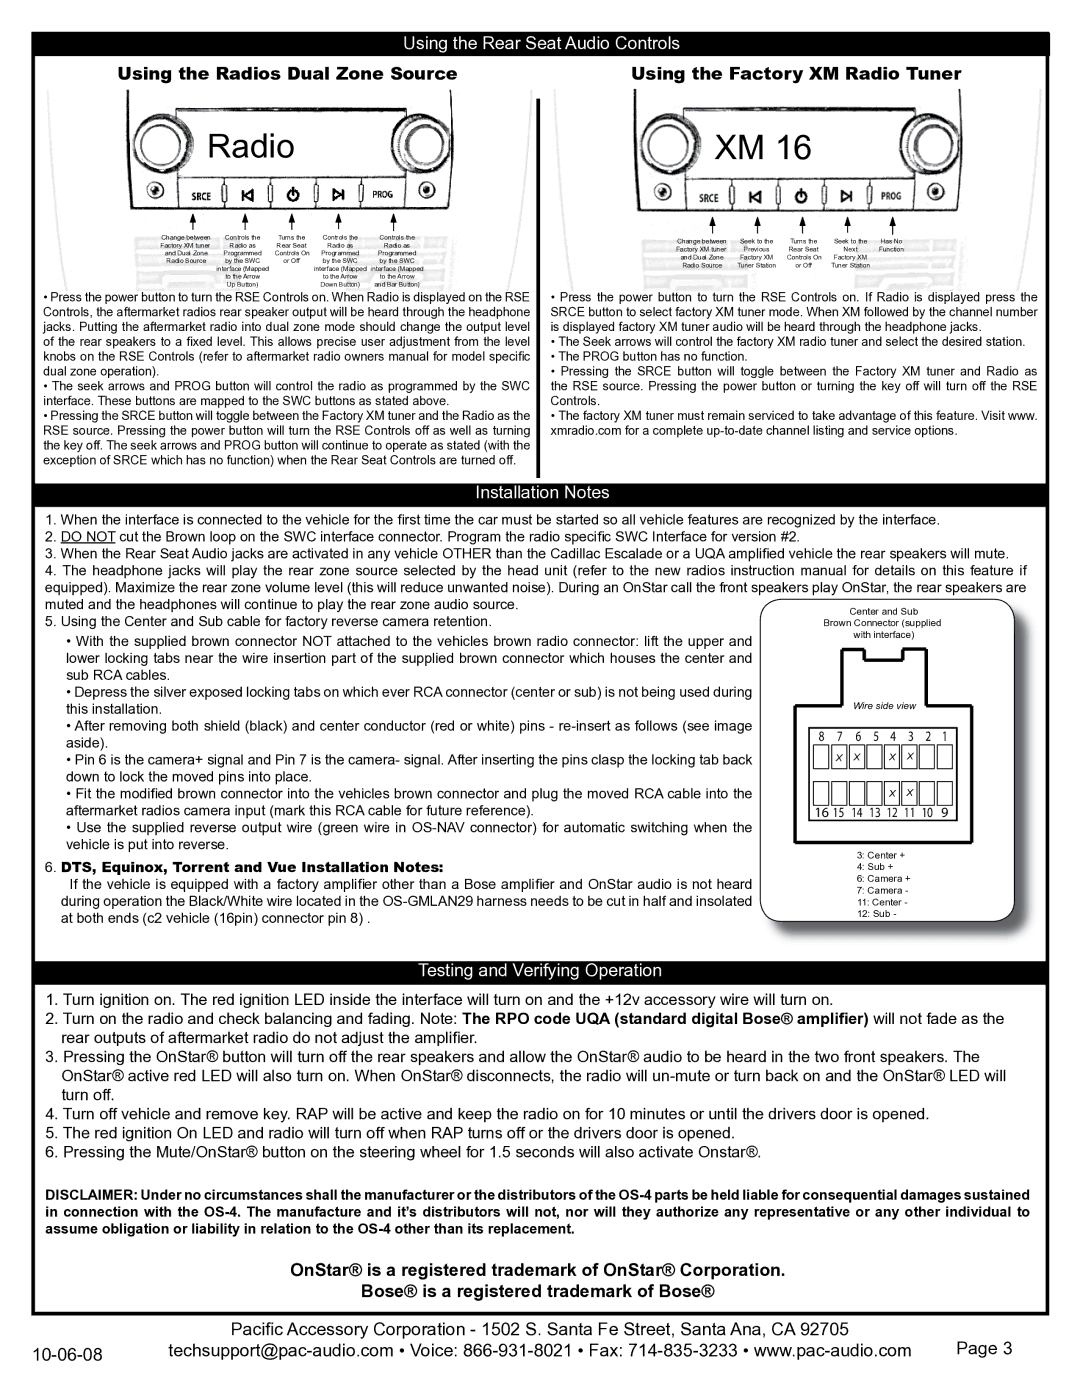
Radio | XM 16 |
Change between | Controls the | Turns the | Controls the | Controls the |
Factory XM tuner | Radio as | Rear Seat | Radio as | Radio as |
and Dual Zone | Programmed | Controls On | Programmed | Programmed |
Radio Source | by the SWC | or Off | by the SWC | by the SWC |
| interface (Mapped |
| interface (Mapped | interface (Mapped |
| to the Arrow |
| to the Arrow | to the Arrow |
| Up Button) |
| Down Button) | and Bar Button) |
•Press the power button to turn the RSE Controls on. When Radio is displayed on the RSE Controls, the aftermarket radios rear speaker output will be heard through the headphone jacks. Putting the aftermarket radio into dual zone mode should change the output level of the rear speakers to a fi xed level. This allows precise user adjustment from the level knobs on the RSE Controls (refer to aftermarket radio owners manual for model specifi c dual zone operation).
•The seek arrows and PROG button will control the radio as programmed by the SWC interface. These buttons are mapped to the SWC buttons as stated above.
•Pressing the SRCE button will toggle between the Factory XM tuner and the Radio as the RSE source. Pressing the power button will turn the RSE Controls off as well as turning the key off. The seek arrows and PROG button will continue to operate as stated (with the exception of SRCE which has no function) when the Rear Seat Controls are turned off.
Change between | Seek to the | Turns the | Seek to the | Has No |
Factory XM tuner | Previous | Rear Seat | Next | Function |
and Dual Zone | Factory XM | Controls On | Factory XM |
|
Radio Source | Tuner Station | or Off | Tuner Station |
|
•Press the power button to turn the RSE Controls on. If Radio is displayed press the SRCE button to select factory XM tuner mode. When XM followed by the channel number is displayed factory XM tuner audio will be heard through the headphone jacks.
•The Seek arrows will control the factory XM radio tuner and select the desired station.
•The PROG button has no function.
•Pressing the SRCE button will toggle between the Factory XM tuner and Radio as the RSE source. Pressing the power button or turning the key off will turn off the RSE Controls.
•The factory XM tuner must remain serviced to take advantage of this feature. Visit www. xmradio.com for a complete
Installation Notes
1.When the interface is connected to the vehicle for the fi rst time the car must be started so all vehicle features are recognized by the interface.
2.DO NOT cut the Brown loop on the SWC interface connector. Program the radio specifi c SWC Interface for version #2.
3.When the Rear Seat Audio jacks are activated in any vehicle OTHER than the Cadillac Escalade or a UQA amplifi ed vehicle the rear speakers will mute.
4.The headphone jacks will play the rear zone source selected by the head unit (refer to the new radios instruction manual for details on this feature if equipped). Maximize the rear zone volume level (this will reduce unwanted noise). During an OnStar call the front speakers play OnStar, the rear speakers are muted and the headphones will continue to play the rear zone audio source.
5.Using the Center and Sub cable for factory reverse camera retention.
•With the supplied brown connector NOT attached to the vehicles brown radio connector: lift the upper and lower locking tabs near the wire insertion part of the supplied brown connector which houses the center and sub RCA cables.
•Depress the silver exposed locking tabs on which ever RCA connector (center or sub) is not being used during this installation.
•After removing both shield (black) and center conductor (red or white) pins -
•Pin 6 is the camera+ signal and Pin 7 is the camera- signal. After inserting the pins clasp the locking tab back down to lock the moved pins into place.
•Fit the modifi ed brown connector into the vehicles brown connector and plug the moved RCA cable into the aftermarket radios camera input (mark this RCA cable for future reference).
•Use the supplied reverse output wire (green wire in
6.DTS, Equinox, Torrent and Vue Installation Notes:
If the vehicle is equipped with a factory amplifi er other than a Bose amplifi er and OnStar audio is not heard during operation the Black/White wire located in the
8 | 7 | 6 | 5 | 4 | 3 | 2 | 1 |
| X | X |
| X | X |
|
|
|
|
|
|
|
|
|
|
X X
16 15 14 13 12 11 10 9
3:Center +
4:Sub +
6:Camera +
7:Camera -
11:Center -
12:Sub -
Testing and Verifying Operation
1.Turn ignition on. The red ignition LED inside the interface will turn on and the +12v accessory wire will turn on.
2.Turn on the radio and check balancing and fading. Note: The RPO code UQA (standard digital Bose® amplifier) will not fade as the rear outputs of aftermarket radio do not adjust the amplifi er.
3.Pressing the OnStar® button will turn off the rear speakers and allow the OnStar® audio to be heard in the two front speakers. The OnStar® active red LED will also turn on. When OnStar® disconnects, the radio will
4.Turn off vehicle and remove key. RAP will be active and keep the radio on for 10 minutes or until the drivers door is opened.
5.The red ignition On LED and radio will turn off when RAP turns off or the drivers door is opened.
6.Pressing the Mute/OnStar® button on the steering wheel for 1.5 seconds will also activate Onstar®.
DISCLAIMER: Under no circumstances shall the manufacturer or the distributors of the
OnStar® is a registered trademark of OnStar® Corporation.
Bose® is a registered trademark of Bose®
| Pacifi c Accessory Corporation - 1502 S. Santa Fe Street, Santa Ana, CA 92705 | Page 3 |