Setup menu list (continued)
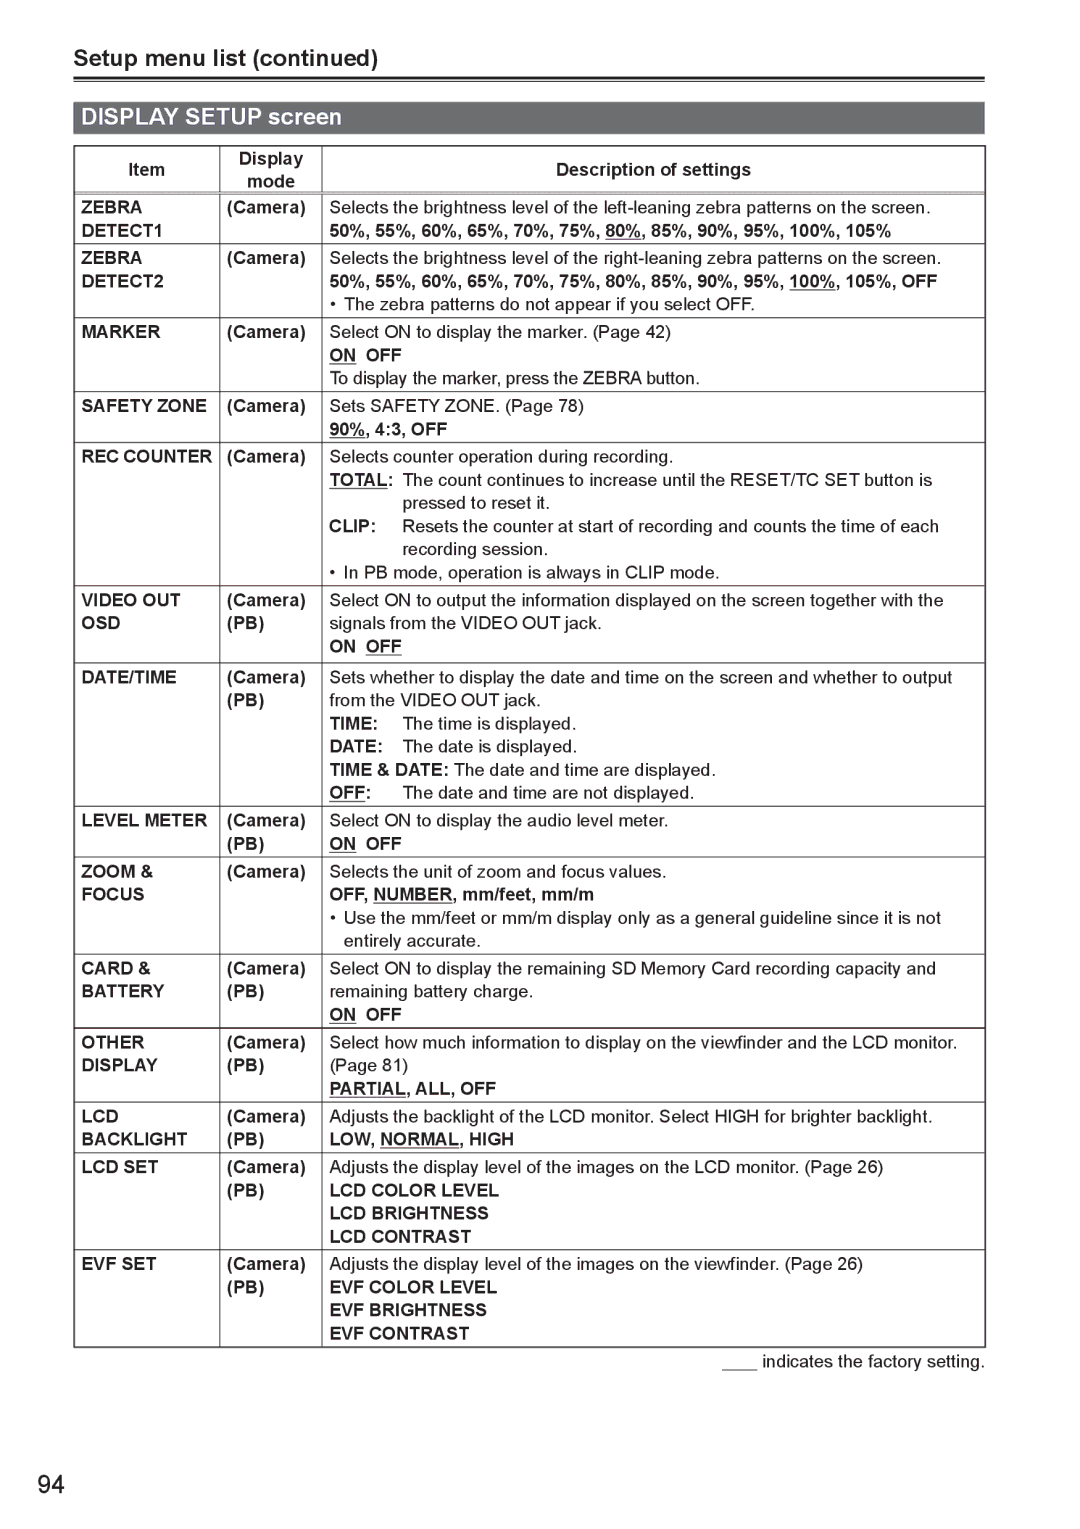
DISPLAY SETUP screen
Item | Display |
| Description of settings | ||
mode |
| ||||
|
|
|
|
| |
|
|
|
|
|
|
ZEBRA | (Camera) | Selects the brightness level of the | |||
DETECT1 |
| 50%, 55%, 60%, 65%, 70%, 75%, 80%, 85%, 90%, 95%, 100%, 105% | |||
ZEBRA | (Camera) | Selects the brightness level of the | |||
DETECT2 |
| 50%, 55%, 60%, 65%, 70%, 75%, 80%, 85%, 90%, 95%, 100%, 105%, OFF | |||
|
| • The zebra patterns do not appear if you select OFF. | |||
MARKER | (Camera) | Select ON to display the marker. (Page 42) | |||
|
| ON OFF |
|
|
|
|
| To display the marker, press the ZEBRA button. | |||
SAFETY ZONE | (Camera) | Sets SAFETY ZONE. (Page 78) | |||
|
| 90%, 4:3, OFF | |||
REC COUNTER | (Camera) | Selects counter operation during recording. | |||
|
| TOTAL: The count continues to increase until the RESET/TC SET button is | |||
|
|
| pressed to reset it. | ||
|
| CLIP: | Resets the counter at start of recording and counts the time of each | ||
|
|
| recording session. | ||
|
| • In PB mode, operation is always in CLIP mode. | |||
VIDEO OUT | (Camera) | Select ON to output the information displayed on the screen together with the | |||
OSD | (PB) | signals from the VIDEO OUT jack. | |||
|
| ON OFF |
|
|
|
DATE/TIME | (Camera) | Sets whether to display the date and time on the screen and whether to output | |||
| (PB) | from the VIDEO OUT jack. | |||
|
| TIME: | The time is displayed. | ||
|
| DATE: The date is displayed. | |||
|
| TIME & DATE: The date and time are displayed. | |||
|
| OFF: | The date and time are not displayed. | ||
LEVEL METER | (Camera) | Select ON to display the audio level meter. | |||
| (PB) | ON OFF |
|
|
|
ZOOM & | (Camera) | Selects the unit of zoom and focus values. | |||
FOCUS |
| OFF, NUMBER, mm/feet, mm/m | |||
|
| • Use the mm/feet or mm/m display only as a general guideline since it is not | |||
|
| entirely accurate. | |||
CARD & | (Camera) | Select ON to display the remaining SD Memory Card recording capacity and | |||
BATTERY | (PB) | remaining battery charge. | |||
|
| ON OFF |
|
|
|
OTHER | (Camera) | Select how much information to display on the viewfinder and the LCD monitor. | |||
DISPLAY | (PB) | (Page 81) | |||
|
| PARTIAL, ALL, OFF | |||
LCD | (Camera) | Adjusts the backlight of the LCD monitor. Select HIGH for brighter backlight. | |||
BACKLIGHT | (PB) | LOW, NORMAL, HIGH | |||
LCD SET | (Camera) | Adjusts the display level of the images on the LCD monitor. (Page 26) | |||
| (PB) | LCD COLOR LEVEL | |||
|
| LCD BRIGHTNESS | |||
|
| LCD CONTRAST | |||
EVF SET | (Camera) | Adjusts the display level of the images on the viewfinder. (Page 26) | |||
| (PB) | EVF COLOR LEVEL | |||
|
| EVF BRIGHTNESS | |||
|
| EVF CONTRAST | |||
|
|
|
|
| indicates the factory setting. |
94