Menu Screens
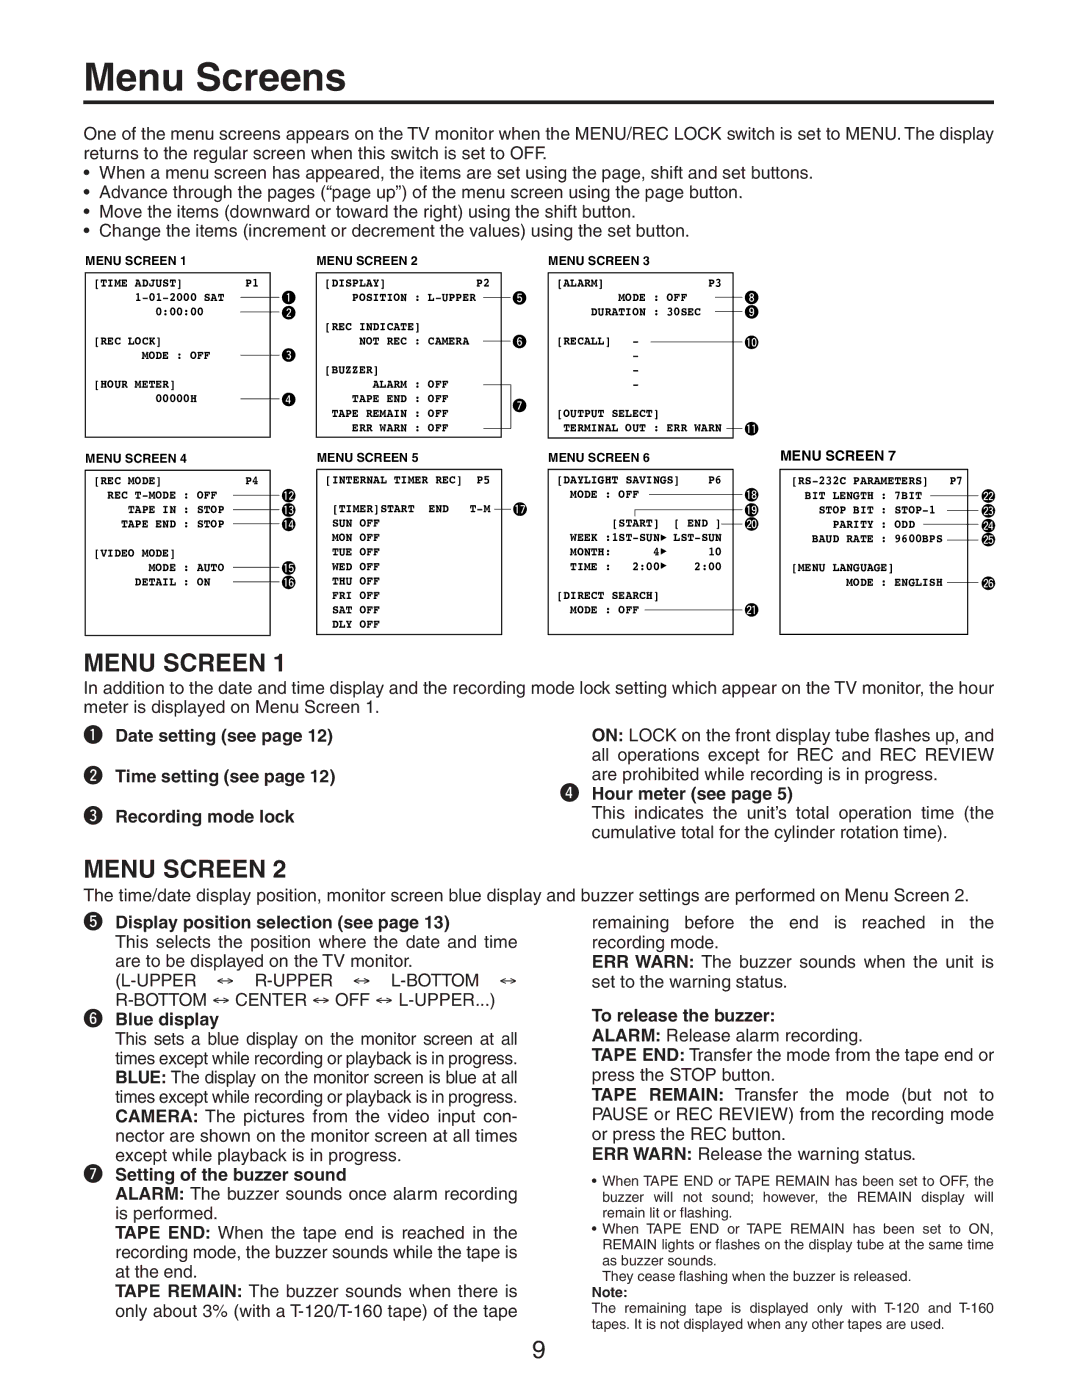
One of the menu screens appears on the TV monitor when the MENU/REC LOCK switch is set to MENU. The display returns to the regular screen when this switch is set to OFF.
¥When a menu screen has appeared, the items are set using the page, shift and set buttons.
¥Advance through the pages (Òpage upÓ) of the menu screen using the page button.
¥Move the items (downward or toward the right) using the shift button.
¥Change the items (increment or decrement the values) using the set button.
MENU SCREEN 1
[TIME ADJUST] | P1 |
| |
|
| ||
|
| ||
0:00:00 |
|
|
|
|
| ||
[REC LOCK] |
|
| |
MODE : OFF |
|
| |
|
| ||
[HOUR METER] |
|
| |
00000H |
|
| |
|
| ||
|
|
|
|
MENU SCREEN 4 |
|
| |
|
|
|
|
[REC MODE] | P4 |
| |
REC |
|
|
|
|
|
| |
TAPE IN : STOP |
|
|
|
|
|
| |
TAPE END : STOP |
|
|
|
|
|
| |
[VIDEO MODE]
MODE : AUTO DETAIL : ON
q w
e
r
!2
!3
!4
!5
!6
MENU SCREEN 2
[DISPLAY]P2
POSITION :
[REC INDICATE]
NOT REC : CAMERA
[BUZZER]
ALARM : OFF TAPE END : OFF TAPE REMAIN : OFF ERR WARN : OFF
MENU SCREEN 5
[INTERNAL TIMER REC] P5
[TIMER]START END
MON OFF
TUE OFF
WED OFF
THU OFF
FRI OFF
SAT OFF
DLY OFF
MENU SCREEN 3
[ALARM]P3
tMODE : OFF DURATION : 30SEC
y | [RECALL] | - |
|
|
|
|
|
|
| ||
|
|
|
|
| |||||||
|
| - |
|
|
|
|
|
|
| ||
|
| - |
|
|
|
|
|
|
| ||
|
| - |
|
|
|
|
|
|
| ||
u | [OUTPUT SELECT] |
|
|
|
| ||||||
|
|
|
|
| |||||||
| TERMINAL OUT : ERR WARN |
| |||||||||
|
|
|
|
|
|
|
|
|
|
| |
| MENU SCREEN 6 |
|
|
|
| ||||||
|
|
|
|
|
|
|
|
| |||
| [DAYLIGHT SAVINGS] | P6 |
| ||||||||
!7 | MODE : OFF |
|
|
|
|
| |||||
|
|
|
|
| |||||||
|
|
|
|
|
|
|
|
|
|
| |
|
| [START] | [ END ] |
|
| ||||||
|
|
|
| ||||||||
|
| ||||||||||
| MONTH: | 4 |
| 10 |
|
| |||||
| TIME : | 2:00 |
| 2:00 |
|
| |||||
| [DIRECT SEARCH] |
|
|
|
| ||||||
| MODE : OFF |
|
|
|
|
| |||||
|
|
|
|
|
| ||||||
|
|
|
|
|
|
|
|
|
|
|
|
i o
!0
!1
!8
!9
@0
@1
MENU SCREEN 7
STOP BIT :
PARITY : ODD
BAUD RATE : 9600BPS
[MENU LANGUAGE]
MODE : ENGLISH
@2
@3
@4
@5
@6
MENU SCREEN 1
In addition to the date and time display and the recording mode lock setting which appear on the TV monitor, the hour meter is displayed on Menu Screen 1.
qDate setting (see page 12)
wTime setting (see page 12)
eRecording mode lock
ON: LOCK on the front display tube flashes up, and all operations except for REC and REC REVIEW are prohibited while recording is in progress.
rHour meter (see page 5)
This indicates the unitÕs total operation time (the cumulative total for the cylinder rotation time).
MENU SCREEN 2
The time/date display position, monitor screen blue display and buzzer settings are performed on Menu Screen 2.
tDisplay position selection (see page 13)
This selects the position where the date and time are to be displayed on the TV monitor.
yBlue display
This sets a blue display on the monitor screen at all times except while recording or playback is in progress. BLUE: The display on the monitor screen is blue at all times except while recording or playback is in progress.
CAMERA: The pictures from the video input con- nector are shown on the monitor screen at all times except while playback is in progress.
uSetting of the buzzer sound
ALARM: The buzzer sounds once alarm recording is performed.
TAPE END: When the tape end is reached in the recording mode, the buzzer sounds while the tape is at the end.
TAPE REMAIN: The buzzer sounds when there is only about 3% (with a
remaining before the end is reached in the recording mode.
ERR WARN: The buzzer sounds when the unit is set to the warning status.
To release the buzzer:
ALARM: Release alarm recording.
TAPE END: Transfer the mode from the tape end or press the STOP button.
TAPE REMAIN: Transfer the mode (but not to PAUSE or REC REVIEW) from the recording mode or press the REC button.
ERR WARN: Release the warning status.
¥When TAPE END or TAPE REMAIN has been set to OFF, the buzzer will not sound; however, the REMAIN display will remain lit or flashing.
¥When TAPE END or TAPE REMAIN has been set to ON, REMAIN lights or flashes on the display tube at the same time as buzzer sounds.
They cease flashing when the buzzer is released.
Note:
The remaining tape is displayed only with
9