Connecting to a PC or Printer

Connecting to a PictBridge-compliant Printer

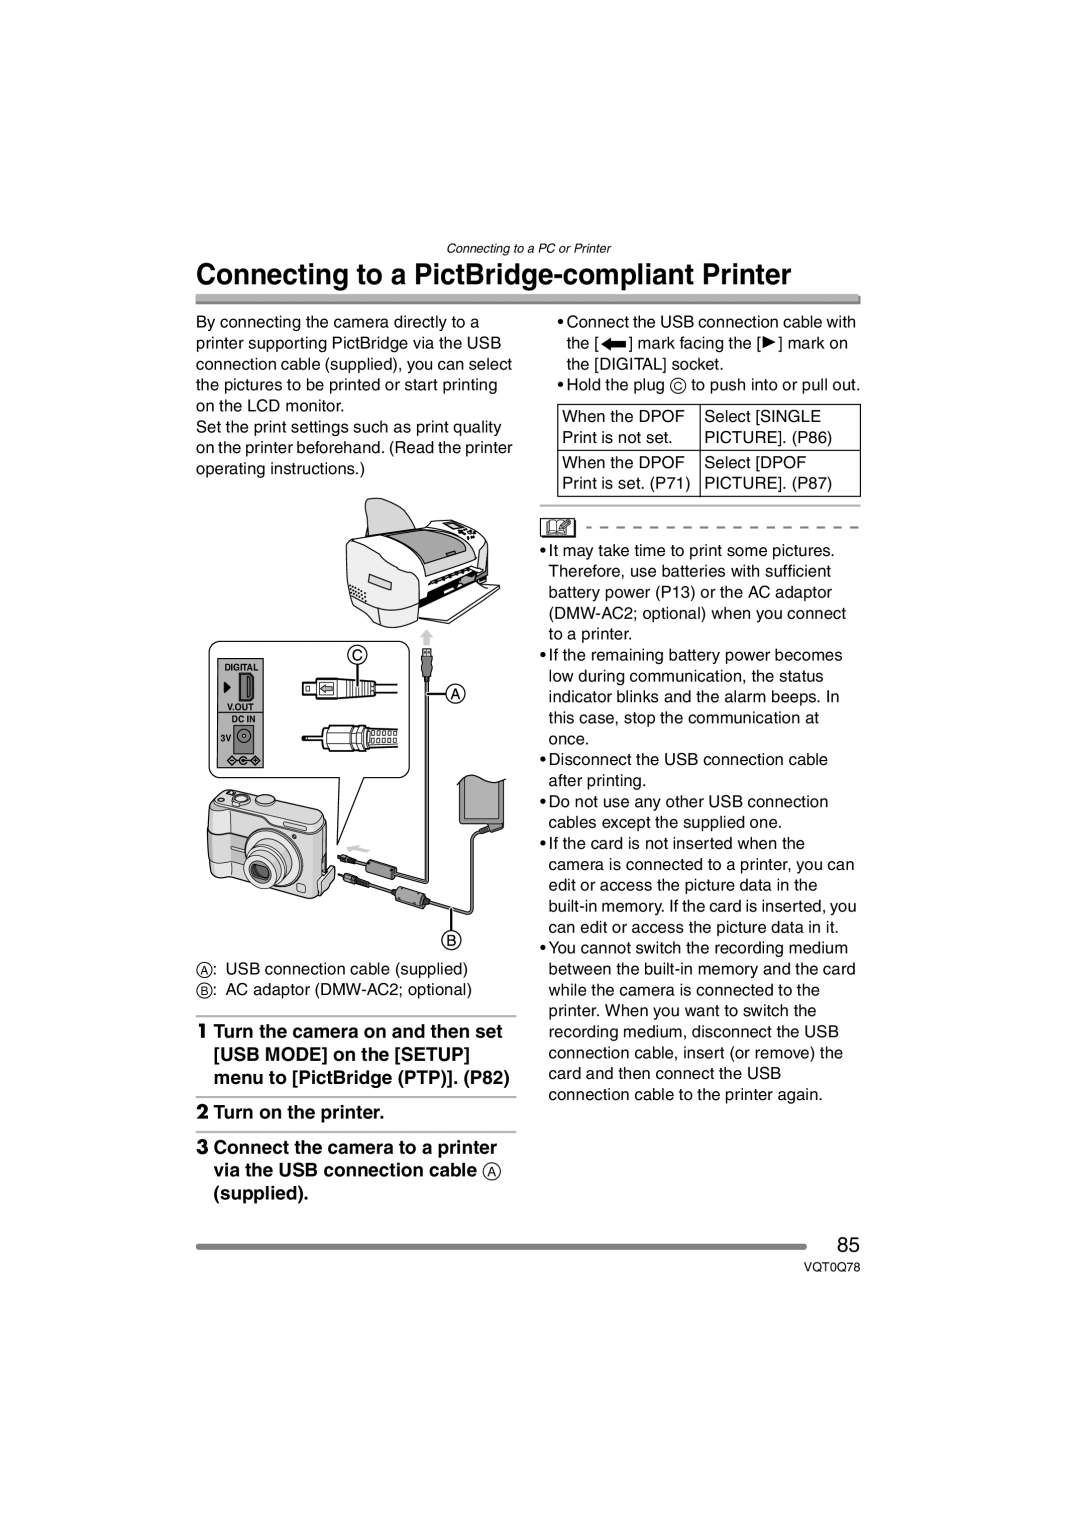
By connecting the camera directly to a printer supporting PictBridge via the USB connection cable (supplied), you can select the pictures to be printed or start printing on the LCD monitor.

Set the print settings such as print quality on the printer beforehand. (Read the printer operating instructions.)

DIGITAL

V.OUT

DC IN

3V

A: USB connection cable (supplied)

B: AC adaptor (DMW-AC2; optional)

1 Turn the camera on and then set [USB MODE] on the [SETUP] menu to [PictBridge (PTP)]. (P82)

2 Turn on the printer.

3 Connect the camera to a printer via the USB connection cable A (supplied).

Connect the USB connection cable with the [] mark facing the [1] mark on the [DIGITAL] socket.

Hold the plug C to push into or pull out.


When the DPOF


Select [SINGLE


Print is not set.


PICTURE]. (P86)


When the DPOF


Select [DPOF


Print is set. (P71)


PICTURE]. (P87)


It may take time to print some pictures. Therefore, use batteries with sufficient battery power (P13) or the AC adaptor (DMW-AC2; optional) when you connect to a printer.

If the remaining battery power becomes low during communication, the status indicator blinks and the alarm beeps. In this case, stop the communication at once.

Disconnect the USB connection cable after printing.

Do not use any other USB connection cables except the supplied one.

If the card is not inserted when the camera is connected to a printer, you can edit or access the picture data in the built-in memory. If the card is inserted, you can edit or access the picture data in it.

You cannot switch the recording medium between the built-in memory and the card while the camera is connected to the printer. When you want to switch the recording medium, disconnect the USB connection cable, insert (or remove) the card and then connect the USB connection cable to the printer again.

85

VQT0Q78

Page 85
Image 85
Panasonic DMC-LS1GN operating instructions Connecting to a PictBridge-compliant Printer, PICTURE. P86, PICTURE. P87

DMC-LS1GN specifications

The Panasonic DMC-LS1GN is a compact digital camera that blends user-friendly features with impressive technology, making it an excellent choice for beginners and those seeking a reliable point-and-shoot option. Released as part of Panasonic's esteemed Lumix series, the DMC-LS1GN captures high-quality images while offering a range of functionalities that cater to various photography needs.

One of the standout features of the DMC-LS1GN is its 6.0-megapixel CCD sensor, which enables users to take clear and detailed photographs. This sensor is complemented by a 3x optical zoom lens, allowing for versatile shooting options whether capturing distant landscapes or close-up subjects. Moreover, the camera’s focal length range of approximately 35-105mm (in 35mm film equivalent) ensures that it is suitable for various photographic situations, from wide-angle scenes to portrait shots.

The DMC-LS1GN also boasts a 2.5-inch LCD display, providing a bright and clear viewfinder for composing shots and reviewing images. This screen is both user-friendly and responsive, important for those new to photography. Furthermore, the camera's Easy Mode simplifies operation by reducing controls to only the essential settings, ensuring that novices can navigate the features without feeling overwhelmed.

In terms of image processing, Panasonic implemented its advanced image processor technology that enhances color reproduction and overall image clarity. One remarkable characteristic of the DMC-LS1GN is its 16:9 aspect ratio shooting option, perfect for capturing photos that can be directly shared on wide-screen displays or incorporated into video projects.

For users concerned about battery life, the DMC-LS1GN includes efficient power management, allowing for extended shooting sessions without frequent recharging. Moreover, the camera supports various memory card formats, ensuring compatibility with standard storage solutions while enhancing the capacity to store images.

Overall, the Panasonic DMC-LS1GN stands out as an ideal choice for those seeking a reliable, straightforward digital camera. Its combination of user-friendly features, solid imaging capabilities, and compact design makes it a compelling option for casual photographers who value performance and ease of use.