DMC-SZ02 DMC-FH8
F1211WT0
Contents
Using the Motion Picture Menu Rec Quality Continuous AF
Using the Playback Menu Upload Set Text Stamp Video Divide
Copy the playback image using
Copying to a PC using PHOTOfunSTUDIO
Care of the camera
About Condensation When the lens is fogged up
Do not subject to strong vibration, shock, or pressure
Standard Accessories
Names and Functions of Main Parts
LCD monitor P46, 110
Cursor buttons DMC-SZ1 DMC-SZ02
Or Press
Strap eyelet
Lens barrel AV OUT/DIGITAL socket P11, 97, 102
Speaker P41
Power on
Charging the Battery
About batteries that you can use with this unit
Inserting the Battery
Insert the battery into the camera to charge it
Charging
Check that this unit is turned off
When using the AC adaptor supplied
Battery indication
Battery indication is displayed on the LCD monitor
About the charging lamp
When recording with picture quality set to HD
Recording still pictures
Recording conditions by Cipa standard
Recording motion pictures
Playback
Playback time
Inserting and Removing the Card optional
Do not touch the connection terminals of the card
Following operations can be performed using this unit
About the Built-in Memory/the Card
Built-in Memory
Card
Preparation
Available recording time when recording motion pictures
Quality setting
Number of recordable pictures
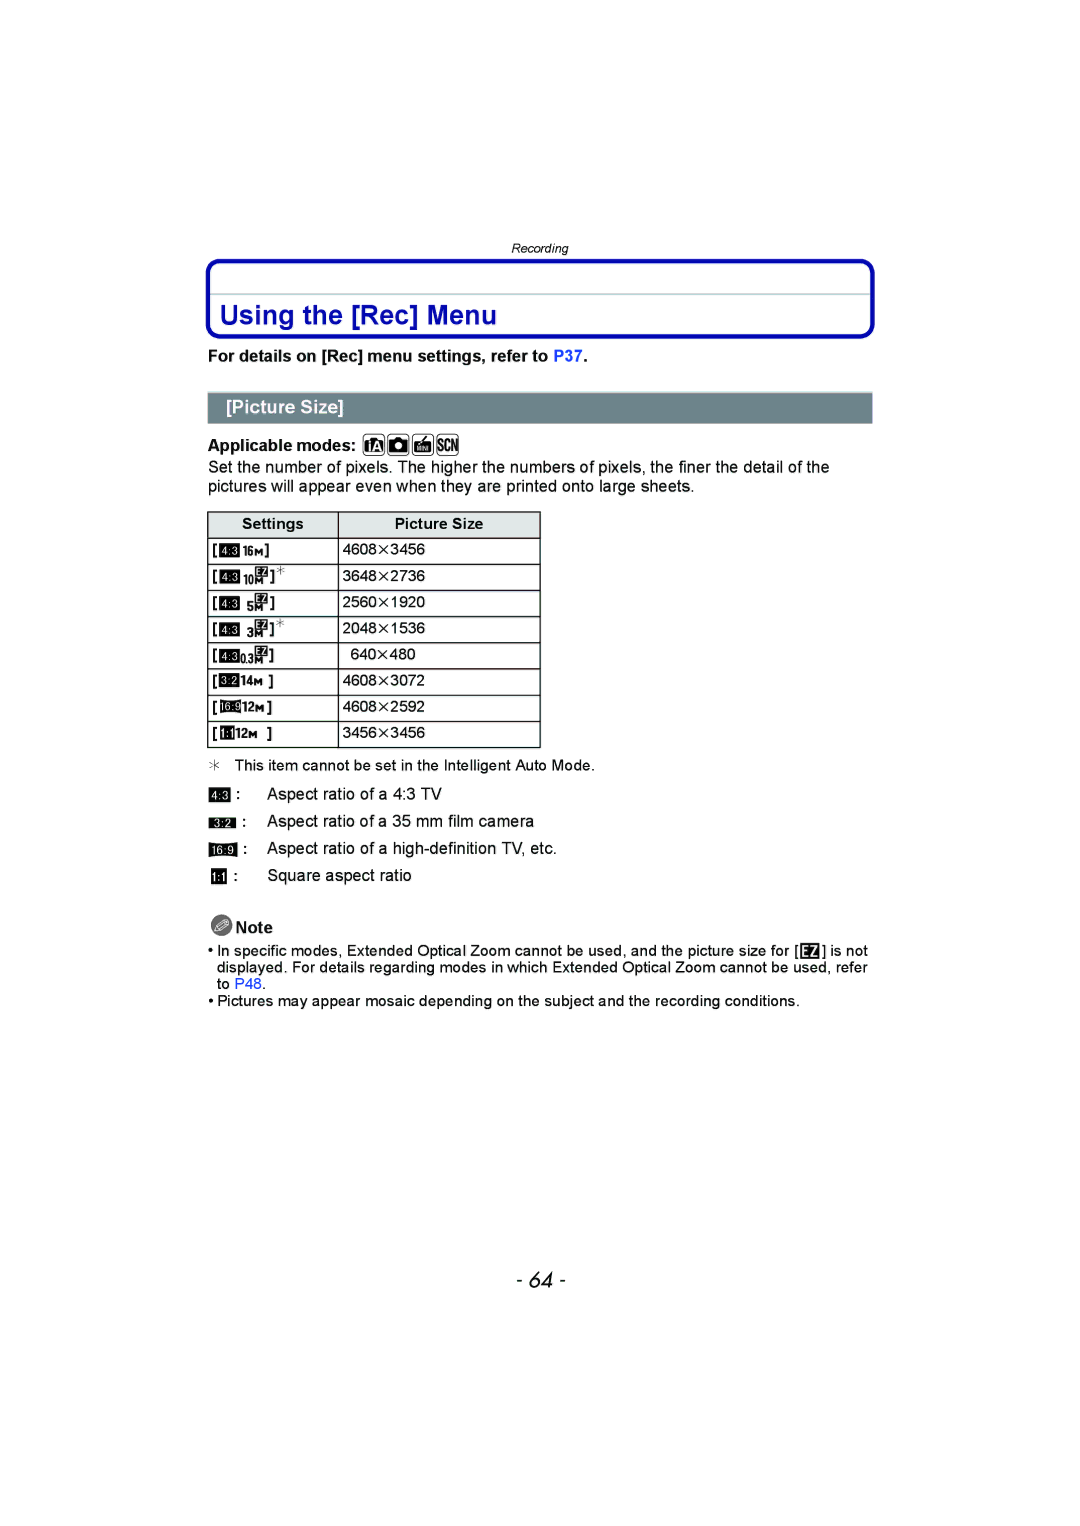
Picture size
Setting Date/Time Clock Set
Slide the REC/PLAY switch to ! and then turn the camera on
Clock is not set when the camera is shipped
Press MENU/SET to set
Changing the Clock Setting
Tips for taking good pictures
Fit the strap and hold the camera carefully
Preventing jitter camera shake
Direction Detection Function Rotate Disp
Selecting the Recording Mode
List of Recording Modes Intelligent Auto Mode P23
Normal Picture Mode P26
Miniature Effect Mode P55
Taking pictures using the automatic function
Recording Mode
When taking pictures
When recording motion pictures
Scene Detection
Portrait Scenery Low Light Macro
Changing the settings
Setup
Rec
Motion Picture
Taking pictures with your favorite settings
Normal Picture Mode
Focusing
Range of focus during the Intelligent Auto Mode
Cm 0.16 feet 6.6 feet M 4.9 feet
3.3 feet Cm 0.16 feet
Compose the picture
Recording Motion Pictures
Start recording by pressing the motion picture button
Applicable modes
About the compatibility of the recorded motion pictures
About zooming while recording motion pictures
Flash setting is fixed to Œ
Recording still pictures while recording motion pictures
Slide the REC/PLAY switch to
Playing Back Pictures Normal Play
Selecting a picture
Press 2 or
Using the Playback Zoom
Displaying Multiple Screens Multi Playback
Rotate the zoom lever towards L W
Rotate the zoom lever towards Z T
Playing Back Motion Pictures
Once deleted, pictures cannot be recovered
Deleting Pictures
To delete a single picture
Select the picture to be deleted, and then Press
When Delete Multi is selected Press MENU/SET
To delete multiple pictures up to 50 or all the pictures
Setting menu items
Setting the Menu
Menu Description of settings Rec P64 to
Using the Quick Menu
Press 3/4 to select the setting and then press MENU/SET
Press 3/4 to select the menu item and then press MENU/SET
About the Setup Menu
Setting Date/Time
Destination
Travel destination area
OFF
Elapsed days are not recorded
Location SET
Travel destination is recorded at the time of recording
Beep Level
Beep Tone 1 / 2 Shutter Vol
High
Brightness
¢ Can be set only when Recording Mode is set
Change the focus icon
Angle of view for motion picture recording can be checked
ON/OFF
1SEC 2SEC
Pictures are displayed until one of the buttons is pressed
Set to match the type of TV
TV Aspect
Vertically
Display so that they are displayed
Set the language displayed on the screen
Stabilizer Demo
Demo Demo Mode
Auto Demo on
Recording Mode
Playback Mode
About the LCD Monitor
Press DISP. to change
Rotate the zoom lever towards Tele
Using the Zoom
Rotate the zoom lever towards Wide
Screen display
Taking Pictures Using the Built-in Flash
Switching to the appropriate flash setting
Do not cover it with your fingers or other objects
Set the flash to match the recording
Available Flash Settings in Recording Mode
Shutter speed for each flash setting
Available flash range
Taking Close-up Pictures AF Macro/Macro Zoom
Picture is taken 10 seconds after shutter is pressed
Taking Pictures with the Self-timer
Picture is taken 2 seconds after shutter is pressed
Compensating the Exposure
Underexposed Properly exposed
Compensate the exposure
Towards positive Towards negative
Effect Mode
Record pictures that look like dioramas Miniature
Recorded Scene Mode
Taking pictures that match the scene being
Portrait
Soft Skin
Scenery
This allows you to take pictures of a wide landscape
Panorama Shot
About playback
Vertical
Technique for Night Portrait Mode
Sports
Night Portrait
Night Scenery
Baby1/Baby2
To cancel Age and Name Select the OFF setting in step
Press 4 to select Exit and then press MENU/SET to finish
Pet
Sunset
High Sens
Glass Through
Display the entry screen
Entering Text
¢ a maximum of 15 characters can be entered for , , ,
Using the Rec Menu
For details on Rec menu settings, refer to P37
Picture Size
Applicable modes
Jitter of the subject
Sensitivity
About Intelligent ISO sensitivity control
White Balance
Setting the White Balance manually
Auto White Balance
AF Mode
Recording
Exposure
Resolution
Digital Zoom
Settings Description of settings Burst speed
Flash setting is fixed to ‰
Burst
Number of recordable
Flash setting is fixed to Πexcept for
Color Mode
AF Assist Lamp
Red-Eye Removal
Stabilizer
Date Stamp Applicable modes
Clock Set
Stamp the year, month, and day
Using the Motion Picture Menu
For details on Motion Picture menu settings, refer to P37
Rec Quality
Continuous AF
Various methods of playback
You can play back the recorded pictures in various methods
Slide Show
Operations performed during slide show
Effect
Changing the slide show settings
Duration or Repeat can be set
Filtering Play
Press 3/4/2/1 to select the category
Then press MENU/SET to set
About the categories to be sorted
Press 3/4/2/1 to select the date to be played back
Calendar
You can display pictures by recording date
Auto Retouch
Having Fun with Recorded Pictures
Brightness and color of the pictures taken can be balanced
Press 3/4 to select the item, and then press
Beauty Retouch DMC-FH8
Press 3/4 to select the effect
After finishing the picture editing, press MENU/SET
Upload Set
Using the Playback Menu
Select the picture, and then press MENU/SET to set
Upload to the image sharing sites
Text Stamp
Baby/Pet
Press Press 3 to select OK, and then press MENU/SET
It cannot be restored once divided
Video Divide
Resize
Cropping
Zoom lever T Enlargement Zoom lever W Reduction 2/1 Move
Favorite
Select the picture, and then press MENU/SET
Print Set
To print the date
Protect
Copy
Playing Back Pictures on a TV Screen
Connect the camera and a TV
Saving the Recorded Still Pictures and Motion Pictures
Copy by inserting the SD card into the recorder
Copy the playback image using an AV cable
Copying to a PC using PHOTOfunSTUDIO
Install PHOTOfunSTUDIO to the PC Connect camera to PC
Copy the images to a PC using PHOTOfunSTUDIO
100
101
Connecting to a PC
PC that can be used
102
Loading still pictures or motion pictures
103
Desktop
104
Uploading the images to sharing sites
Start up the LUMIXUP.EXE by double-clicking it. P103
Select the destination to upload
105
Printing the Pictures
Press 3/4 to select PictBridgePTP, and then press MENU/SET
106
Selecting a single picture and printing it
Selecting multiple pictures and printing them
Press Press 3/4 to select an item and then press MENU/SET
Print Settings
107
Print with Date
Num.of prints
108
Paper Size
109
When printing different pictures on 1 sheet of paper
Layout Layouts for printing that can be set with this unit
Screen Display
110
111
Age P61
112
About the LCD monitor
113
About the Lens
114
115
Do not bend or drop the card
About the personal information
Disclaimer
When not using the camera for a long period of time
116
About the picture data
About tripods or unipods
Message Display
117
Please turn camera off and then on again/System Error
This battery cannot be used
118
Insert SD card again/Try another card
Troubleshooting
Battery and power source
119
Recording
Subject is not focused properly
120
Recorded picture looks rough. Noise appears on the picture
121
Motion picture recording stops in the middle
Recording by Panorama Shot ends before finishing
Operation sound is small
LCD monitor
122
Flash
Playback
123
Playback sound or operation sound is too low
124
Red part of the recorded image has changed color to black
Thumbnail is displayed appears on the screen
Sound of the recorded motion pictures sometimes breaks up
125
TV, PC and printer
126
Others
127
Zooming stops instantaneously
Zoom does not go up to maximum magnification
File numbers are not recorded consecutively