ƔUsing printer

Printing

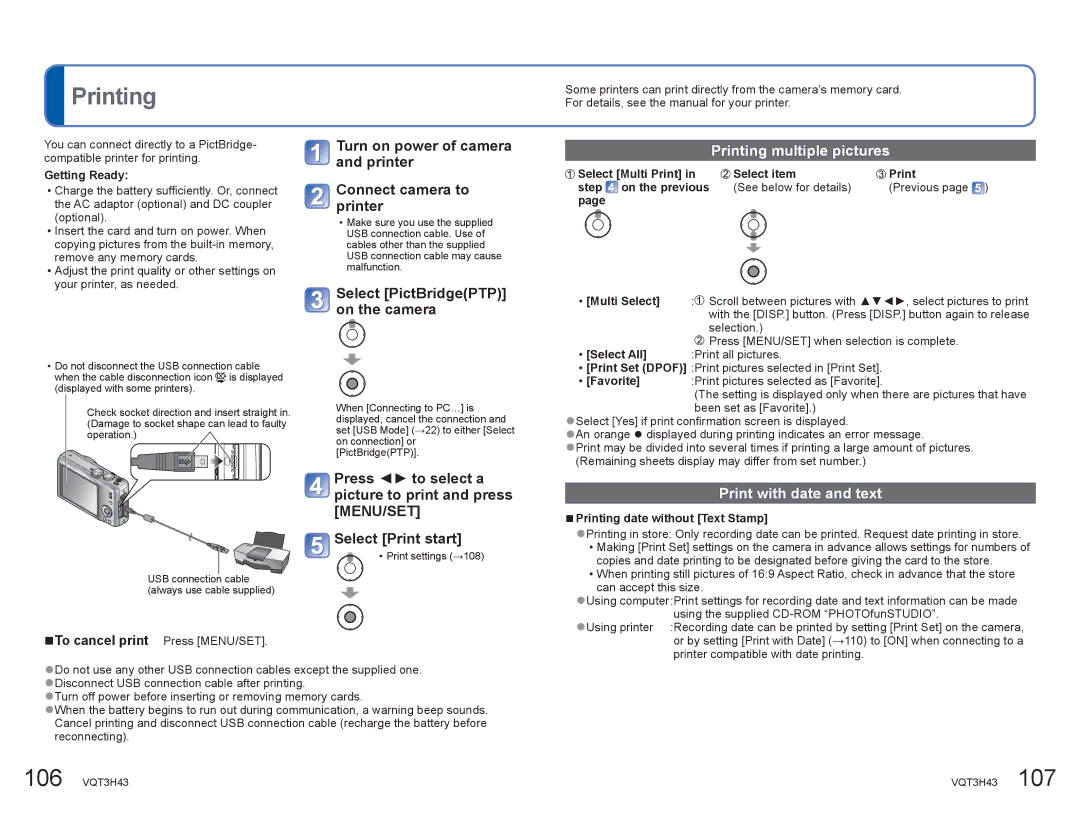
You can connect directly to a PictBridge- compatible printer for printing.

Getting Ready:

Charge the battery sufficiently. Or, connect the AC adaptor (optional) and DC coupler (optional).

Insert the card and turn on power. When copying pictures from the built-in memory, remove any memory cards.

Adjust the print quality or other settings on your printer, as needed.

Do not disconnect the USB connection cable when the cable disconnection icon is displayed (displayed with some printers).

Check socket direction and insert straight in. (Damage to socket shape can lead to faulty operation.)

Turn on power of camera and printer

Connect camera to printer

Make sure you use the supplied USB connection cable. Use of cables other than the supplied USB connection cable may cause malfunction.

Select [PictBridge(PTP)] on the camera

When [Connecting to PC…] is displayed, cancel the connection and set [USB Mode] ( 22) to either [Select on connection] or [PictBridge(PTP)].

Some printers can print directly from the camera’s memory card.

For details, see the manual for your printer.

Printing multiple pictures

Select [Multi Print] in

Select item

Print

step on the previous

(See below for details)

(Previous page )

page


[Multi Select]

: Scroll between pictures with ŸźŻŹ, select pictures to print


with the [DISP.] button. (Press [DISP.] button again to release


selection.)

[Select All]

Press [MENU/SET] when selection is complete.

:Print all pictures.

[Print Set (DPOF)] :Print pictures selected in [Print Set].

[Favorite]

:Print pictures selected as [Favorite].


(The setting is displayed only when there are pictures that have


been set as [Favorite].)

ƔSelect [Yes] if print confirmation screen is displayed.

ƔAn orange Ɣ displayed during printing indicates an error message.

ƔPrint may be divided into several times if printing a large amount of pictures. (Remaining sheets display may differ from set number.)

Press ŻŹ to select a picture to print and press [MENU/SET]

Select [Print start]

• Print settings ( 108)

USB connection cable (always use cable supplied)

ŶTo cancel print Press [MENU/SET].

ƔDo not use any other USB connection cables except the supplied one. ƔDisconnect USB connection cable after printing.

ƔTurn off power before inserting or removing memory cards.

ƔWhen the battery begins to run out during communication, a warning beep sounds. Cancel printing and disconnect USB connection cable (recharge the battery before reconnecting).

Print with date and text

ŶPrinting date without [Text Stamp]

ƔPrinting in store: Only recording date can be printed. Request date printing in store.

Making [Print Set] settings on the camera in advance allows settings for numbers of copies and date printing to be designated before giving the card to the store.

When printing still pictures of 16:9 Aspect Ratio, check in advance that the store

can accept this size.

ƔUsing computer:Print settings for recording date and text information can be made using the supplied CD-ROM “PHOTOfunSTUDIO”.

:Recording date can be printed by setting [Print Set] on the camera, or by setting [Print with Date] ( 110) to [ON] when connecting to a printer compatible with date printing.

106 VQT3H43

VQT3H43 107

Page 86
Image 86
Panasonic DMCZS8K manual Select PictBridgePTP on the camera, Printing multiple pictures, Print with date and text

DMCZS8K specifications

The Panasonic DMC-ZS8K is a compact digital camera that combines sophistication with user-friendly features, making it an ideal choice for both photography enthusiasts and casual users. This model stands out in the ultra-zoom category, equipped with a versatile zoom lens that caters to a wide range of shooting scenarios, from sweeping landscapes to intimate close-ups.

One of the primary features of the DMC-ZS8K is its impressive 24x optical zoom lens, which offers a focal length equivalent to 24-480mm in 35mm terms. This extensive zoom range allows users to capture stunning detail from great distances, making it perfect for wildlife photography and travel snapshots. The Intelligent Zoom feature extends this capability even further, digitally enhancing zoom functionality while maintaining image quality.

At the heart of the DMC-ZS8K lies a high-resolution 16-megapixel MOS sensor, designed to produce vivid and sharp images. This sensor, coupled with Panasonic's excellent image processing technology, ensures that photos maintain clarity even in challenging lighting conditions. The camera also supports a variety of shooting modes, including Panorama, Night Portrait, and various Scene modes, making it easy for users to achieve the right photographic effect.

The camera is equipped with a 3-inch LCD display that features a high-resolution screen, offering vibrant colors and easy visibility in bright conditions. The user interface is intuitive, allowing for quick navigation through settings and captured images. For users looking to enhance their photography skills, the DMC-ZS8K includes creative filters and effects, enabling manipulation of images directly in-camera.

Another significant aspect of the DMC-ZS8K is its video recording capability. It supports full HD video recording, allowing users to capture high-quality footage with sound. The advanced optical image stabilization technology helps to minimize blurring caused by camera shake, ensuring smooth and stable videos.

Connectivity is another highlight, with built-in Wi-Fi that facilitates easy sharing of images and videos directly to social media or cloud storage. Users can connect their mobile devices to the camera for remote shooting, further enhancing its usability.

In summary, the Panasonic DMC-ZS8K is a compact powerhouse that caters to a variety of photography needs, blending advanced features with ease of use. Its combination of a versatile zoom lens, high-quality sensor, creative options, and connectivity makes it a formidable choice for anyone looking to elevate their photography experience.