Reference ￿￿￿Troubleshooting guide

Operation

Page

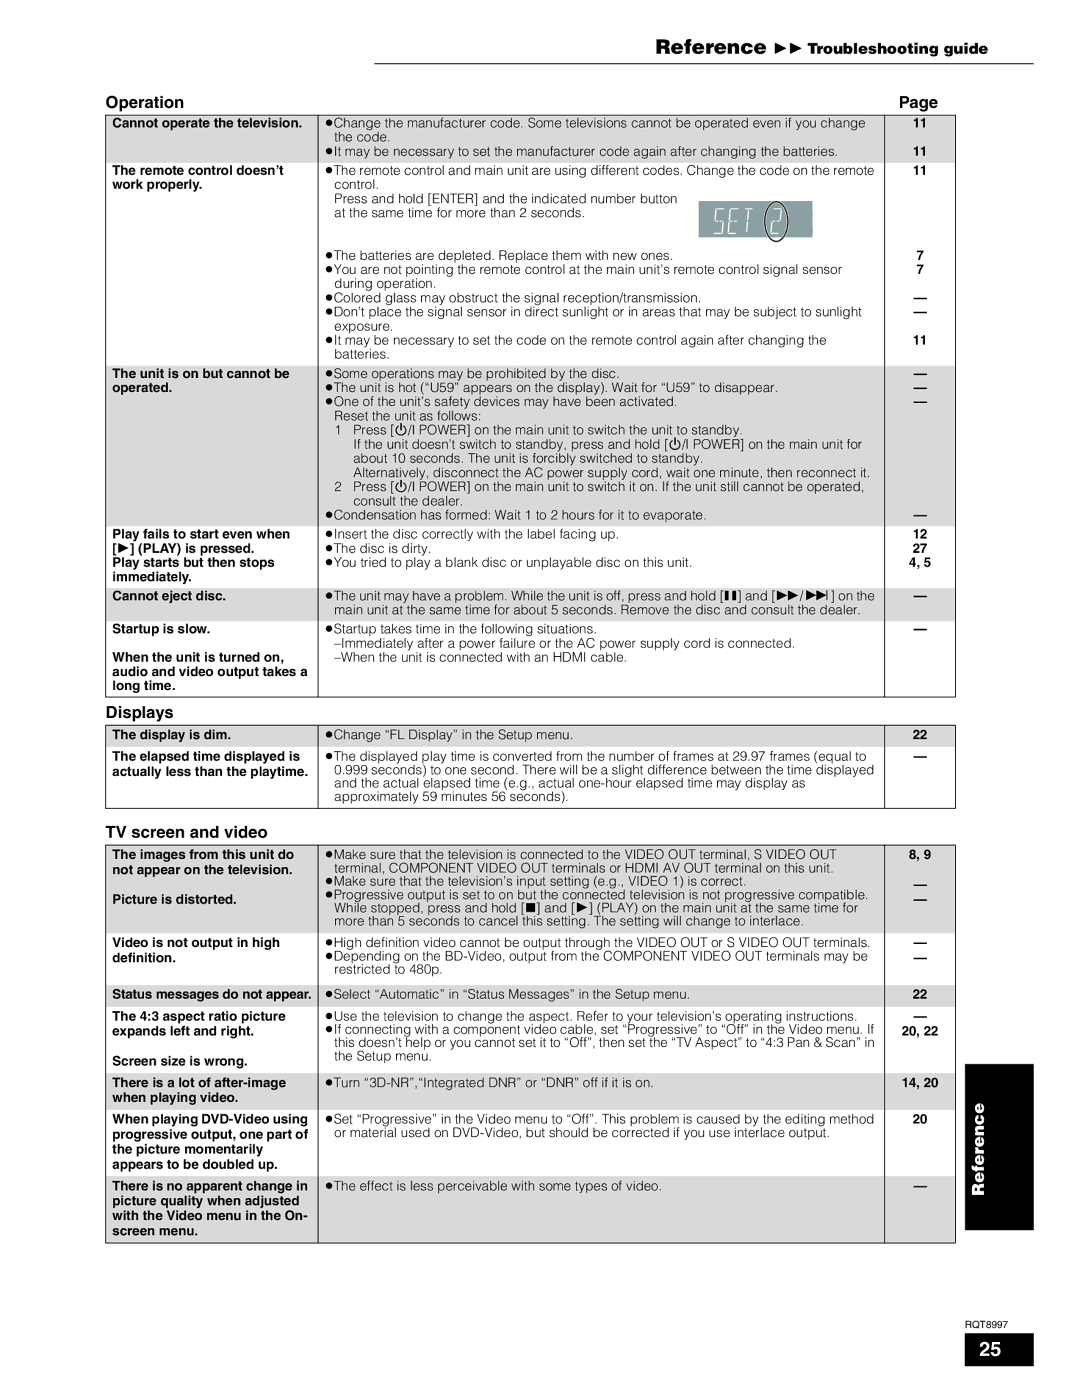
Cannot operate the television.

The remote control doesn’t work properly.

The unit is on but cannot be operated.

Play fails to start even when [￿] (PLAY) is pressed.

Play starts but then stops immediately.

Cannot eject disc.

Startup is slow.

When the unit is turned on, audio and video output takes a long time.

￿Change the manufacturer code. Some televisions cannot be operated even if you change

11

the code.


￿It may be necessary to set the manufacturer code again after changing the batteries.

11

￿The remote control and main unit are using different codes. Change the code on the remote

11

control.


Press and hold [ENTER] and the indicated number button


at the same time for more than 2 seconds.


D


R


￿The batteries are depleted. Replace them with new ones.


7

￿You are not pointing the remote control at the main unit’s remote control signal sensor

7

during operation.


￿Colored glass may obstruct the signal reception/transmission.


￿Don’t place the signal sensor in direct sunlight or in areas that may be subject to sunlight

exposure.


￿It may be necessary to set the code on the remote control again after changing the

11

batteries.


￿Some operations may be prohibited by the disc.


￿The unit is hot (“U59” appears on the display). Wait for “U59” to disappear.


￿One of the unit’s safety devices may have been activated.


Reset the unit as follows:


1 Press [￿/I POWER] on the main unit to switch the unit to standby.


If the unit doesn’t switch to standby, press and hold [￿/I POWER] on the main unit for


about 10 seconds. The unit is forcibly switched to standby.


Alternatively, disconnect the AC power supply cord, wait one minute, then reconnect it.


2 Press [￿/I POWER] on the main unit to switch it on. If the unit still cannot be operated,


consult the dealer.


￿Condensation has formed: Wait 1 to 2 hours for it to evaporate.


￿Insert the disc correctly with the label facing up.


12

￿The disc is dirty.


27

￿You tried to play a blank disc or unplayable disc on this unit.


4, 5


￿The unit may have a problem. While the unit is off, press and hold [￿] and [￿/￿] on the

main unit at the same time for about 5 seconds. Remove the disc and consult the dealer.


￿Startup takes time in the following situations.


–Immediately after a power failure or the AC power supply cord is connected.


–When the unit is connected with an HDMI cable.


Displays

The display is dim.

The elapsed time displayed is actually less than the playtime.

￿Change “FL Display” in the Setup menu.

￿The displayed play time is converted from the number of frames at 29.97 frames (equal to 0.999 seconds) to one second. There will be a slight difference between the time displayed and the actual elapsed time (e.g., actual one-hour elapsed time may display as approximately 59 minutes 56 seconds).

22

TV screen and video

The images from this unit do not appear on the television.

Picture is distorted.

Video is not output in high definition.

Status messages do not appear.

The 4:3 aspect ratio picture expands left and right.

Screen size is wrong.

There is a lot of after-image when playing video.

When playing DVD-Video using progressive output, one part of the picture momentarily appears to be doubled up.

There is no apparent change in picture quality when adjusted with the Video menu in the On- screen menu.

￿Make sure that the television is connected to the VIDEO OUT terminal, S VIDEO OUT terminal, COMPONENT VIDEO OUT terminals or HDMI AV OUT terminal on this unit.

￿Make sure that the television’s input setting (e.g., VIDEO 1) is correct.

￿Progressive output is set to on but the connected television is not progressive compatible. While stopped, press and hold [￿] and [￿] (PLAY) on the main unit at the same time for more than 5 seconds to cancel this setting. The setting will change to interlace.

￿High definition video cannot be output through the VIDEO OUT or S VIDEO OUT terminals. ￿Depending on the BD-Video, output from the COMPONENT VIDEO OUT terminals may be

restricted to 480p.

￿Select “Automatic” in “Status Messages” in the Setup menu.

￿Use the television to change the aspect. Refer to your television’s operating instructions. ￿If connecting with a component video cable, set “Progressive” to “Off” in the Video menu. If this doesn’t help or you cannot set it to “Off”, then set the “TV Aspect” to “4:3 Pan & Scan” in

the Setup menu.

￿Turn “3D-NR”,“Integrated DNR” or “DNR” off if it is on.

￿Set “Progressive” in the Video menu to “Off”. This problem is caused by the editing method or material used on DVD-Video, but should be corrected if you use interlace output.

￿The effect is less perceivable with some types of video.

8, 9

22

20, 22

14, 20

20

Reference

RQT8997

25

Page 25
Image 25
Panasonic DMP-BD10A operating instructions Operation, Displays, TV screen and video, Display is dim

DMP-BD10A specifications

The Panasonic DMP-BD10A is a groundbreaking Blu-ray Disc player that marked a significant advance in home entertainment technology when it was released. As one of the early players in the Blu-ray market, the DMP-BD10A has earned a reputation for its impressive performance, solid build quality, and rich feature set that cater to both casual viewers and audiophiles alike.

One of the standout features of the DMP-BD10A is its capability to deliver stunning high-definition video at resolutions of up to 1080p. This ensures that viewers experience a level of detail and clarity previously unattainable with standard-definition DVDs. The player employs advanced video processing technologies such as the P4HD (Precision Cinema Progressive) for enhanced image quality, allowing for smooth, cinematic visuals free from judder and artifacts.

Audio performance is another key characteristic of the DMP-BD10A. It supports various high-definition audio formats, including Dolby TrueHD, DTS-HD Master Audio, and Linear PCM. This allows users to enjoy their movie soundtracks in a crystal-clear, immersive audio environment. The player features multiple audio output options, including HDMI and optical outputs, ensuring compatibility with a wide range of home theater systems.

The DMP-BD10A is also equipped with an Ethernet port, enabling users to connect to the internet for firmware updates and access online content. While options for streaming services were limited during its initial release, the ability to upgrade firmware ensures longevity and compatibility with future technologies.

One of the technological highlights of the DMP-BD10A is its support for BonusView, allowing users to enjoy picture-in-picture commentary and supplementary features during playback. This capability adds a layer of interactivity, providing viewers with insights and behind-the-scenes content that enriches the viewing experience.

Additionally, the DMP-BD10A is designed with user-friendly navigation and a sleek, compact design that fits well into any home entertainment setup. The remote control is intuitive, making it easy for users to access its various features.

In summary, the Panasonic DMP-BD10A combines exceptional video and audio performance with advanced features and technologies, making it a significant player in the evolution of home theater systems. Its solid build and focus on high-definition playback establish it as a noteworthy option for those looking to enhance their entertainment experience.