Getting started ￿￿￿Connection

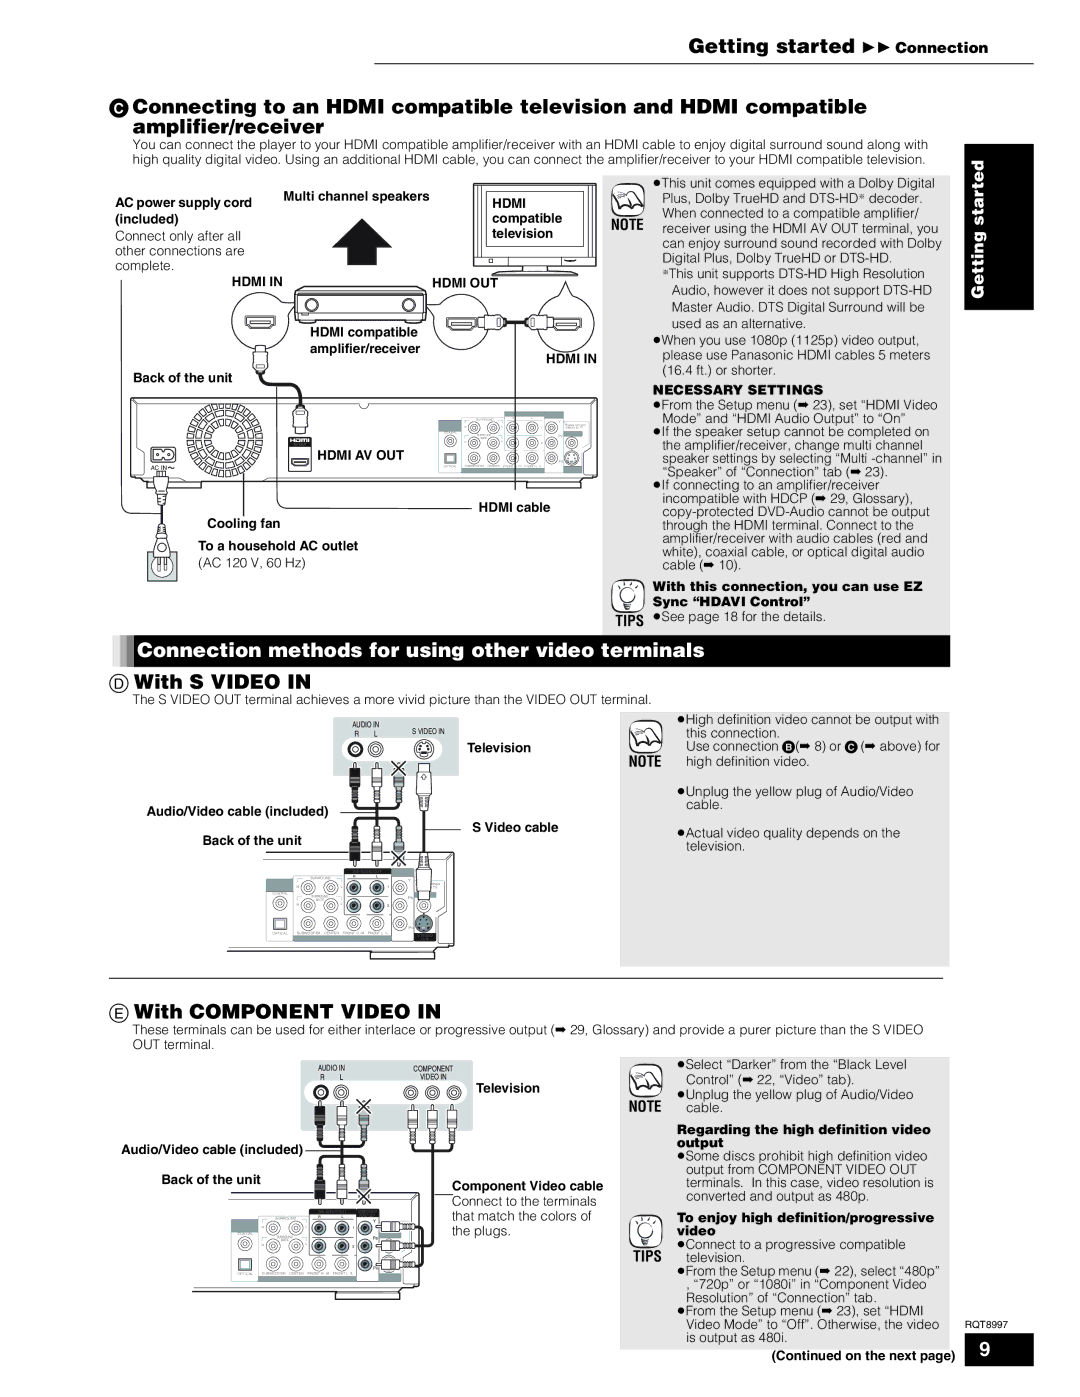
￿Connecting to an HDMI compatible television and HDMI compatible amplifier/receiver

You can connect the player to your HDMI compatible amplifier/receiver with an HDMI cable to enjoy digital surround sound along with high quality digital video. Using an additional HDMI cable, you can connect the amplifier/receiver to your HDMI compatible television.

AC power supply cord

Multi channel speakers


HDMI


(included)


compatible

Connect only after all


television

other connections are


complete.


HDMI IN

HDMI OUT


HDMI compatible


amplifier/receiver


HDMI IN


Back of the unit


Manufactured


2ch AUDIO OUT

COMPONENT


SURROUND

RL

VIDEO OUT


DIGITAL AUDIO


Y


OUT

R

L

1

Please connect


(PCM/BITSTREAM)

directly to TV.


COAXIAL

SURROUND


VIDEO OUT


BACK

L


PB


AV OUT

R

2


HDMI AV OUT


PR

AC IN

OPTICAL

SUBWOOFER

CENTER

FRONT R /R FRONT L /L

S VIDEO


7.1ch AUDIO OUT

OUT

HDMI cable

Cooling fan

To a household AC outlet (AC 120 V, 60 Hz)

NOTE

TIPS

￿This unit comes equipped with a Dolby Digital Plus, Dolby TrueHD and DTS-HD￿decoder. When connected to a compatible amplifier/ receiver using the HDMI AV OUT terminal, you can enjoy surround sound recorded with Dolby Digital Plus, Dolby TrueHD or DTS-HD.

￿This unit supports DTS-HD High Resolution Audio, however it does not support DTS-HD Master Audio. DTS Digital Surround will be used as an alternative.

￿When you use 1080p (1125p) video output, please use Panasonic HDMI cables 5 meters (16.4 ft.) or shorter.

NECESSARY SETTINGS

￿From the Setup menu (23), set “HDMI Video Mode” and “HDMI Audio Output” to “On”

￿If the speaker setup cannot be completed on the amplifier/receiver, change multi channel speaker settings by selecting “Multi -channel” in “Speaker” of “Connection” tab (23).

￿If connecting to an amplifier/receiver incompatible with HDCP (29, Glossary), copy-protected DVD-Audio cannot be output through the HDMI terminal. Connect to the amplifier/receiver with audio cables (red and white), coaxial cable, or optical digital audio cable (10).

With this connection, you can use EZ Sync “HDAVI Control”

￿See page 18 for the details.

Getting started

Connection methods for using other video terminals

￿￿With S VIDEO IN

The S VIDEO OUT terminal achieves a more vivid picture than the VIDEO OUT terminal.

AUDIO IN

S VIDEO IN

R

L


Television

Audio/Video cable (included)

S Video cable

Back of the unit

Manufactured


2ch AUDIO OUT


COMPONENT


SURROUND

R

L


VIDEO OUT

DIGITAL AUDIO


Y

OUT

R

L


1

Please connect

(PCM/BITSTREAM)


directly to TV.

COAXIAL

SURROUND


VIDEO OUT


BACK

L


PB


R


2


PR

OPTICAL

SUBWOOFER CENTER

FRONT R /R

FRONT L /L

S VIDEO


7.1ch AUDIO OUT


OUT

￿High definition video cannot be output with this connection.

Use connection ￿(8) or ￿￿(above) for NOTE high definition video.

￿Unplug the yellow plug of Audio/Video cable.

￿Actual video quality depends on the television.

￿￿With COMPONENT VIDEO IN

These terminals can be used for either interlace or progressive output (29, Glossary) and provide a purer picture than the S VIDEO OUT terminal.

AUDIO IN

R L

Audio/Video cable (included)

Back of the unit

Manufactured


2ch AUDIO OUT


COMPONENT


SURROUND

R

L


VIDEO OUT

DIGITAL AUDIO


Y


OUT

R

L


1

Please connect

(PCM/BITSTREAM)


directly to TV.

COAXIAL

SURROUND


VIDEO OUT


BACK

L


PB


R


2


PR

OPTICAL

SUBWOOFER CENTER

FRONT R /R

FRONT L /L

S VIDEO


7.1ch AUDIO OUT


OUT

COMPONENT

VIDEO IN

Television

NOTE

Component Video cable Connect to the terminals that match the colors of the plugs.

TIPS

￿Select “Darker” from the “Black Level Control” (22, “Video” tab).

￿Unplug the yellow plug of Audio/Video cable.

Regarding the high definition video output

￿Some discs prohibit high definition video output from COMPONENT VIDEO OUT terminals. In this case, video resolution is converted and output as 480p.

To enjoy high definition/progressive video

￿Connect to a progressive compatible television.

￿From the Setup menu (22), select “480p”

,“720p” or “1080i” in “Component Video Resolution” of “Connection” tab.

￿From the Setup menu (23), set “HDMI Video Mode” to “Off”. Otherwise, the video is output as 480i.

(Continued on the next page)

RQT8997

9

Page 9
Image 9
Panasonic DMP-BD10A Connection methods for using other video terminals, With S Video, With Component Video

DMP-BD10A specifications

The Panasonic DMP-BD10A is a groundbreaking Blu-ray Disc player that marked a significant advance in home entertainment technology when it was released. As one of the early players in the Blu-ray market, the DMP-BD10A has earned a reputation for its impressive performance, solid build quality, and rich feature set that cater to both casual viewers and audiophiles alike.

One of the standout features of the DMP-BD10A is its capability to deliver stunning high-definition video at resolutions of up to 1080p. This ensures that viewers experience a level of detail and clarity previously unattainable with standard-definition DVDs. The player employs advanced video processing technologies such as the P4HD (Precision Cinema Progressive) for enhanced image quality, allowing for smooth, cinematic visuals free from judder and artifacts.

Audio performance is another key characteristic of the DMP-BD10A. It supports various high-definition audio formats, including Dolby TrueHD, DTS-HD Master Audio, and Linear PCM. This allows users to enjoy their movie soundtracks in a crystal-clear, immersive audio environment. The player features multiple audio output options, including HDMI and optical outputs, ensuring compatibility with a wide range of home theater systems.

The DMP-BD10A is also equipped with an Ethernet port, enabling users to connect to the internet for firmware updates and access online content. While options for streaming services were limited during its initial release, the ability to upgrade firmware ensures longevity and compatibility with future technologies.

One of the technological highlights of the DMP-BD10A is its support for BonusView, allowing users to enjoy picture-in-picture commentary and supplementary features during playback. This capability adds a layer of interactivity, providing viewers with insights and behind-the-scenes content that enriches the viewing experience.

Additionally, the DMP-BD10A is designed with user-friendly navigation and a sleek, compact design that fits well into any home entertainment setup. The remote control is intuitive, making it easy for users to access its various features.

In summary, the Panasonic DMP-BD10A combines exceptional video and audio performance with advanced features and technologies, making it a significant player in the evolution of home theater systems. Its solid build and focus on high-definition playback establish it as a noteworthy option for those looking to enhance their entertainment experience.