DVD AUDIO/VIDEO Player
Servicenter list and warranty can be found on pages 42
User memo
Accessories
Getting started
DVD-H2000
Table of contents
Batteries
Button-type battery Lithium battery
Button-type battery
Button-type battery Lithium battery
Service
Safety
Installation
Maintenance
Started
Disc information
MP3 playback
Control reference guide
Remote control
Standby/on switch ê/I, Power
Direct Cinema Progressive indicator
Batteries
Remote control
Professional Commander
Replacing the button-type battery
Video OUT terminal
Connection to a television
480P Component Video OUT terminal
Component Video OUT terminal
Selecting TV screen type
Basic operations
Basic play
Press 1 play
» Starting play from a selected Program, title, or track
When a menu screen appears on Television
Press the numbered buttons to select an item
Resume function
»D Slow-motion play
»A Skipping
»B Frame-by-frame viewing
»C Fast forward and rewind-SEARCH
To enjoy even higher quality Sound-AUDIO only
»A Selecting still pictures-Page Skip
Selecting groups to play
Advanced operations
Marking places to play again-MARKER
Press Marker
Press Marker at the point you want to mark
»B Random play
Press Play Mode until the random play screen appears
Changing the play sequence
»A All group play
Changing the play sequence
Program play
Move the joystick 3, 4 to select a group and press Enter
Move the joystick 3, 4 to select a track and press Enter
Manufacturer
Television operation
Press 1 play or Enter
Playing the programs on
Selecting programs to play
Press Direct Navigator
Move the joystick 3, 4, 2, 1 to se
Using the play list menu to play Specific scenes
Press Play List
Scene List and press Enter
»B A-B repeat play
Press Repeat Mode
Repeat play
»A Repeat play
Changing the sound quality
Increasing your enjoyment of movies and music
Improving CD sound
Press Angle
Changing soundtracks Subtitle languages and angles
Press Audio
Press Subtitle
To change the position of the icons
Using On-Screen Menu Icons
»A Common procedures 1 Press Display
Move the joystick 3, 4 to select the menu
Shuttle screen
Using On-Screen Menu Icons
Icon Content
Icons for disc information
Display menu
Icons for unit information
Play menu Audio menu
Video menu U2 Reducing picture noise
U1 Common picture adjustments
U3 Adjusting the resolution of progressive video
White
U5 Adjusting the amount of red, green, and blue
Operations
Changing settings
Common procedures
When you are finished
Menus Items Options
Summary of settings
When setting ratings When the level is
Entering a password
Language code list
Channel balance ?
Speaker setting
Delay time
Speaker presence and size =
DTS Digital Surround
Digital output
PCM Down Conversion
Dolby Digital
Home Theater
Home Theater-Enjoying more powerful sound
What you want to do How to do it
Settings
Change Digital output
Connecting an amplifier with
Change Speaker setting
Channel audio input terminals
Theater
» Connecting an analog amplifier or System component
» Connecting a digital amplifier or System component
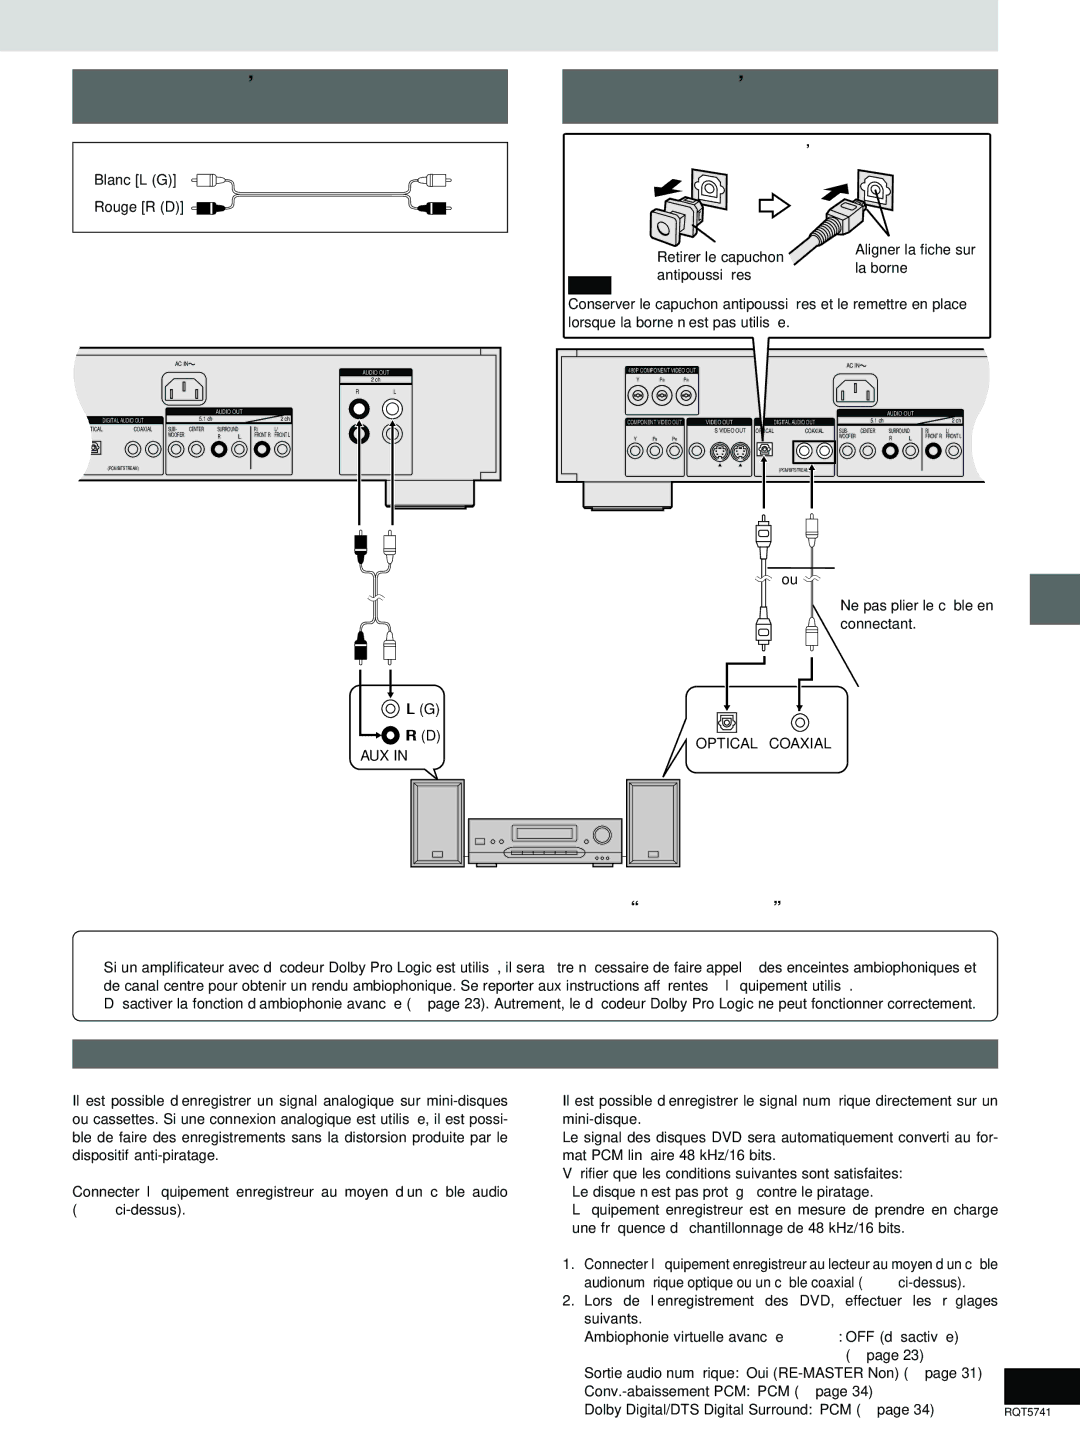
Recording to MDs or cassette tapes
Operation
Troubleshooting guide
Reference pages are shown as black circled numbers Power
Displays
Picture
Disc handling
Maintenance
Reference
Glossary
Factory Servicenters Locations
Servicenter List only for U.S.A
Panasonic/Technics DVD Player Limited Warranty
Limited Warranty only for U.S.A
Terminal 480P Component Video OUT
Cambio del idioma de la pantalla
Conexión a un televisor
Reproducción básica
Selección del tipo de pantalla del Televisor
Electric Corporation of America Puerto Rico, Inc. PSC
Specifications
Lecteur DVD Audio/Vidéo
¸ Fiche adaptateur BNC-RCA
Accessoires
’intérieur de la télécommande
Mise en route
Table des matières
Pile bouton
Pile
Pile de type bouton Pile au lithium
Mise au rebut du bloc-batterie et de la pile
Entretien
Service après-vente
Emplacement
Mesures de sécurité
Propos des disques
Lecture MP3
Unité principale
Guide de référence des commandes
Télécommande
Piles
Télécommande
Télécommande Commandeur
Installation de la pile bouton
Prise de S Video OUT
Raccordement à un téléviseur
Prise de 480P Component Video OUT
Prise de Component Video OUT
Appuyer sur Action pour appeler
Appuyer sur ê, Power pour établir
Mode de paramétrage
Le contact
Appuyer sur 1 lecture
Lecture de base
Si un menu s’affiche à l’écran du téléviseur
Fonction de poursuite
Lecture de base
Base
»D Lecture ralentie
»A Saut
»B Avance recule image par image
» Avance rapide recul rapide Recherche
Pour l’écoute d’un son de »C qualité encore plus élevée- PC
» Choix d’images fixes-Saut de
Sélection de groupes pour la » lecture
Fonctions évoluées
Appuyer sur Marker
Appuyer sur Marker au point à marquer
Appuyer sur lecture
Modification de la séquence de lecture
»A Lecture de tous les groupes
»B Lecture aléatoire
Lecture programmée
Code Fabricant
Pour saisir un numéro à deux chiffres
Utilisation de listes pour la Lecture de programmes
Appuyer sur Direct Navigator
Appuyer sur 1 lecture ou Enter
Puyer sur Enter
Appuyer sur Play List
Et appuyer sur Enter Incliner la manette 3, 4 pour sélec
Tionner Liste des séquences et ap
Lecture en reprise d’une sélection de plages
Appuyer sur Repeat Mode
Lecture en reprise
»A Lecture en reprise
Modification de la qualité Sonore-Filtre numérique
Reproduction d’un son » ambiophonique virtuel avancé avec
Amélioration du son CD
Appuyer sur Angle
Changement de langue des
Appuyer sur Audio
Appuyer sur Subtitle
Volué ées
Menus à icônes-utilisation
»A Marches à suivre communes 1 Appuyer sur Display
Incliner la manette 3, 4 pour sélec- tionner le menu
Icône Description
Icônes de renseignements sur les disques
Écran de repérage proportionnel
Menu d’affichage
Icônes de renseignements sur le lecteur
Menu de lecture Menu audio
Icône
Menu vidéo
U2 Réduction du bruit
U1 Réglages de l’image communs Icône Description
U6 Optimisation de la vidéo Icône Description
Fonctions
Modification des réglages
Marches à suivre communes
Appuyer sur Action pour afficher les menus
Menus Rubriques Options
Tableau récapitulatif des réglages
Fonctions é
Programmation du mot de passe
Voluées
Équilibre des canaux ?
Paramètres des enceintes Acoustiques
Présence et taille des enceintes =
Temps de retard
Réglage Sortie audio
Sortie numérique
Conversion-abaissement PCM
Composant Réglage
Cinéma maison
Cinéma maison-Pour un rendu sonore en puissance
Rendu recherché Marche à suivre Réglages
³Modifier Paramètres des enceintes acoustiques
Et à un décodeur séparés
Ma maison
» Connexion d’un amplificateur ou Autre appareil analogique
» Connexion d’un amplificateur ou Autre appareil numérique
Enregistrement sur mini-disques ou cassettes
Audio
Guide de dépannage
Références
Opération
Affichages
Image
Entretien
Service après-vente
Manipulation des disques
Glossaire
Panasonic Canada Inc
Spécifications