IMPORTANT SAFETY INSTRUCTIONS
Read these operating instructions carefully before using the unit. Follow the safety instructions on the unit and the applicable safety instructions listed below. Keep these operating instructions handy for future reference.
| 1) | Read these instructions. | 10) Protect the power cord from being walked on | |||||
| ||||||||
| 2) | Keep these instructions. | or pinched particularly at plugs, convenience | |||||
| 3) | Heed all warnings. | receptacles, and the point where they exit | |||||
Started | 4) | Follow all instructions. | from the apparatus. |
| ||||
5) | Do not use this apparatus near water. | 11) Only use attachments/accessories specified | ||||||
| ||||||||
| 6) | Clean only with dry cloth. | by the manufacturer. |
| ||||
| 7) | Do not block any ventilation openings. Install | 12) Use only with the cart, | |||||
Getting |
| in accordance with the manufacturer’s | stand, | tripod, | bracket, or | |||
| instructions. | table | specified | by | the | |||
|
| |||||||
| 8) | Do not install near any heat sources such as | manufacturer, | or | sold | with | ||
|
| radiators, heat registers, stoves, or other | the apparatus. When a cart | |||||
|
| apparatus (including amplifiers) that produce | is used, use caution when moving the | |||||
|
| heat. | cart/apparatus combination to avoid injury | |||||
| 9) | Do not defeat the safety purpose of the | from |
|
|
| ||
|
| polarized or | 13) Unplug this apparatus during lightning | |||||
|
| plug has two blades with one wider than the | storms or when unused for long periods of | |||||
|
| other. A | time. |
|
|
|
| |
|
| and a third grounding prong. The wide blade | 14) Refer all servicing to qualified service per- | |||||
|
| or the third prong are provided for your safe- | sonnel. Servicing is required when the appa- | |||||
|
| ty. If the provided plug does not fit into your | ratus has been damaged in any way, such | |||||
|
| outlet, consult an electrician for replacement | as | |||||
|
| of the obsolete outlet. | liquid has been spilled or objects have fallen | |||||
|
|
| into the apparatus, the apparatus has been | |||||
exposed to rain or moisture, does not operate normally, or has been dropped.
Do not rest the unit on your lap for a long time while using it. The unit can become hot and cause burns.
To prevent damage
Avoid the following;
≥Spraying flammable insecticides near the unit. ≥Pressing the LCD.
≥Touching the lens and other parts of the laser pickup. Do not use the unit in the following places;
≥Where the temperature is below 5 oC (41 oF) or above 35 oC (95 oF). (Operating the unit be- yond this range can cause the protection circuitry to function and render the unit inoperable.)
≥Sandy places such as beaches.
≥On top of cushions, sofas, or hot equipment such as amplifiers.
RQT6536
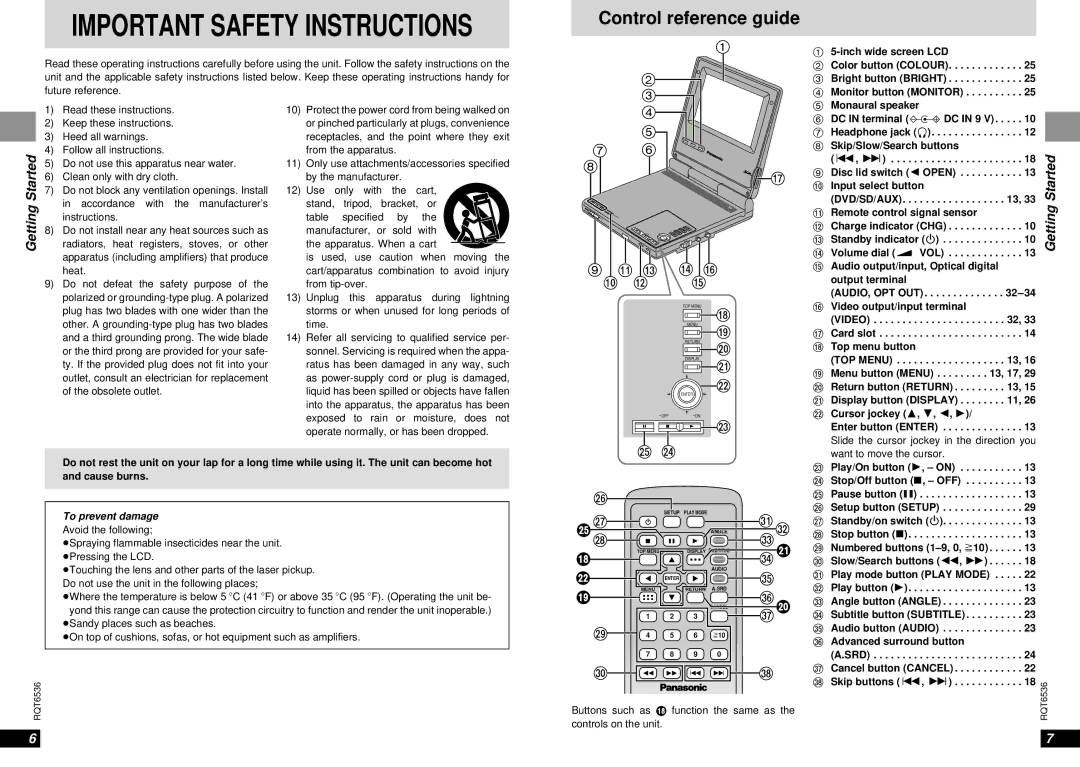
Control reference guide
|
| 1 |
| 2 |
|
| 3 |
|
| 4 |
|
| 5 | MONITOR |
|
| |
7 | 6 | BRIGHT |
COLOUR | ||
8 |
| A |
|
|
| DVD/SD |
OPEN | /AUX |
– OFF
– ON CHG
Í |
9 ; = > @ : < ?
TOP MENU
![]()
![]()
![]()
![]() B
B
MENU C
RETURN D
DISPLAY E
F
ENTER
G |
I H
J
IK |
| SETUP PLAY MODE | ANGLEOP | |
|
|
| ||
L | ∫ | ; | 1 | Q |
B |
|
|
| R E |
| TOP MENU |
| DISPLAY SUBTITLE | |
F |
|
|
| AUDIO |
| ENTER |
| S | |
C | MENU |
| RETURN | A.SRD |
1 | 2 | 3 | T | |
| UD | |||
|
|
|
| CANCEL |
M | 4 | 5 | 6 | S10 |
7 8 9 0
N![]() 6 5
6 5 ![]()
![]() : 9
: 9 ![]() V
V
Buttons such as B function the same as the controls on the unit.
1
2 Color button (COLOUR). . . . . . . . . . . . . 25 3 Bright button (BRIGHT) . . . . . . . . . . . . . 25 4 Monitor button (MONITOR) . . . . . . . . . . 25
5Monaural speaker
6 DC IN terminal (% DC IN 9 V) . . . . . 10 7 Headphone jack (Ë). . . . . . . . . . . . . . . . 12
8Skip/Slow/Search buttons
(:, 9) . . . . . . . . . . . . . . . . . . . . . . . 18
9 Disc lid switch (2 OPEN) . . . . . . . . . . . 13
:Input select button
(DVD/SD/AUX). . . . . . . . . . . . . . . . . . 13, 33
;Remote control signal sensor
< Charge indicator (CHG) . . . . . . . . . . . . . 10 = Standby indicator (Í) . . . . . . . . . . . . . . 10
> Volume dial ( ![]() VOL) . . . . . . . . . . . . . 13
VOL) . . . . . . . . . . . . . 13
?Audio output/input, Optical digital output terminal
(AUDIO, OPT OUT) . . . . . . . . . . . . . .
@Video output/input terminal
(VIDEO) . . . . . . . . . . . . . . . . . . . . . . . 32, 33 A Card slot . . . . . . . . . . . . . . . . . . . . . . . . . 14
BTop menu button
(TOP MENU) . . . . . . . . . . . . . . . . . . . 13, 16 C Menu button (MENU) . . . . . . . . . 13, 17, 29 D Return button (RETURN) . . . . . . . . . 13, 15 E Display button (DISPLAY) . . . . . . . . 11, 26
FCursor jockey (3, 4, 2, 1)/
Enter button (ENTER) . . . . . . . . . . . . . . 13
Slide the cursor jockey in the direction you want to move the cursor.
G Play/On button (1, – ON) . . . . . . . . . . . 13 H Stop/Off button (∫, – OFF) . . . . . . . . . . 13 I Pause button (;) . . . . . . . . . . . . . . . . . . 13 J Setup button (SETUP) . . . . . . . . . . . . . . 29 K Standby/on switch (Í). . . . . . . . . . . . . . 13 L Stop button (∫). . . . . . . . . . . . . . . . . . . . 13 M Numbered buttons
TAdvanced surround button
(A.SRD) . . . . . . . . . . . . . . . . . . . . . . . . . . 24 U Cancel button (CANCEL) . . . . . . . . . . . . 22 V Skip buttons (:, 9) . . . . . . . . . . . . 18
Getting Started
RQT6536
6 | 7 |