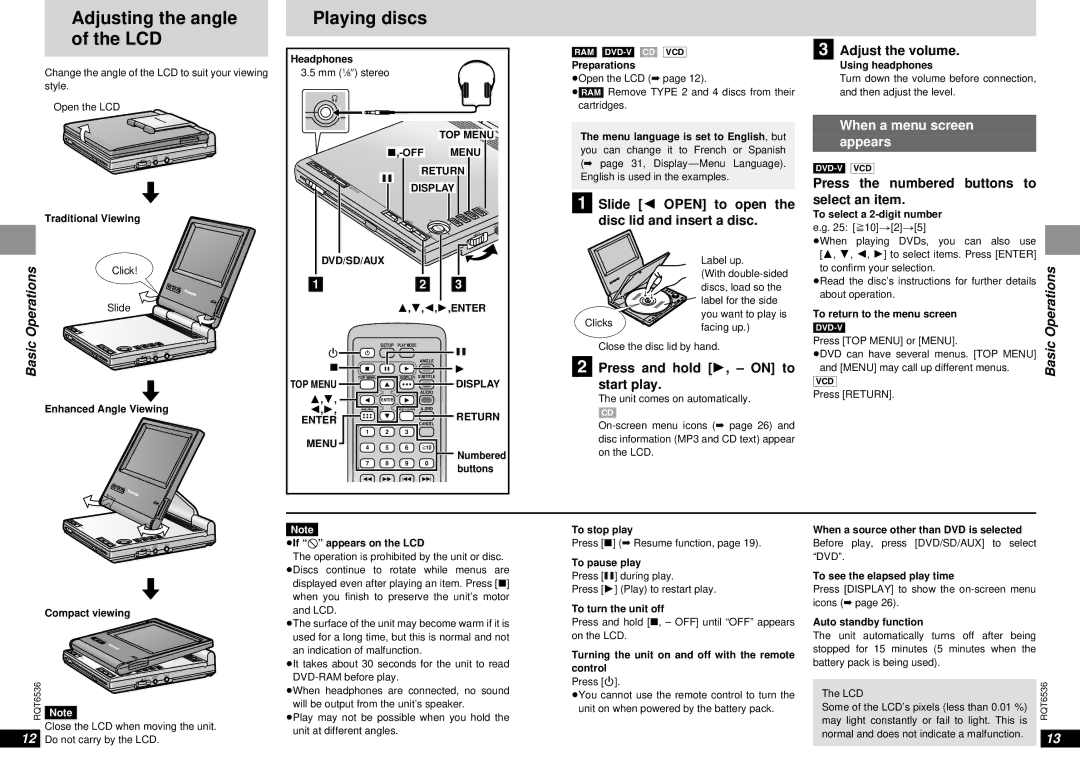
Adjusting the angle of the LCD
Change the angle of the LCD to suit your viewing style.
Open the LCD
OPEN
|
| AUDIO | VIDEO | |
CHG | VOL | OPT | OUT |
|
| Í |
|
|
|
Traditional Viewing
Playing discs
Headphones |
|
|
|
|
| |
3.5 mm (1⁄8q) stereo |
|
|
|
| ||
|
|
| TOP MENU | |||
|
| MENU |
| |||
|
| RETURN |
|
| ||
|
| ; |
|
|
|
|
OPEN | DVD/SD/AUX | DISPLAY |
|
|
| |
|
|
|
|
| T |
|
|
|
|
|
| OP | ME |
|
|
|
|
| ME | |
|
|
|
| RE | NU | |
|
|
|
| NU |
| |
|
| – | D | TUR |
| |
|
|
| ISP | N |
| |
|
| OFF |
| LA |
| AUDI |
|
|
| Y |
| ||
|
| E |
|
|
| T O |
|
| NT |
|
|
| OP |
|
| ER |
|
|
| |
|
| – |
|
| VOL |
|
|
| ON |
|
|
|
|
|
| CHG |
|
|
|
|
|
| Í |
|
|
|
|
[RAM]
Preparations
≥Open the LCD (➡ page 12).
≥[RAM] Remove TYPE 2 and 4 discs from their cartridges.
The menu language is set to English, but you can change it to French or Spanish (➡ page 31, Display— Menu Language). English is used in the examples.
[1] Slide [2 OPEN] to open the disc lid and insert a disc.
[3] Adjust the volume.
Using headphones
Turn down the volume before connection, and then adjust the level.
When a menu screen
appears
Press the numbered buttons to select an item.
To select a
≥When playing DVDs, you can also use
Basic Operations
Click!
Slide
OPEN
|
| AUDIO | |
CHG | VOL | OPT | OUT |
| Í |
|
|
MONITOR | BRIGHT |
|
|
| COLOUR |
VIDEO
DVD/SD/AUX |
| ||
[1] |
| [2] | [3] |
|
| 3,4,2,1,ENTER | |
|
| SETUP PLAY MODE | ; |
Í |
| ANGLE | |
∫ |
|
| |
∫ | ; 1 | 1 | |
TOP MENU | TOP MENU | DISPLAY SUBTITLE | DISPLAY |
| AUDIO | ||
3,4, |
|
| |
| ENTER |
| |
|
|
| |
| Label up. | |
| (With | |
| discs, load so the | |
| label for the side | |
Clicks | you want to play is | |
facing up.) | ||
|
Close the disc lid by hand.
[2] Press and hold [1, – ON] to start play.
The unit comes on automatically.
[3, 4, 2, 1] to select items. Press [ENTER] |
| |
to confirm your selection. | Operations | |
≥Read the disc’s instructions for further details | ||
| ||
about operation. |
| |
To return to the menu screen |
| |
| ||
Press [TOP MENU] or [MENU]. | Basic | |
≥DVD can have several menus. [TOP MENU] | ||
| ||
and [MENU] may call up different menus. |
| |
[VCD] |
| |
Press [RETURN]. |
|
Enhanced Angle Viewing
MONITOR | BRIGHT |
|
| COLOUR |
2,1, | MENU |
| RETURN A.SRD | RETURN | |
|
|
|
| ||
ENTER |
|
|
| CANCEL | |
|
|
|
| ||
| 1 | 2 | 3 |
|
|
MENU | 4 | 5 | 6 | S10 | Numbered |
| 7 | 8 | 9 | 0 | |
| buttons | ||||
|
|
|
|
| |
| 6 5 : 9 |
| |||
[CD]
OPEN
|
| AUDIO | VIDEO | |
CHG | VOL | OPT | OUT |
|
| Í |
|
|
|
Compact viewing
OPEN
|
|
| AUDIO | VIDEO | |
| CHG | VOL | OPT | OUT |
|
RQT6536 |
| Í |
|
|
|
Note |
|
|
|
| |
|
|
|
|
| |
Close the LCD when moving the unit.
12 Do not carry by the LCD.
Note
≥If “$” appears on the LCD
≥The operation is prohibited by the unit or disc. ≥Discs continue to rotate while menus are displayed even after playing an item. Press [∫] when you finish to preserve the unit’s motor
and LCD.
≥The surface of the unit may become warm if it is used for a long time, but this is normal and not an indication of malfunction.
≥It takes about 30 seconds for the unit to read
≥When headphones are connected, no sound will be output from the unit’s speaker.
≥Play may not be possible when you hold the unit at different angles.
To stop play
Press [∫] (➡ Resume function, page 19).
To pause play
Press [;] during play.
Press [1] (Play) to restart play.
To turn the unit off
Press and hold [∫, – OFF] until “OFF” appears on the LCD.
Turning the unit on and off with the remote control
Press [Í].
≥You cannot use the remote control to turn the unit on when powered by the battery pack.
When a source other than DVD is selected
Before play, press [DVD/SD/AUX] to select “DVD”.
To see the elapsed play time
Press [DISPLAY] to show the
Auto standby function
The unit automatically turns off after being stopped for 15 minutes (5 minutes when the battery pack is being used).
The LCD | RQT6536 | |
Some of the LCD’s pixels (less than 0.01 %) | ||
may light constantly or fail to light. This is | ||
|
normal and does not indicate a malfunction. | 13 |
|