Power supply
AC adaptor
StartedGetting |
|
| DC IN 9V | |
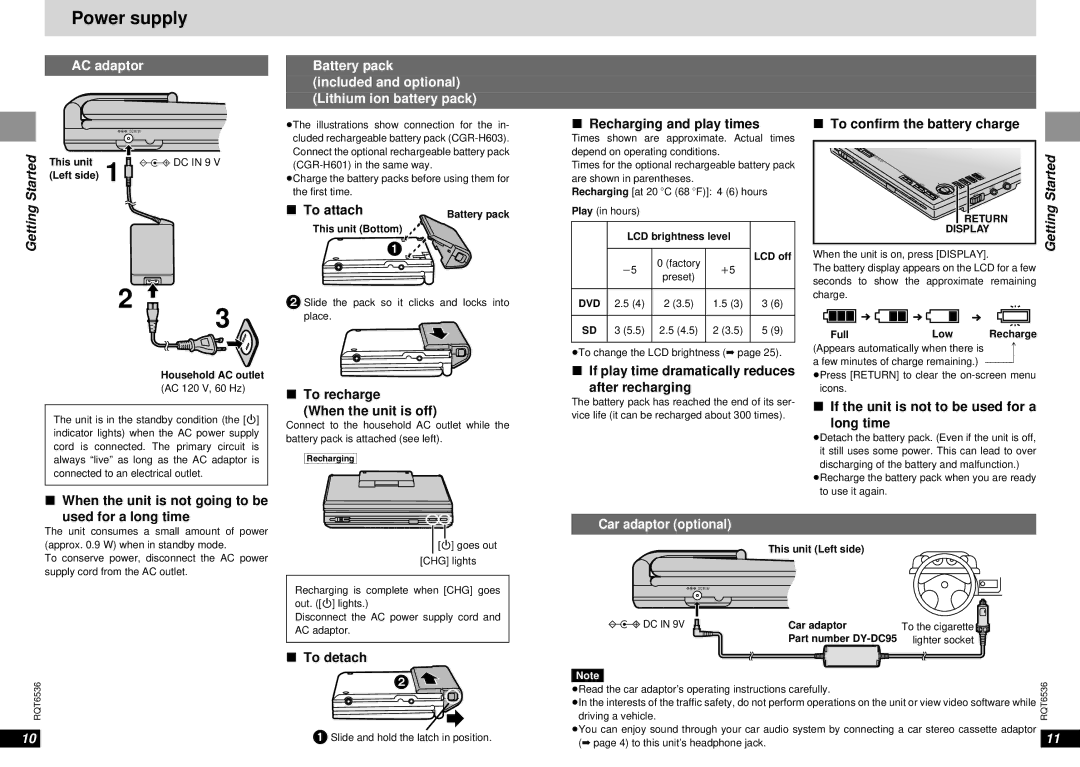
This unit | 1 | % DC IN 9 V | ||
| ||||
| (Left side) |
|
2
3 ![]()
Household AC outlet
(AC 120 V, 60 Hz)
The unit is in the standby condition (the [Í] indicator lights) when the AC power supply cord is connected. The primary circuit is always “live” as long as the AC adaptor is connected to an electrical outlet.
∫When the unit is not going to be
used for a long time
The unit consumes a small amount of power
Battery pack
(included and optional) (Lithium ion battery pack)
≥The illustrations show connection for the in- cluded rechargeable battery pack
≥Charge the battery packs before using them for the first time.
∫ To attach | Battery pack |
This unit (Bottom)
1![]()
2Slide the pack so it clicks and locks into place.
∫To recharge
∫(When the unit is off)
Connect to the household AC outlet while the battery pack is attached (see left).
[Recharging]
∫Recharging and play times
Times shown are approximate. Actual times depend on operating conditions.
Times for the optional rechargeable battery pack are shown in parentheses.
Recharging [at 20 oC (68 oF)]: 4 (6) hours
Play (in hours)
| LCD brightness level |
| ||
|
|
|
| LCD off |
|
| 0 (factory |
| |
| j5 | i5 |
| |
| preset) |
| ||
|
|
|
| |
|
|
|
|
|
DVD | 2.5 (4) | 2 (3.5) | 1.5 (3) | 3 (6) |
|
|
|
|
|
SD | 3 (5.5) | 2.5 (4.5) | 2 (3.5) | 5 (9) |
|
|
|
|
|
≥To change the LCD brightness (➡ page 25).
∫If play time dramatically reduces
after recharging
The battery pack has reached the end of its ser- vice life (it can be recharged about 300 times).
Car adaptor (optional)
∫To confirm the battery charge
| DVD/SD |
|
|
|
| Started | |
OPEN | /AUX |
|
|
|
| ||
|
|
|
| T |
| ||
|
|
|
| OP | ME | ||
|
|
|
| ME | |||
|
| D | RET | NU |
| ||
|
| UR |
| VIDEO | |||
| – |
| ISPL N |
| |||
| OFF |
| AY |
| AUDIO | ||
|
| E |
|
| OPT OUT | ||
|
| NTER |
|
|
| ||
|
| – |
| VOL |
| ||
| CHG | ON |
|
|
| ||
|
|
|
|
| |||
|
|
|
|
|
| ||
| Í |
|
|
|
| Getting | |
|
|
| RETURN | ||||
|
| DISPLAY | |||||
When the unit is on, press [DISPLAY]. | |||||||
| |||||||
The battery display appears on the LCD for a few |
| ||||||
seconds to show the approximate remaining |
| ||||||
charge. |
|
|
|
|
|
| |
Full | Low | Recharge |
(Appears automatically when there is | f | |
a few minutes of charge remaining.) | ||
≥Press [RETURN] to clear the
∫If the unit is not to be used for a
long time
≥Detach the battery pack. (Even if the unit is off, it still uses some power. This can lead to over discharging of the battery and malfunction.)
≥Recharge the battery pack when you are ready to use it again.
(approx. 0.9 W) when in standby mode.
To conserve power, disconnect the AC power supply cord from the AC outlet.
[Í] goes out
[CHG] lights
Recharging is complete when [CHG] goes out. ([Í] lights.)
Disconnect the AC power supply cord and AC adaptor.
This unit (Left side)
![]() DC IN 9V
DC IN 9V
DC IN 9V |
|
| Car adaptor | To the cigarette | ||
| ||||||
|
|
| Part number | lighter socket | ||
|
|
| ||||
|
|
|
|
|
|
|
| ∫ To detach |
RQT6536 | 2 |
| |
10 | 1 Slide and hold the latch in position. |
Note |
| RQT6536 | |
≥Read the car adaptor’s operating instructions carefully. | |||
≥In the interests of the traffic safety, do not perform operations on the unit or view video software while | |||
driving a vehicle. | |||
≥You can enjoy sound through your car audio system by connecting a car stereo cassette adaptor |
| ||
11 | |||
(➡ page 4) to this unit’s headphone jack. | |||