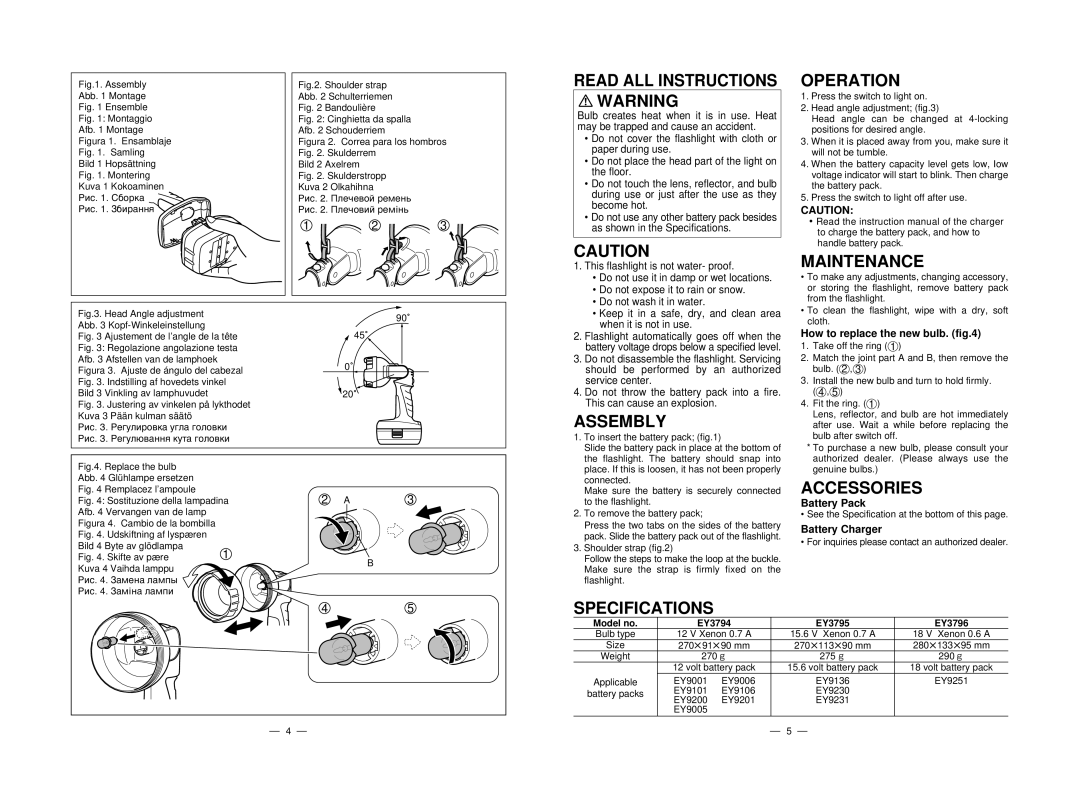
Fig.1. Assembly

Abb. 1 Montage

Fig. 1 Ensemble

Fig. 1: Montaggio

Afb. 1 Montage

Figura 1. Ensamblaje

Fig. 1. Samling

Bild 1 Hopsättning

Fig. 1. Montering

Kuva 1 Kokoaminen

êËÒ. 1. ë·Ó͇ êËÒ. 1. á·Ë‡ÌÌfl

Fig.2. Shoulder strap Abb. 2 Schulterriemen Fig. 2 Bandoulière

Fig. 2: Cinghietta da spalla Afb. 2 Schouderriem

Figura 2. Correa para los hombros Fig. 2. Skulderrem

Bild 2 Axelrem

Fig. 2. Skulderstropp Kuva 2 Olkahihna

êËÒ. 2. èΘ‚ÓÈ ÂÏÂ̸ êËÒ. 2. èΘӂËÈ Âϥ̸

123

READ ALL INSTRUCTIONS

WARNING

Bulb creates heat when it is in use. Heat may be trapped and cause an accident.

Do not cover the flashlight with cloth or paper during use.

Do not place the head part of the light on the floor.

Do not touch the lens, reflector, and bulb during use or just after the use as they become hot.

Do not use any other battery pack besides as shown in the Specifications.

CAUTION

1. This flashlight is not water- proof.

OPERATION

1.Press the switch to light on.

2.Head angle adjustment; (fig.3)

Head angle can be changed at 4-locking positions for desired angle.

3.When it is placed away from you, make sure it will not be tumble.

4.When the battery capacity level gets low, Iow voltage indicator will start to blink. Then charge the battery pack.

5.Press the switch to light off after use.

CAUTION:

Read the instruction manual of the charger to charge the battery pack, and how to handle battery pack.

MAINTENANCE

Fig.3. Head Angle adjustment Abb. 3 Kopf-Winkeleinstellung

Fig. 3 Ajustement de l’angle de la tête Fig. 3: Regolazione angolazione testa Afb. 3 Afstellen van de lamphoek Figura 3. Ajuste de ángulo del cabezal Fig. 3. Indstilling af hovedets vinkel Bild 3 Vinkling av lamphuvudet

Fig. 3. Justering av vinkelen på lykthodet Kuva 3 Pää n kulman sää tö

êËÒ. 3. ê„ÛÎËӂ͇ ۄ· „ÓÎÓ‚ÍË êËÒ. 3. ê„Û₇ÌÌfl ÍÛÚ‡ „ÓÎÓ‚ÍË

90

45

0

20

• Do not use it in damp or wet locations.

• Do not expose it to rain or snow.

• Do not wash it in water.

• Keep it in a safe, dry, and clean area

when it is not in use.

2. Flashlight automatically goes off when the

battery voltage drops below a specified level.

3. Do not disassemble the flashlight. Servicing

should be performed by an authorized

service center.

4. Do not throw the battery pack into a fire.

This can cause an explosion.

ASSEMBLY

1. To insert the battery pack; (fig.1)

Slide the battery pack in place at the bottom of

the flashlight. The battery should snap into

To make any adjustments, changing accessory, or storing the flashlight, remove battery pack from the flashlight.

To clean the flashlight, wipe with a dry, soft cloth.

How to replace the new bulb. (fig.4)

1.

Take off the ring ( 1 )

2.

Match the joint part A and B, then remove the

3.

bulb. ( 2 , 3 )

Install the new bulb and turn to hold firmly.

4.

( 4 , 5 )

Fit the ring. ( 1 )


Lens, reflector, and bulb are hot immediately


after use. Wait a while before replacing the


bulb after switch off.

* To purchase a new bulb, please consult your


authorized dealer. (Please always use the

Fig.4. Replace the bulb Abb. 4 Glühlampe ersetzen Fig. 4 Remplacez l’ampoule

Fig. 4: Sostituzione della lampadina Afb. 4 Vervangen van de lamp Figura 4. Cambio de la bombilla Fig. 4. Udskiftning af lyspæren Bild 4 Byte av glödlampa

Fig. 4. Skifte av pære1 Kuva 4 Vaihda lamppu

êËÒ. 4. á‡ÏÂ̇ ·ÏÔ˚ êËÒ. 4. á‡Ï¥Ì‡ ·ÏÔË

2 A

3

B

place. If this is loosen, it has not been properly

connected.

Make sure the battery is securely connected

to the flashlight.

2. To remove the battery pack;

Press the two tabs on the sides of the battery

pack. Slide the battery pack out of the flashlight.

3. Shoulder strap (fig.2)

Follow the steps to make the loop at the buckle.

Make sure the strap is firmly fixed on the

flashlight.

genuine bulbs.)

ACCESSORIES

Battery Pack

• See the Specification at the bottom of this page.

Battery Charger

• For inquiries please contact an authorized dealer.

45

SPECIFICATIONS

4

Model no.

EY3794


EY3795

EY3796

Bulb type

12 V Xenon 0.7 A


15.6 V Xenon 0.7 A

18 V Xenon 0.6 A

Size

270 91

90 mm


270 113 90 mm

280 133 95 mm

Weight

270n


275n

290n


12 volt battery pack


15.6 volt battery pack

18 volt battery pack

Applicable

EY9001

EY9006


EY9136

EY9251

battery packs

EY9101

EY9106


EY9230


EY9200

EY9201


EY9231


EY9005


5


Page 3
Image 3
Panasonic EY3796, EY3795, EY3794 manual Operation, Maintenance, Assembly, Accessories, Specifications

EY3795, EY3794, EY3796 specifications

Panasonic has long been a pioneer in the power tools industry, known for integrating advanced technology and innovation into their products. Among their standout offerings are the EY3796, EY3794, and EY3795 models, each designed with specific features and performance capabilities that cater to various user needs.

The Panasonic EY3796 is a versatile and robust cordless impact wrench that boasts a maximum torque of up to 300 Nm. This makes it an excellent choice for heavy-duty applications such as automotive repairs and construction tasks. Its lightweight design and ergonomic handle provide users with optimal comfort during extended use, reducing fatigue. The tool is equipped with a high-performance brushless motor, which not only enhances power efficiency but also extends the tool’s lifespan by minimizing wear and tear on internal components.

Similarly, the EY3794 model showcases impressive battery technology with a Lithium-ion design that offers long run time and quick recharge capabilities. Its compact size and low weight make it particularly suitable for tight spaces while still delivering high torque output. Auto-stop technology is featured in this model, which halts operation after achieving the desired torque, preventing over-tightening and ensuring precision in every application.

In contrast, the Panasonic EY3795 is designed specifically for drilling applications and features a two-speed gear system for adaptability across various materials. With a maximum speed of 1,700 RPM, this model excels in both drilling and fastening tasks. The robust build quality ensures durability, while its integrated LED lights enhance visibility in dimly lit workspaces, allowing for greater control and accuracy.

All three models feature Panasonic's advanced electronic control technologies, providing users with increased reliability and safety. Intelligent battery management extends the life of the batteries, while the overload protection system prevents damage to the tools in case of excessive use.

In summary, the Panasonic EY3796, EY3794, and EY3795 represent a significant advancement in cordless tool technology, offering powerful performance, ergonomic designs, and user-friendly features. Whether for professionals in demanding industries or DIY enthusiasts, these tools deliver reliability and efficiency that users can depend on for a variety of tasks.