CONNECTIONS

Cautions:

Keep the DC Power ON / OFF switch in the OFF position until all connections have been properly made.

Connect the enclosed camera head and the cam- era control unit in the same package. Connecting other models may cause malfunctions.

Internal Sync Operation

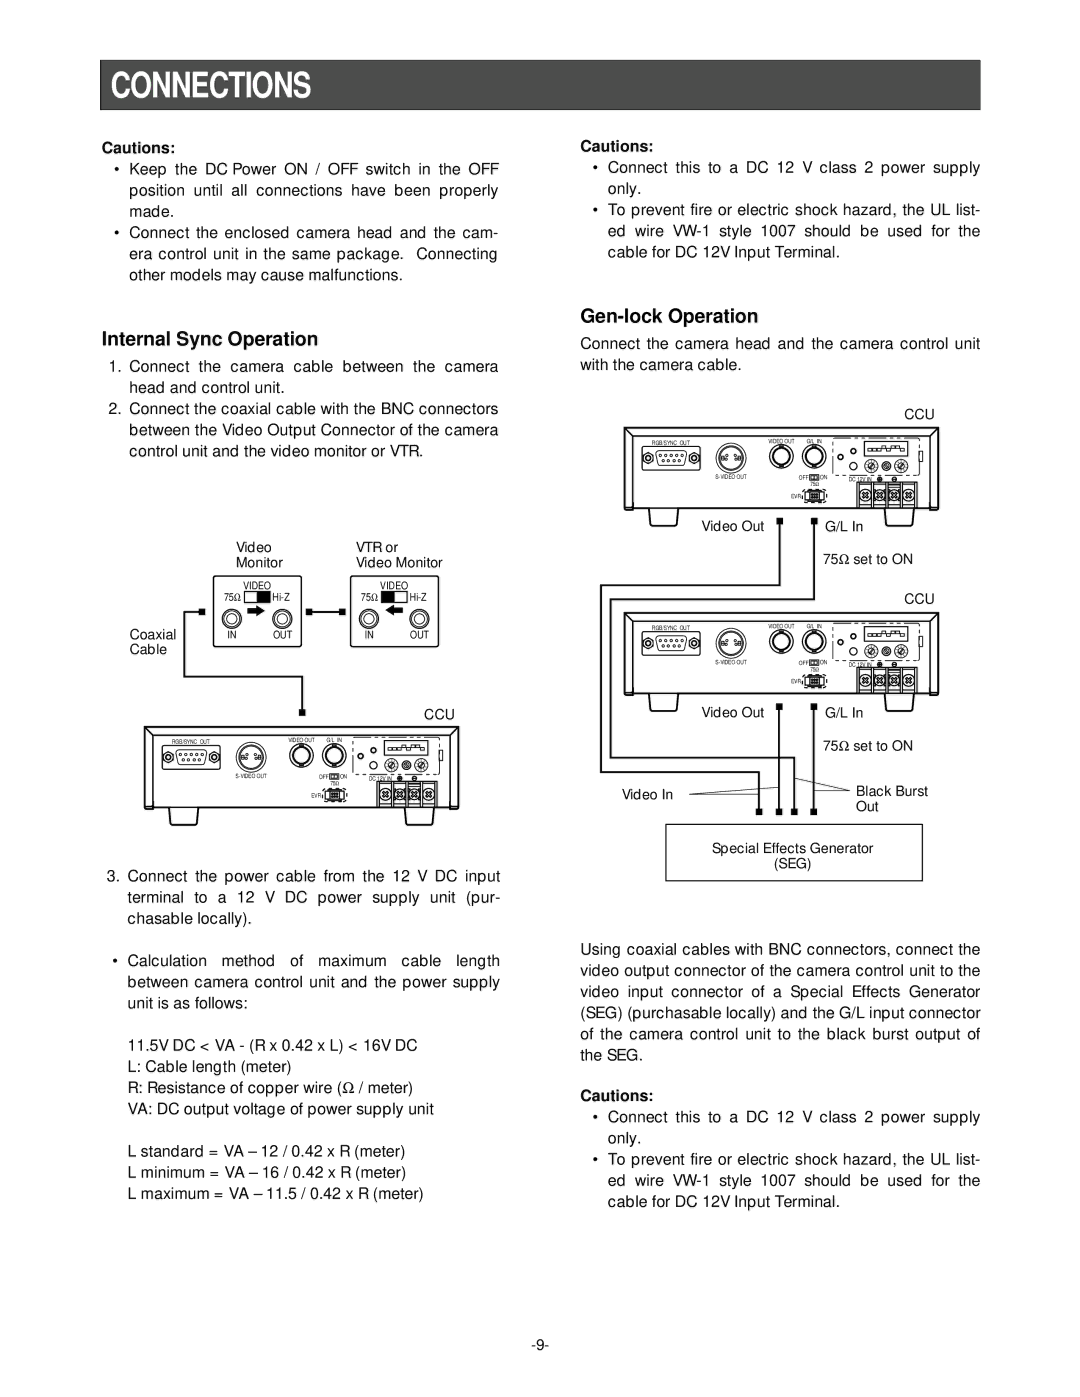
1.Connect the camera cable between the camera head and control unit.

2.Connect the coaxial cable with the BNC connectors between the Video Output Connector of the camera control unit and the video monitor or VTR.

Video

VTR or

Monitor

Video Monitor


75Ω

VIDEO

75Ω

VIDEO


Hi-Z

Hi-Z

Coaxial

IN

OUT

IN

OUT

Cable


CCU

RGB/SYNC OUT

VIDEO OUT

G/L IN

4

5

6

4

5

6

3


7

3


7

2


8

2


8

1

0

9

1

0

9

S-VIDEO OUT

OFF

ON

DC 12V IN


75Ω


EVR

3.Connect the power cable from the 12 V DC input terminal to a 12 V DC power supply unit (pur- chasable locally).

Calculation method of maximum cable length between camera control unit and the power supply unit is as follows:

11.5V DC < VA - (R x 0.42 x L) < 16V DC

L: Cable length (meter)

R:Resistance of copper wire (Ω / meter) VA: DC output voltage of power supply unit

L standard = VA – 12 / 0.42 x R (meter)

L minimum = VA – 16 / 0.42 x R (meter)

L maximum = VA – 11.5 / 0.42 x R (meter)

Cautions:

Connect this to a DC 12 V class 2 power supply only.

To prevent fire or electric shock hazard, the UL list- ed wire VW-1 style 1007 should be used for the cable for DC 12V Input Terminal.

Gen-lock Operation

Connect the camera head and the camera control unit with the camera cable.

CCU

RGB/SYNC OUT

VIDEO OUT

G/L IN

4

5

6

4

5

6

3


7

3


7

2

0

8

2

0

8

1

9

1

9

S-VIDEO OUT

OFF


ON

DC 12V IN


75Ω


EVR

Video Out


G/L In

75Ω set to ON

CCU

RGB/SYNC OUT

VIDEO OUT

G/L IN

4

5

6

4

5

6

3


7

3


7

2

0

8

2

0

8

1

9

1

9

S-VIDEO OUT

OFF

ON

DC 12V IN


75Ω


EVR


Video Out


G/L In


75Ω set to ON


Black Burst


Video In


Out


Special Effects Generator


(SEG)


Using coaxial cables with BNC connectors, connect the video output connector of the camera control unit to the video input connector of a Special Effects Generator (SEG) (purchasable locally) and the G/L input connector of the camera control unit to the black burst output of the SEG.

Cautions:

Connect this to a DC 12 V class 2 power supply only.

To prevent fire or electric shock hazard, the UL list- ed wire VW-1 style 1007 should be used for the cable for DC 12V Input Terminal.

-9-

Page 11
Image 11
Panasonic GP-KS1000E manual Connections, Internal Sync Operation

GP-KS1000E specifications

The Panasonic GP-KS1000E is a versatile and high-performance camera designed for various professional image capture applications. This compact camera is well-suited for broadcasting, education, and industrial use, making it a go-to solution for many professionals in the visual media sector. Boasting advanced imaging technologies and robust features, the GP-KS1000E sets itself apart in a competitive market.

One of the standout features of the GP-KS1000E is its high-quality imaging capabilities. It utilizes a 1/3-inch CCD sensor that delivers remarkable resolution, allowing users to capture crisp, clear images even in challenging lighting conditions. The camera supports a maximum resolution of 1,024 x 1,024 pixels, which is ideal for professional-grade applications, including live streaming and video production.

The camera is equipped with an impressive signal-to-noise ratio and can operate with a minimal illumination of just 0.03 lux in color mode, making it highly effective for low-light environments. This capability is further enhanced by the GP-KS1000E’s automatic gain control (AGC) feature, which adjusts the camera’s sensitivity based on lighting conditions, ensuring optimal performance at all times.

In terms of connectivity, the Panasonic GP-KS1000E supports a range of output formats, including composite and Y/C outputs, enabling seamless integration with different video equipment. Additionally, it features an RS-232C interface for remote control operations, which is particularly useful for installations that require centralized management of multiple cameras.

One of the significant advantages of the GP-KS1000E is its compact and lightweight design, making it easy to install in various settings, such as studios or educational facilities. The camera can be mounted on a tripod or integrated into fixed installations, giving users the flexibility to meet their specific requirements.

The camera's advanced processing technology includes features such as automatic white balance and digital noise reduction. These technologies work together to produce high-quality images with accurate color reproduction, no matter the environment or conditions.

Overall, the Panasonic GP-KS1000E's blend of advanced technology, exceptional imaging quality, and user-friendly features positions it as a leading choice for professionals seeking a reliable and effective imaging solution. Whether utilized in broadcasting, education, or industrial applications, the GP-KS1000E delivers impressive performance and adaptability.