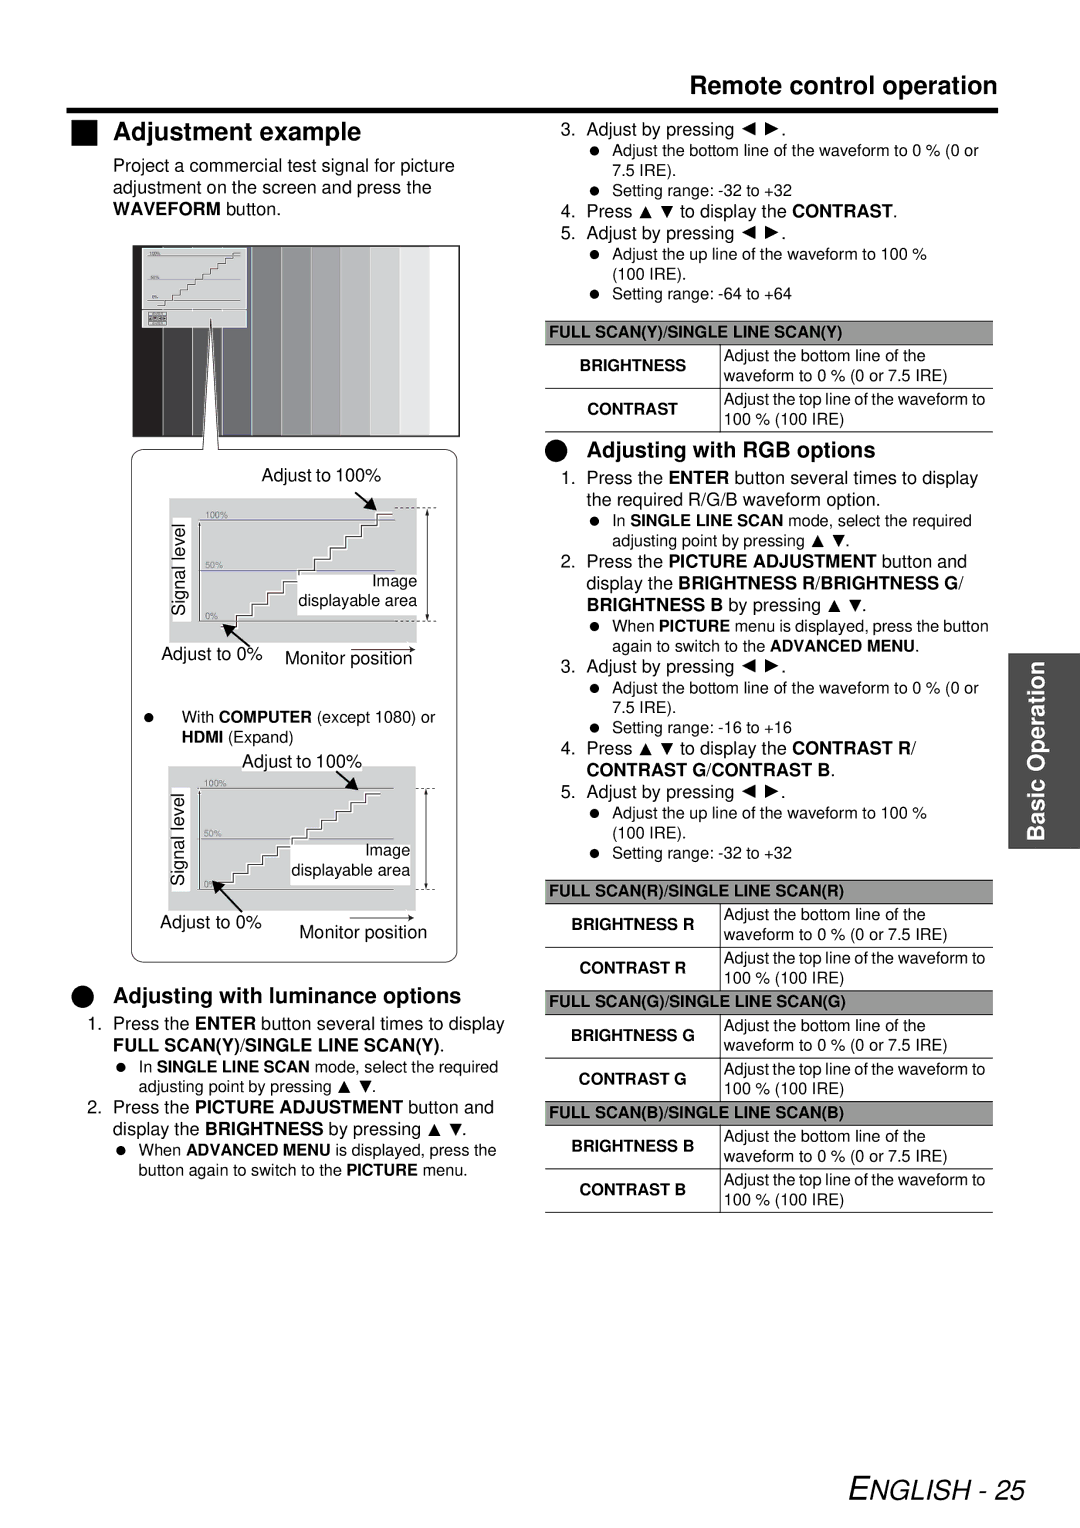
Adjustment example
Project a commercial test signal for picture adjustment on the screen and press the WAVEFORM button.
100%
50%
0%
ENTER
ENTER
Adjust to 100%
level | 100% |
| ||
|
|
|
| |
Signal |
| 50% | Image | |
|
| |||
|
|
| ||
displayable area
0%
Adjust to 0% Monitor position
With COMPUTER (except 1080) or
HDMI (Expand)
Adjust to 100%
level |
| 100% |
|
|
|
|
|
|
|
|
|
|
|
|
|
|
| |||
|
|
|
|
|
|
|
|
|
|
|
|
|
|
|
|
|
|
|
| |
|
|
|
|
|
|
|
|
|
|
|
|
|
|
|
|
|
|
| ||
|
|
|
|
|
|
|
|
|
|
|
|
|
|
|
|
|
|
| ||
|
|
|
|
|
|
|
|
|
|
|
|
|
|
|
|
|
|
| ||
|
|
|
|
|
|
|
|
|
|
|
|
|
|
|
|
|
|
| ||
Signal |
|
| 50% |
|
|
|
|
|
|
|
|
|
|
|
|
|
|
|
| |
|
|
|
|
|
|
|
|
|
|
|
|
|
|
|
|
|
|
|
| |
|
|
|
|
|
|
|
|
|
|
|
|
|
|
| Image |
|
| |||
|
| 0% |
|
|
|
|
|
| displayable area |
|
| |||||||||
|
|
|
|
|
|
|
| |||||||||||||
|
|
|
|
|
|
|
| |||||||||||||
|
|
|
|
|
|
|
|
|
|
|
|
|
|
|
|
|
|
| ||
|
|
|
|
|
|
|
|
|
|
|
|
|
|
|
|
|
|
|
|
|
Adjust to 0% |
|
|
|
|
|
|
|
|
|
|
|
|
| |||||||
|
|
| Monitor position | |||||||||||||||||
|
|
|
|
|
|
|
|
|
|
| ||||||||||
Adjusting with luminance options
1.Press the ENTER button several times to display FULL SCAN(Y)/SINGLE LINE SCAN(Y).
In SINGLE LINE SCAN mode, select the required adjusting point by pressing F G.
2.Press the PICTURE ADJUSTMENT button and display the BRIGHTNESS by pressing F G.
When ADVANCED MENU is displayed, press the button again to switch to the PICTURE menu.
Remote control operation
3. Adjust by pressing I H.
Adjust the bottom line of the waveform to 0 % (0 or 7.5 IRE).
Setting range:
4.Press F G to display the CONTRAST.
5.Adjust by pressing I H.
Adjust the up line of the waveform to 100 % (100 IRE).
Setting range:
FULL SCAN(Y)/SINGLE LINE SCAN(Y)
BRIGHTNESS | Adjust the bottom line of the | |
waveform to 0 % (0 or 7.5 IRE) | ||
| ||
CONTRAST | Adjust the top line of the waveform to | |
100 % (100 IRE) | ||
|
Adjusting with RGB options
1.Press the ENTER button several times to display the required R/G/B waveform option.
In SINGLE LINE SCAN mode, select the required adjusting point by pressing F G.
2.Press the PICTURE ADJUSTMENT button and display the BRIGHTNESS R/BRIGHTNESS G/ BRIGHTNESS B by pressing F G.
When PICTURE menu is displayed, press the button again to switch to the ADVANCED MENU.
3.Adjust by pressing I H.
Adjust the bottom line of the waveform to 0 % (0 or 7.5 IRE).
Setting range:
4.Press F G to display the CONTRAST R/
CONTRAST G/CONTRAST B.
5.Adjust by pressing I H.
Adjust the up line of the waveform to 100 % (100 IRE).
Setting range:
FULL SCAN(R)/SINGLE LINE SCAN(R)
BRIGHTNESS R | Adjust the bottom line of the | |
waveform to 0 % (0 or 7.5 IRE) | ||
| ||
CONTRAST R | Adjust the top line of the waveform to | |
100 % (100 IRE) | ||
| ||
FULL SCAN(G)/SINGLE | LINE SCAN(G) | |
BRIGHTNESS G | Adjust the bottom line of the | |
waveform to 0 % (0 or 7.5 IRE) | ||
| ||
CONTRAST G | Adjust the top line of the waveform to | |
100 % (100 IRE) | ||
| ||
FULL SCAN(B)/SINGLE | LINE SCAN(B) | |
BRIGHTNESS B | Adjust the bottom line of the | |
waveform to 0 % (0 or 7.5 IRE) | ||
| ||
CONTRAST B | Adjust the top line of the waveform to | |
100 % (100 IRE) | ||
|
Basic Operation
