USB (continued)
Recording mode
ENGLISH | You can select the desired recording mode before you start the |
| |
| basic recording (\ page 12). |
| Press [REC MODE] repeatedly to select your desired setting. |
128 KBPS |
| 192 KBPS |
| 320 KBPS | |||
|
| ||||||
|
|
|
|
|
|
|
|
|
|
|
|
|
| ||
Recording mode |
| Effect |
|
|
| ||
128 KBPS |
| Long play mode |
|
|
| ||
192 KBPS |
| Normal mode |
|
|
| ||
|
|
| |||||
320 KBPS |
| High quality sound mode | |||||
|
|
|
|
|
|
|
|
| During recording | |
ESPAÑOL | Press [DISPLAY] repeatedly to display the current recording | |
mode. | ||
| ||
| Note: | |
| You cannot change the recording mode during recording. |
Adding track marks
When recording from analogue source such as radio, music port or AUX, you may want to separate the sound or music track at desired point during recording.
You can perform this separation by adding track marks using the various listed modes.
ESPAÑOL |
|
|
| MANUAL |
| TIME MARK | ||||
| Before recording |
|
|
|
|
| ||||
| Press [EDIT MODE] repeatedly to select your desired track | |||||||||
| mark mode. |
|
|
|
|
|
|
|
| |
| Radio: |
|
|
|
|
|
|
|
| |
|
|
|
|
|
|
|
|
|
|
|
|
|
|
|
|
|
|
|
|
|
|
| MUSIC PORT or AUX: |
|
|
|
|
| ||||
|
|
|
| MANUAL |
| SYNCHRO |
|
| ||
|
|
|
|
| TIME MARK |
|
| |||
|
|
|
|
|
| |||||
|
|
|
|
|
|
|
|
| ||
| Edit mode |
| Action |
|
|
|
|
| ||
|
|
|
| |||||||
| MANUAL |
| Track marks are inserted manually. | |||||||
ESPAÑOL |
|
| Press [OK] to add track mark during | |||||||
|
| recording. |
|
|
|
|
| |||
|
|
|
|
|
|
|
| |||
| TIME MARK |
| Track marks are inserted automatically every | |||||||
|
|
| fi ve minutes. |
|
|
|
|
| ||
|
|
|
| |||||||
| SYNCHRO |
| Recording automatically starts when the other | |||||||
|
|
| equipment starts to play. | |||||||
|
|
| Recording pause when detects silence for | |||||||
|
|
| approximately three seconds. | |||||||
Note:
•If you press [OK] or pause recording while using TIME MARK mode during recording, the fi
•You cannot insert track marks manually in SYNCHRO mode.
ESPAÑOL
RQTX0271
14
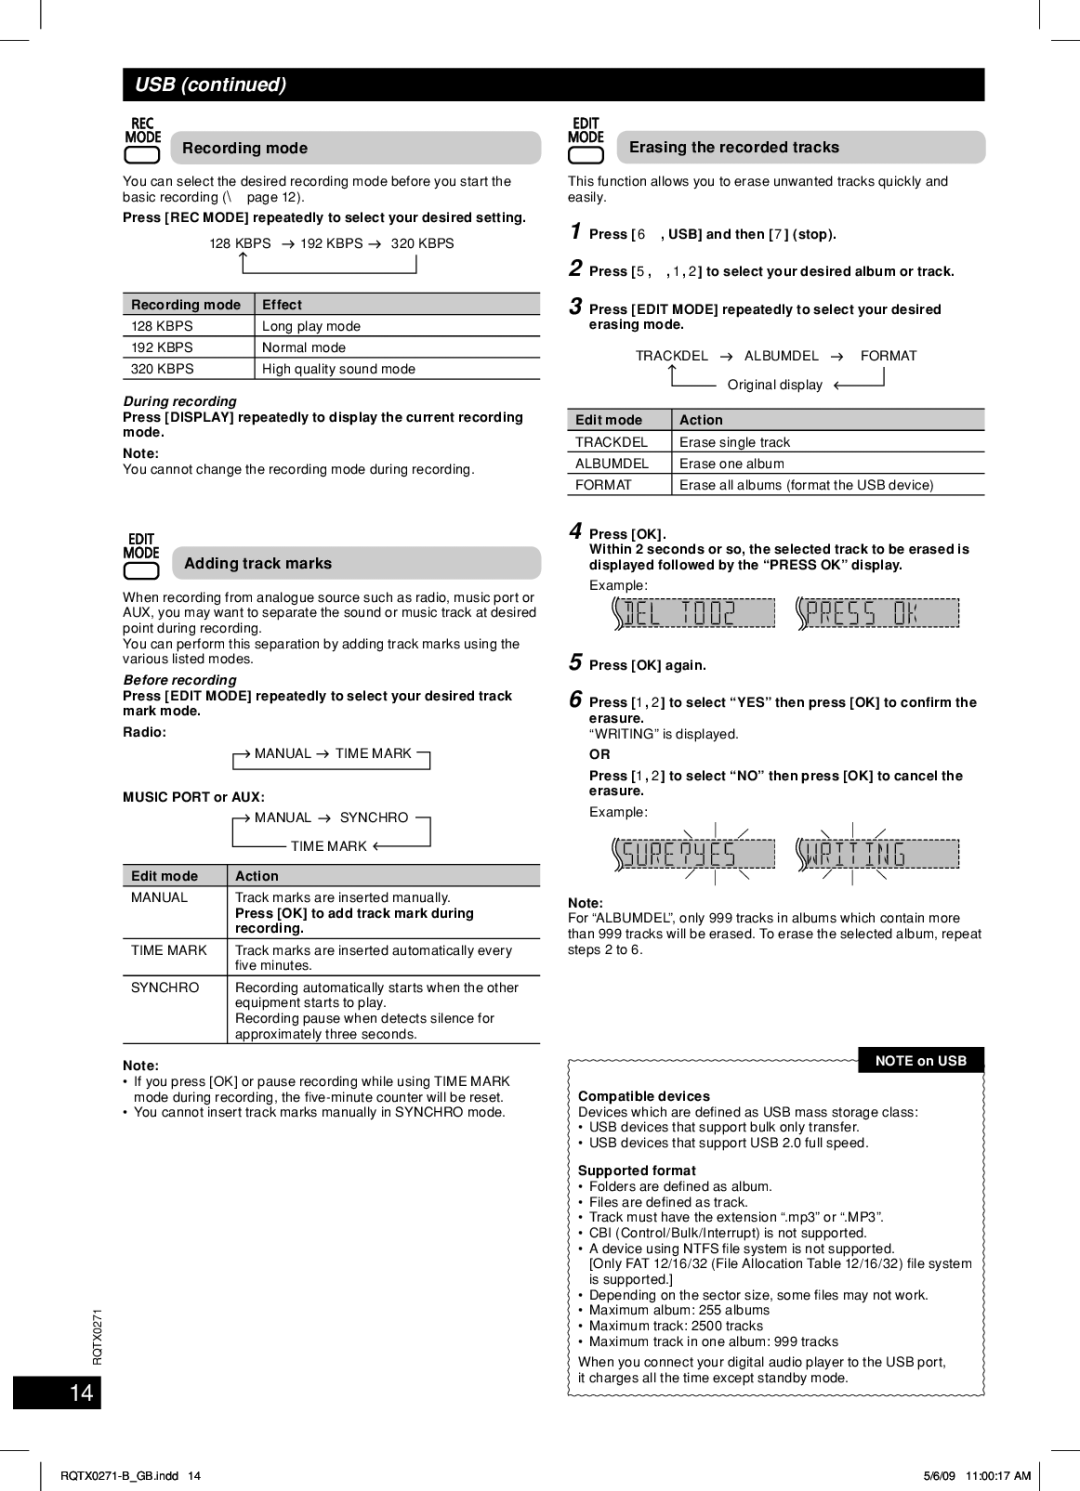
Erasing the recorded tracks
This function allows you to erase unwanted tracks quickly and easily.
1 Press [6 , USB] and then [7 ] (stop).
2 Press [5, ∞, 1, 2] to select your desired album or track.
3 Press [EDIT MODE] repeatedly to select your desired erasing mode.
TRACKDEL |
|
| ALBUMDEL |
|
| FORMAT | |||
|
|
|
| ||||||
|
|
|
| Original display |
|
|
| ||
|
|
|
|
|
|
| |||
|
|
|
|
|
|
|
| ||
Edit mode | Action |
|
|
|
|
|
| ||
|
|
|
|
| |||||
TRACKDEL | Erase single track |
|
|
| |||||
|
|
|
|
| |||||
ALBUMDEL | Erase one album |
|
|
| |||||
|
| ||||||||
FORMAT | Erase all albums (format the USB device) | ||||||||
4 Press [OK].
Within 2 seconds or so, the selected track to be erased is displayed followed by the “PRESS OK” display.
Example:
5 Press [OK] again.
6 Press [1, 2] to select “YES” then press [OK] to confirm the erasure.
“WRITING” is displayed.
OR
Press [1, 2] to select “NO” then press [OK] to cancel the erasure.
Example:
Note:
For “ALBUMDEL”, only 999 tracks in albums which contain more than 999 tracks will be erased. To erase the selected album, repeat steps 2 to 6.
NOTE on USB
Compatible devices
Devices which are defi ned as USB mass storage class:
•USB devices that support bulk only transfer.
•USB devices that support USB 2.0 full speed.
Supported format
•Folders are defi ned as album.
•Files are defi ned as track.
•Track must have the extension “.mp3” or “.MP3”.
•CBI (Control/Bulk/Interrupt) is not supported.
•A device using NTFS fi le system is not supported.
[Only FAT 12/16/32 (File Allocation Table 12/16/32) fi le system is supported.]
•Depending on the sector size, some fi les may not work.
•Maximum album: 255 albums
•Maximum track: 2500 tracks
•Maximum track in one album: 999 tracks
When you connect your digital audio player to the USB port, it charges all the time except standby mode.
5/6/09 11:00:17 AM |
