SDR-H20GN
Use only the recommended accessories
Information for Your Safety
Carefully observe copyright laws
Indemnity concerning recording content
Contents
104
Dubbing images
Creating DVD-Video discs
101
Easy recording! l34
Features
Before using
Extended recording
Editing scenes! l59
Using with a computer! l
Lens Leica Dicomar SDR-H250 Lens SDR-H20
Accessories
Optional accessories
Parts identification and handling
Card slot cover SD Card l Card access lamp Access l 17
Before using Grip belt l
Using grip belt
Adjust the belt length and the pad position
Using the lens cover SDR-H250
During recording
Using the LCD monitor
Adjust the angle of the LCD monitor as desired
Tripod receptacle
Concerning the button-type battery
Using the remote control SDR-H250
Install a button-type battery
Remote control usable range
Instructions Capacity
HDD and SD card
Concerning SD cards
Display on Screen Indication in these
256 MB
Handling precautions
Access lamp
HDD handling precautions
Card access lamp
Charging lamp Lights up Charging
Power supply
Charging the battery
Setup
SDR-H20
Charging time and recordable time
Charging time
SDR-H250
Setup SDR-H20
How to turn the power on and off with the LCD monitor
Connecting to the AC outlet
How to turn on the power Set the OFF/ON switch to on
How to turn off the power Set the OFF/ON switch to OFF
Inserting/removing an SD card
To turn on the power Open the LCD monitor
To turn off the power Close the LCD monitor
Set the OFF/ON switch to OFF to turn off the power
Basic operations
Selecting a mode
How to use the joystick
Securely close the card slot cover
Move the joystick up, down, left or right to operate
Video recording mode
About the operation icons displayed in each mode
Picture playback mode
Setup Picture recording mode
Using the menu screen
Switching the language
To exit the menu screen
Operating with remote control SDR-H250
Press the Menu button
To get back to the previous screen
Press the Menu button to exit the menu screen
Setting date and time
Select a menu item
Setup Display style Screen display
Adjusting the LCD monitor
Power LCD Plus
Recording
Before recording
Basic camera positioning
Anti-Ground-Shooting AGS SDR-H250
About auto mode
Recording motion pictures
Recording time elapsed
Screen indications in the video recording mode
Recording mode
To end the recording
SD card
HDD
Recording still pictures
To record still pictures clearly
Press the Photoshot button fully to take the picture SDR-H20
Size of still pictures Selected recording destination
Screen indications in picture recording mode
Concerning the focusing area SDR-H250
Recording with a shutter operation effect
Picture Size
Side
Zoom in/out function
Move the zoom lever
Digital zoom function
Rotate the LCD monitor towards the lens side
Recording yourself
Recording with the video light SDR-H250
To use the zoom microphone function
To return to normal recording
Backlight compensation function
Fade in/fade out function
Move the joystick up to select ª
Press the recording start/stop button
Soft skin mode
Move the joystick left to select
Move the joystick up to select
To cancel the tele macro function
Tele macro function SDR-H250
Colour night view function
Press the Photoshot button
Self-timer recording
Recording guideline function
Move the joystick left to select Ø
Recording images with a 169 aspect ratio
Wide mode
Image stabilizer function
Wind noise reduction function
To cancel the scene mode function
Scene mode
To cancel the wind noise reduction function
White balance
Manual focus adjustment
To restore to the automatic adjustment
About the white balance sensor a
Set the AUTO/MANUAL/FOCUS switch to Manual
About the black balance adjustment SDR-H250
Manual adjustment mode
To restore to automatic adjustment
Manual shutter speed/ aperture adjustment
Move the joystick left or right to make the adjustment
Manual iris/gain adjustment
Manual shutter speed adjustment
Move the joystick to operate
Motion picture playback
Select the scene to be played back
Press the joystick
To display the recording date during playback
Playing back motion pictures by date
To adjust the volume
Move the volume lever to change the volume level
Frame-by-frame playback
Scenes recorded on the same day are displayed as thumbnails
About still picture compatibility
Still picture playback
Select the file to be played back
Selected medium File number
LSQT1214GN.book 58 ページ 2007年2月8日 木曜日 午後8時50分
Select the scene to be deleted, then press the joystick
Editing scenes
Deleting scenes
Deleting scenes one at a time
Select the scene to be protected, then press the joystick
Using playlists
What is a playlist?
Locking motion picture scenes
To play back a playlist
Creating a new playlist
To add another scene to the same playlist
Adding scenes to playlist
Playing back a playlist
Editing a playlist
Select the scene to start playback, then press the joystick
Press the button in the thumbnail display
Moving scenes
Select the scene to be moved, then press the joystick
Deleting scenes
Deleting files one at a time
Editing still pictures
Deleting still picture files
To continue deleting other files
Locking still picture files
Select the file to be deleted, then press the joystick
Select the file to be protected, then press the joystick
Dpof setting
To cancel all Dpof settings
What is DPOF?
Select the file to be copied, then press the joystick
To cancel copying halfway
Copying still picture files
Select Select or ALL and press the joystick
Displaying HDD information
HDD management
Card management
Formatting HDD
LSQT1214GN.book 69 ページ 2007年2月8日 木曜日 午後8時50分
Start playback on this unit
With a TV
Playback on TV
Connect this unit and a TV
Dubbing images onto other video devices
With a DVD recorder
With a VCR
Dubbing recordings onto a DVD recorder
Select PictBridge # HDD or SD Card and press the joystick
With a printer PictBridge
Connect this unit and a video device
Connect this unit and a printer
Select a file to be printed, then press the joystick
Select the date print setting on Date Print
Select the paper size setting on Paper Size
Select the layout setting on page Layout
LSQT1214GN.book 74 ページ 2007年2月8日 木曜日 午後8時50分
With a computer
Before using with a computer
What you can do with a computer
ImageMixer3 for Panasonic
Operating environment
Disc type
Using Built-in SD Drive
Usable discs
Insert the CD-ROM into the computer
Installation
Installing ImageMixer3 for Panasonic
Reading the software help
Software uninstallation
Connection and recognition procedures
Connection and recognition
Drive icons
About the computer display
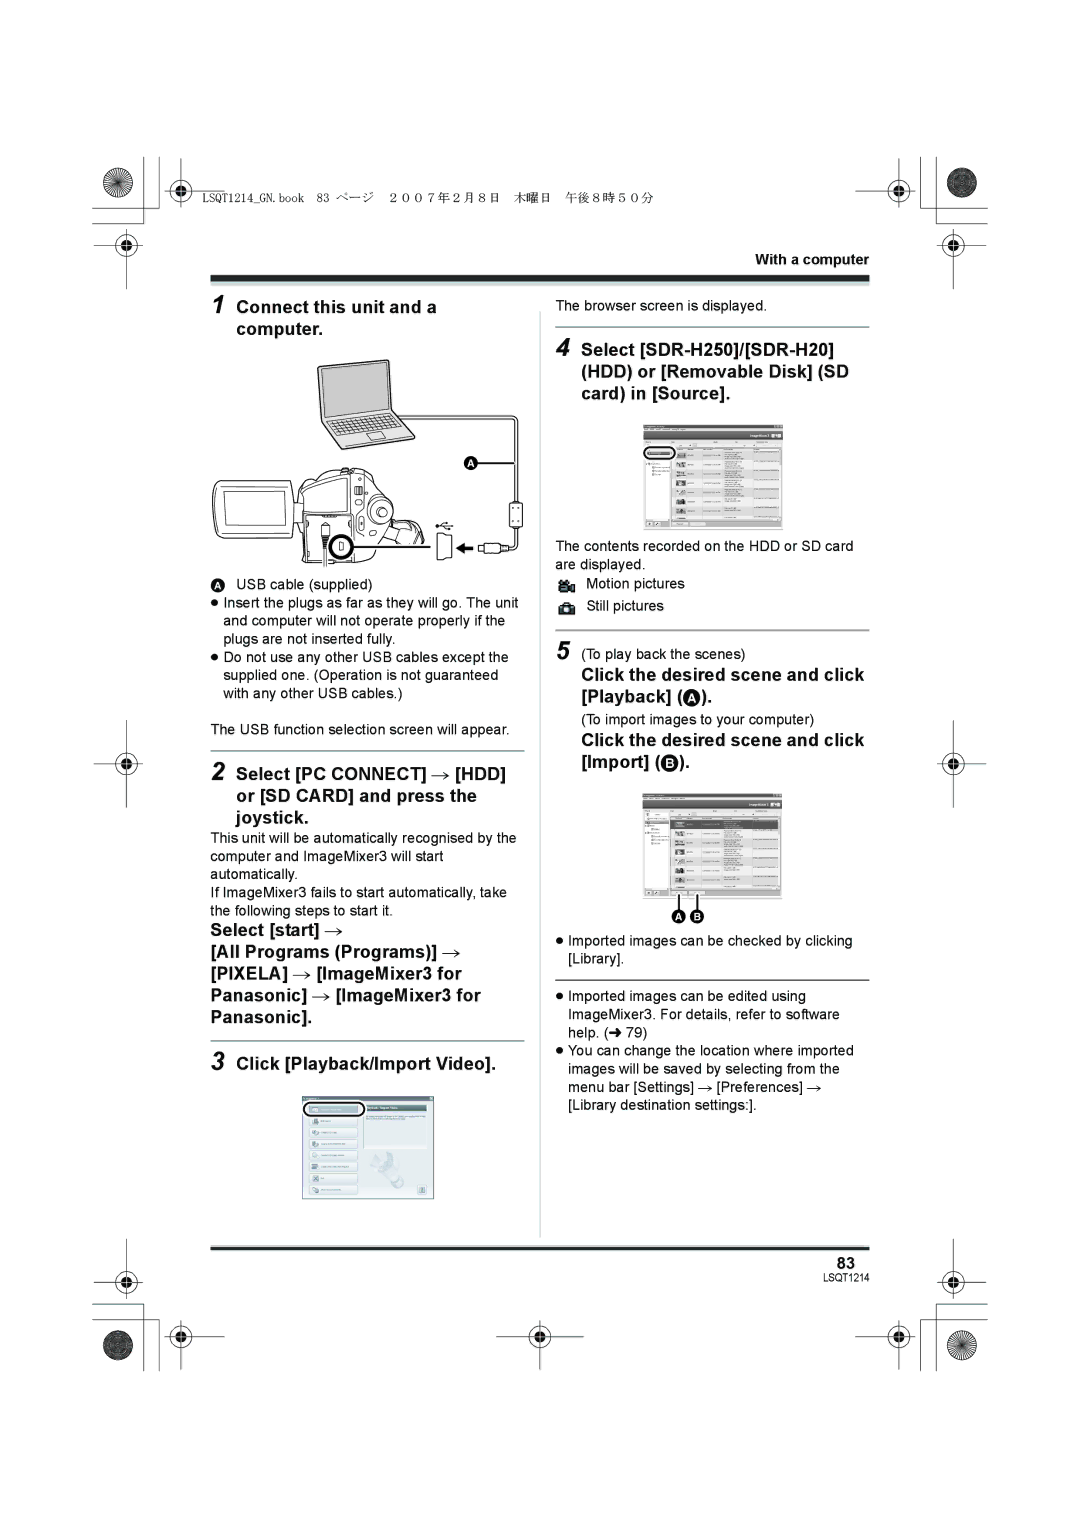
Connect this unit and a computer
Select PC Connect # HDD or SD Card and press the joystick
Double click the icon in task tray
Rotate the mode dial to select or Press the DVD Copy button
To disconnect USB cable safely
DVD Copy function
Insert a DVD disc into the DVD drive
Playing back and importing images
Click the desired scene and click Import B
Click the desired scene and click Playback a
Creating DVD-Video discs with the selected images
Click Still image D
Check the write settings and click OK
To import still pictures
Insert a DVD disc into the DVD drive and click Write tab
Still picture recording menus
Menus
Menu list
Motion picture recording menus
Delete ALL l 64 Select l
Other menus
Still picture playback menus
Flash
Beep
Beeps
Beeps for 4 times
Recording indications
Indications
Indications
Media indications
No.10
Playback indications
Confirmatory indications
Messages
LIMIT. Backup HDD then Format Recommend Data Back
About recovery
Functions that cannot be used simultaneously
Can motion pictures be recorded on an SD card?
Frequently asked questions
What should I do when the HDD is full?
What kind of cards can be used on this unit?
Is editing possible on a computer?
Is playback possible on a computer?
Troubleshooting
Recording stops
≥ Is the memory of the HDD or card full?
Playback picture
Stops # Do not drop or shake this unit while operating it
This unit
≥ Is manual focus mode selected?
Recorded still pictures
Are not clear
≥ Is this unit connected to a computer?
Card then press the Reset button to restart the unit
# SDR-H250 Press the Reset button with the projecting part
SWITCH. is displayed
CD-ROM to your computer. l Will not start even when
Others With a computer
Even if connected by
Reconnect the USB cable An image that should
About this unit
When carrying the unit, do not drop or bump it
About the SD card
About the battery
About the AC adaptor
What to do if the lens is fogged up
LCD monitor
About condensation
Causes of condensation
Auto focus
Explanation of terms
Automatic white balance
White balance
Recording a subject with little contrast
SD Speed Class Rating Class
SD Card/Hard Disk Video Camera
Specifications
Audio output level Line
Dimensions
Operating temperature
Others Video output level
Pictures
Others Still pictures
Picture size
Number of recordable
512 MB
Number of recordable pictures on the HDD or an SD card
30 GB
16 MB 32 MB 64 MB 128 MB
Picture size 640k480 640k360
Others SDR-H20
111
LSQT1214 a