Model No. SDR-SW20P/PC
Thank you for choosing Panasonic
Things You Should Know
Responsible partyPanasonic Corporation of North America
SDR-SW20P
One Panasonic Way, Secaucus, NJ
Support Contact
Important Safety Instructions
AC adaptor
Battery
Battery pack Lithium ion battery pack
Camera and SD card sold separately temperature
Precautions
This symbol is only valid in the European Union
Indemnity concerning recording content
For the purposes of these operating instructions
LCD monitor
Water resistance
Important Water resistance
Underwater use
Care after underwater use
Handling
Card/Battery door and terminal cover
Replacing the water-resistant packing
Lens, microphone and speaker
Contents
Using this unit as an external
Using DVD burners Sold separately
Connecting to a Macintosh Computer
Specifications
Insert the battery
Set the mode dial to OFF Opendoor. the card/battery
Closedoor. the card/battery
Quick guide
Enter the date and time
Open the terminal cover
Plug the DC plug into the DC input terminal on the unit
Set to Start recording Take picture Stop recording
Recording
During playback
Set to Select and enter Picture to view
Parts identification
Accessories
Tripod mounting hole
VW-VBJ10
Handling
Mode dial P.26
Using as strap
Using the 2-way hand strap supplied
Using as a grip belt
Parts identification and handling
Using the LCD monitor
SD Memory Card SD/SDHC Memory Card
Recommended Panasonic SD/SDHC Memory Cards as of December
Type of card Capacity
Be careful when sharing cards between devices
Precautions in handling
Write-protecting cards
Sdhc Memory Cards can be used only with Sdhc devices
Set the mode dial to OFF
Setup 1 Charging
Insert the battery into the unit and charge it
To AC outlet Lever
If the status indicator does the following
Status indicator
Plug the DC plug into the DC input terminal on Unit
Does not flash
Remaining battery capacity indication
Setup
Charging time and recordable time
Charging time Approx hours 15 minutes
Insert/Removecard. the SD
Inserting/Removing SD
Set to icon of desired mode
Turning power ON/OFF
Turning power ON/OFF from the LCD monitor
When not in use, set the mode dial to OFF
Setting Quick Start
Make settings from the menus. P.28
Quick starts
LCD monitor Unit response Status
Display the menu
Setup 5 Setting from the menu
Select the top menu
To return to the previous screen
Select an item Enter the selected item Close the menu
Using the cursor buttons
Setting the date and time
Setting the date and time
Changing the display language
Set to or Select the desired menu
Adjusting the LCD monitor
Adjusting the LCD monitor
Selectitem. and adjust
Changing the display language
Basic stance
Recording 1 Before recording
Taking pictures underwater
White balance sensor Microphone
For SD cards applicable with this unit P.20
Card/battery door
Motion pictures
Automatic recording
Recording
Set to Press
To change recording mode If recording stops
Recording mode and recording times
Recording times for Panasonic SD cards approximate
256
Set to Press Take picture
Still pictures
To remove shutter sound
Anced Effect
To avoid jitter
Picture quality
To change picture quality
Recording 4 Zoom/avoid jitter/maintain
Enlarge Restore
Enlarging zoom
To enlarge further
Avoid jitter image stabilizer function
Picture brightness in dark locations
Maintain brightness in dark locations auto slow shutter
Apply zoom effect to sounds zoom microphone
Display operation icons
Recording 5 Other recording options
Change operation icons
To hide operation icons
Ancedade Color
Fade-in/Fade-out
Other recording options
Self-timer
Backlight compensation function
To quit halfway through
MagicPix function
Soft skin mode
Recording manually
Adjusting focus manually manual focus adjustment
Motion/still pictures
Set to or
To cancel the setting
Using situation-specific settings scene mode
Incandescent lighting
Setting manually
Achieve natural colors white balance
Set to
To return to automatic adjustment
Auto white balance range
Shutter speed adjustment range
Adjusting shutter speed shutter speed
Iris adjustment Gain adjustment Darker
Adjusting brightness iris/gain
Iris/gain value adjustment range
Setting the city and region of your travel destination
Setting home city and region
To cancel
Recording 7 Useful functions
Avoid wind noise wind noise reduction function
Restoring local date and time after returning home
View slants and composition guide lines
Set to
Playback 1 Viewing motion pictures
Select the desired scene
Enter the picture to view
Select the date to display
Power does not shut off when the LCD monitor is closed
Displaying thumbnails by date
Fast forward/rewind playback
Playback
Slow-motion playback
Frame-by-frame playback
Cursor button
Playback 2 Viewing still pictures
To move to the next page either press the left and right
Use a sufficiently charged battery or the AC adaptor
To cancel deletion halfway through
Editing 1 Deletingpictures motion/still
Deleting one picture at a Time
Selecting and deleting Multiple pictures
Deleted pictures cannot be restored
Deleting all pictures
Preventing accidental Deletion
Formatting cards
Formatting cards
Card
Setup Dpof SET ALL
Editing 3 Setting Dpof for still Pictures
To display LCD monitor information on TV
Playback on TV
With other Products
Copying pictures using the AV cable supplied
Copying to video recorders or DVD recorders
Printing pictures from PictBridge printers
To cancel printing
Print settings
Settings not supported by the printer cannot be selected
Available settings
Required equipment as of December
Using DVD burners
Supported discs 12 cm disc
Time required for copying Reference
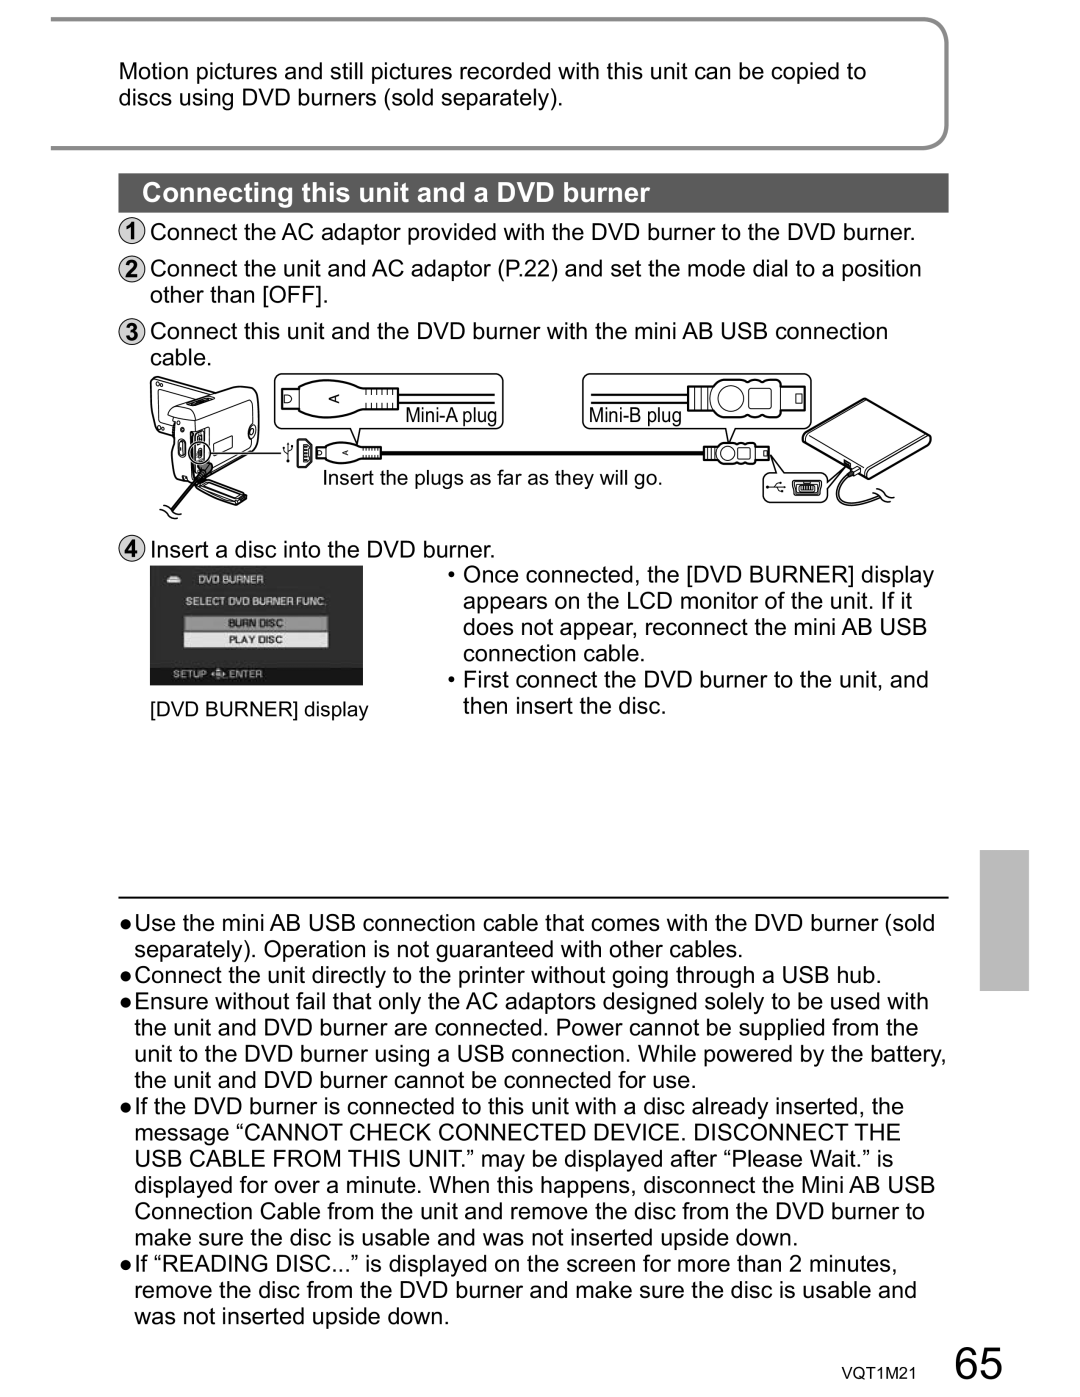
Connecting this unit and a DVD burner
Copying all motion pictures to discs
To cancel copying
Copying still pictures to discs
Select thumbnails Select a date
Copying selected motion pictures to discs
Copying using a DVD burner
Deleting copied motion pictures
Playing back discs
Exiting
With a Computer
Software on the CD-ROM
Video editing software MotionSD Studio 1.3E
DirectX For Windows
End User License Agreement
End User License Agreement
Operating environment required for MotionSD Studio
Operating environment
Microsoft Windows XP Home Edition/Professional
InstallingSTUDIO MotionSD
Uninstalling the software
If the Setup Menu does not start up automatically
Importing motion pictures and still pictures
Using MotionSD Studio
Closing MotionSD Studio
Editing motion pictures and still pictures
Click in the lower right- hand corner of the screen
From the SD Browser screen
Connecting the unit to a computer
Using this unit as an external drive Mass storage
Disconnecting the unit
Bottom right of the unit’s LCD monitor
This unit can be used as an external drive
SD card folder structure
Checking the connections
When the driver is recognized
When the driver is not recognized
Operating environment required for external drives
Connecting the unit to a the computer
Copying still pictures to computers
An icon labeled Noname or Untitled appears on the desktop
Others 1 Menus
Set the mode dial to or
Recording menu
Playback menu
Settings/Notices Mode
Purpose
Setup menu
Date YES / no OFF
Settings/Notices Mode
Others 2 LCD monitor displays
When recording
Motion picture recording display
Still picture recording display
Motion picture playback display
During playback
Still picture playback display
Operating status P.52
Others 3 Messages
Close the card/battery door
Connected to the unit
New disc
Device that cannot be used with this unit is
Battery is swollen
Others 4 Troubleshooting
Power does not turn on
Audio is not output
Motion picture recording stops on its own
Images on the SD card do not look normal
Appear on TV or Terminals? Appear stretched
Vertical TV’s operating instructions Direction
An error message
After disconnecting
USB cable
Appears on
Error
Help mode
Soft skin mode Set and cancel
Scene mode
Balance mode
Others 5 Cautions for use
When using the unit
SD cards
Battery
LCD monitor
AC adaptor
Shock proof
Cleaning
Condensation
SD Video Camera Information for your safety
Others 6 Specifications
Specifications may change without prior notice
AC adaptor Information for your safety
Battery pack Information for your safety
Others
Optional accessories
Accessory No Description
Visa
Accessory Order Form For USA Customers
Request for Service Notice USA Only
For hearing or speech impaired TTY users, TTY
Customer Services Directory For USA only
Limited Warranty Coverage
Panasonic Video Products Limited Warranty
Limited Warranty For USA Customers
Limited Warranty Limits And Exclusions
Carry-In, Mail-in Prepaid or In-Home Service
Panasonic Product Limited Warranty
Warranty For Canadian Customers
Numerics
Index
Inserte la batería
Spanish Quick Use Guide/Guía española
Cierre la tapa de la tarjeta/batería
Conecte el adaptador de CA suministrado
Introduzcahora. la fecha y la
Para el uso rápido
Abra la cubierta del terminal
Grabación
Durante la reproducción Seleccione SÍ
Póngalo en
114 VQT1M21
VQT1M21
Panasonic Canada Inc
Panasonic Puerto Rico, Inc
Ambler Drive, Mississauga, Ontario, L4W 2T3
VQT1M21
OK~
MtOOO·l§jM
Made in China Fabriqu8 en Chine
Eas for life
UOlleJISI6aUIJnpOJd JIUOSeUed