Camera operation setting [CAMERA SETUP]

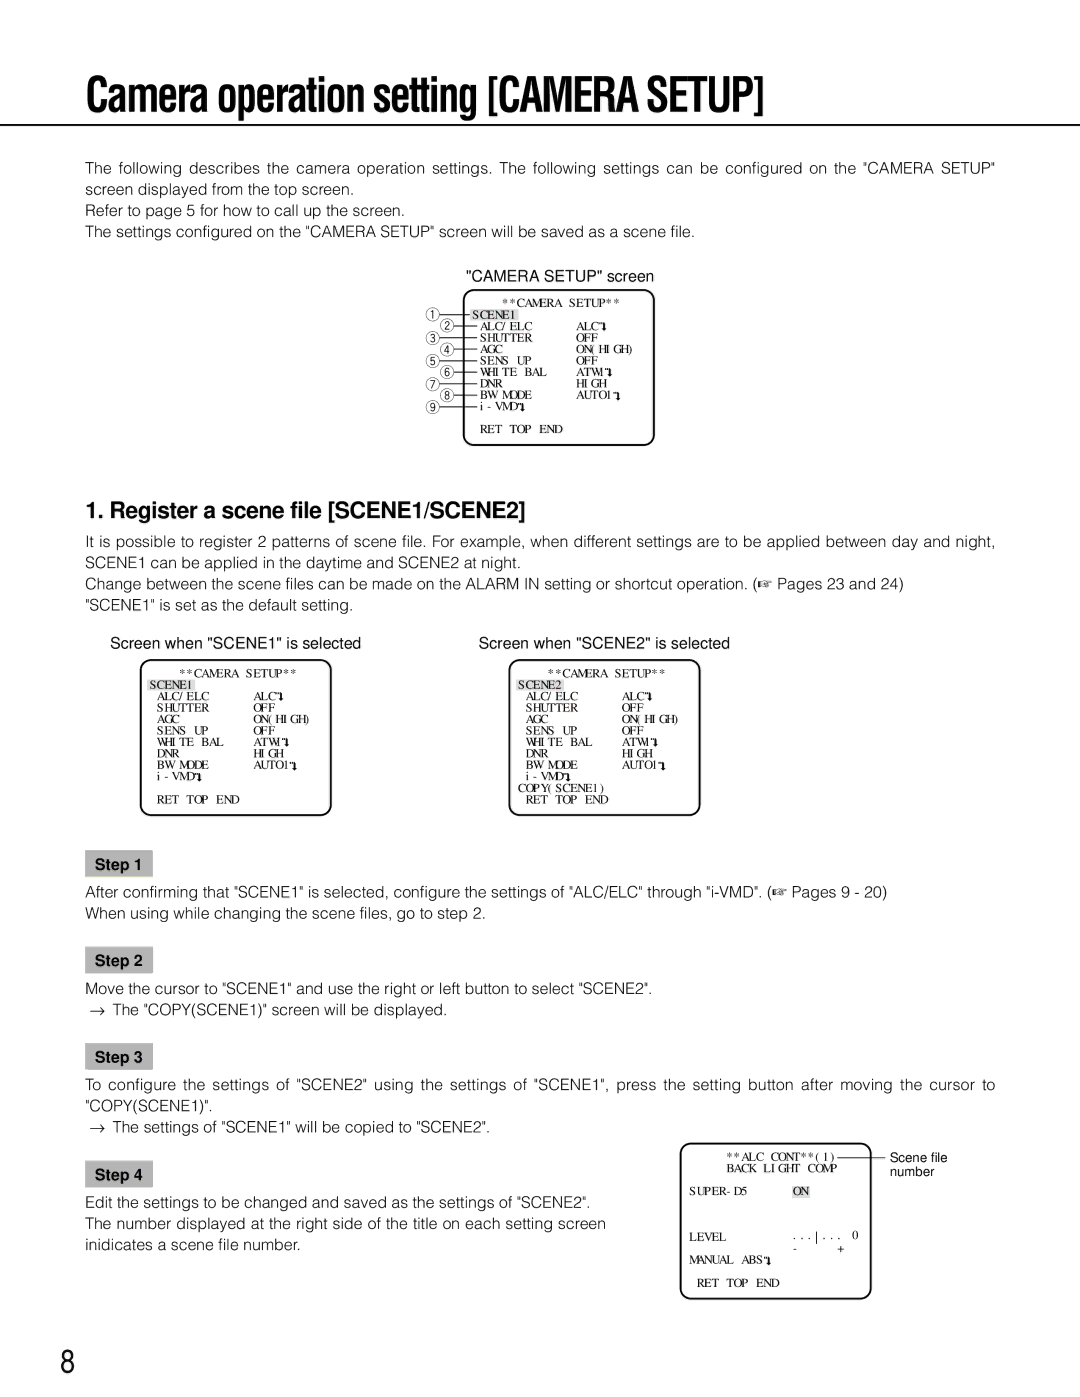
The following describes the camera operation settings. The following settings can be configured on the "CAMERA SETUP" screen displayed from the top screen.

Refer to page 5 for how to call up the screen.

The settings configured on the "CAMERA SETUP" screen will be saved as a scene file.

"CAMERA SETUP" screen

q


**CAMERA SETUP**


SCENE1


w


ALC


e


ALC/ELC


SHUTTER

OFF

r


t


AGC

ON(HIGH)


SENS UP

OFF

y


u


WHITE BAL

ATW1


DNR

HIGH

i


o


BW MODE

AUTO1


i-VMD


RET TOP END

1. Register a scene file [SCENE1/SCENE2]

It is possible to register 2 patterns of scene file. For example, when different settings are to be applied between day and night, SCENE1 can be applied in the daytime and SCENE2 at night.

Change between the scene files can be made on the ALARM IN setting or shortcut operation. (+ Pages 23 and 24) "SCENE1" is set as the default setting.

Screen when "SCENE1" is selected

Screen when "SCENE2" is selected


**CAMERA SETUP**


**CAMERA SETUP**


SCENE1


ALC


SCENE2


ALC


ALC/ELC


ALC/ELC


SHUTTER

OFF


SHUTTER

OFF


AGC

ON(HIGH)


AGC

ON(HIGH)


SENS UP

OFF


SENS UP

OFF


WHITE BAL

ATW1


WHITE BAL

ATW1


DNR

HIGH


DNR

HIGH


BW MODE

AUTO1


BW MODE

AUTO1


i-VMD


i-VMD


RET TOP END


COPY(SCENE1)


RET TOP END


Step 1

After confirming that "SCENE1" is selected, configure the settings of "ALC/ELC" through "i-VMD". (Pages 9 - 20) When using while changing the scene files, go to step 2.

Step 2

Move the cursor to "SCENE1" and use the right or left button to select "SCENE2".

The "COPY(SCENE1)" screen will be displayed.

Step 3

To configure the settings of "SCENE2" using the settings of "SCENE1", press the setting button after moving the cursor to "COPY(SCENE1)".

The settings of "SCENE1" will be copied to "SCENE2".

Step 4

Edit the settings to be changed and saved as the settings of "SCENE2". The number displayed at the right side of the title on each setting screen inidicates a scene file number.

**ALC CONT**(1)


Scene file

BACK LIGHT COMP


number

SUPER-D5


ON


LEVEL

...... 0


MANUAL ABS


-


+


RET TOP END

8

Page 8
Image 8
Panasonic wv-cp500 Register a scene file SCENE1/SCENE2, Screen when SCENE1 is selected, Screen when SCENE2 is selected

wv-cp500 specifications

The Panasonic WV-CP500 and WV-CP504 are advanced surveillance cameras renowned for their reliability, image quality, and versatile features. These cameras are part of Panasonic's comprehensive line of surveillance solutions, designed to meet the demands of various commercial and industrial applications.

Both models are equipped with a high-resolution 1/3-inch CCD image sensor, capable of delivering stunning video quality at resolutions up to 540 TV lines for the WV-CP500 and 480 TV lines for the WV-CP504. This high resolution ensures that users can capture clear, detailed images, making it easier to identify subjects and monitor activities in real time.

One of the standout features of the WV-CP500 and WV-CP504 is their exceptional low-light performance. The cameras possess a minimum illumination capability of just 0.5 lux, which allows for effective monitoring even in dimly lit environments. This is particularly advantageous for security applications in areas with varying light conditions, such as parking lots and retail stores.

Both models also incorporate advanced technologies such as Adaptive Black Stretch and Automatic Gain Control (AGC). Adaptive Black Stretch enhances visibility in dark areas without affecting the bright areas of an image, allowing for a more comprehensive view of the scene. AGC helps ensure that the camera maintains optimal brightness levels, enhancing the image quality in changing lighting conditions.

In terms of practical features, the WV-CP500 and WV-CP504 offer multiple lens options, allowing users to customize their surveillance setup according to specific needs. The cameras support various mounting types, including ceiling and wall installations, making them versatile enough for a wide range of settings.

Panasonic has prioritized durability with these models, and both are designed to operate effectively in challenging environments. They feature robust housings that can withstand dust and moisture, which is critical in outdoor applications or industrial settings. The cameras are also equipped with advanced digital signal processing, which optimizes the image for superior clarity and detail.

Furthermore, the WV-CP500 and WV-CP504 are compatible with various Panasonic video management systems, enabling seamless integration into existing surveillance setups. This compatibility allows for efficient monitoring and management of multiple camera feeds, providing users with a comprehensive security solution.

In summary, the Panasonic WV-CP500 and WV-CP504 surveillance cameras offer excellent image quality, versatile mounting options, and robust durability. Their innovative features and technologies make them ideal choices for businesses and organizations looking to enhance security and monitor their premises effectively.