7.Insert the mounting base into the hole made in Step 1.
8. Secure the mounting base to the ceil- |
ing board with the ceiling board fixing |
screws (4 positions). |
q Engage the top of the mounting base |
with the 1st anchor bolt. |
w Secure the mounting base with dou- |
ble nuts. |
e Secure the mounting base by turning |
the ceiling board fixing screws clock- |
wise. |
1st anchor bolt
Nut |
| Insert the anchor bolt |
| ||
| ||
|
| |
|
|
|
|
|
|
|
|
|
|
|
|
|
|
|
|
|
|
|
|
|
|
|
|
|
|
|
Double nuts ![]()
![]()
![]()
![]()
![]()
Ceiling board fixing screw
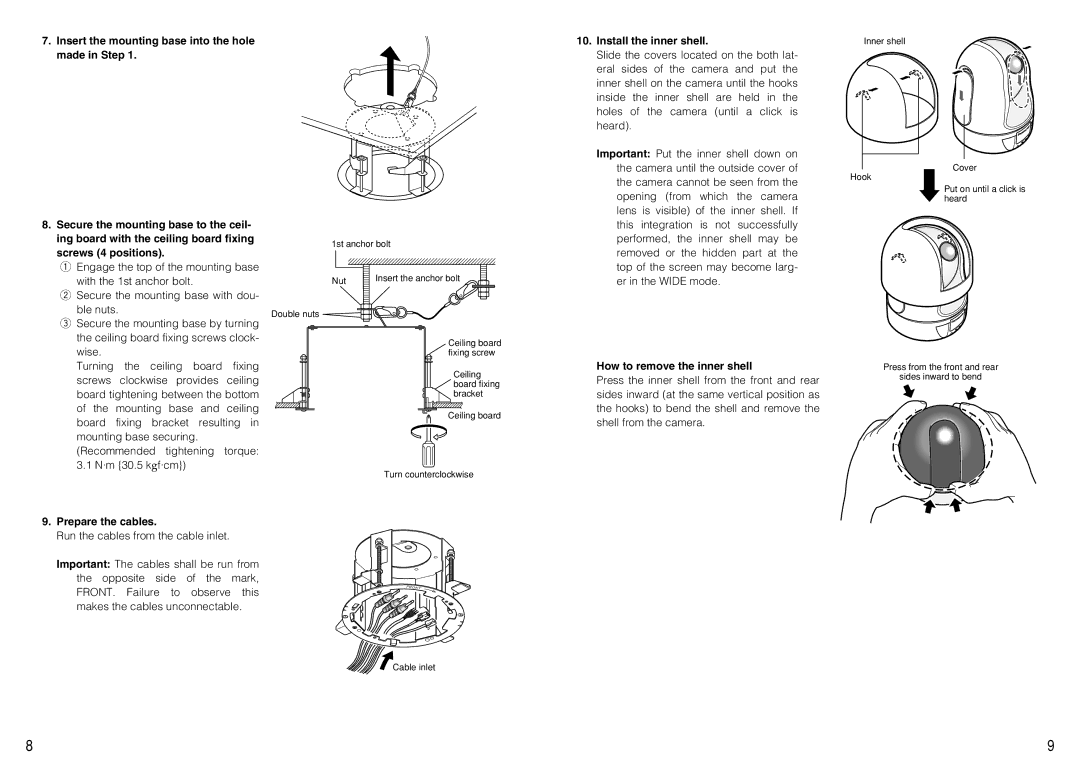
10.Install the inner shell.
Slide the covers located on the both lat- eral sides of the camera and put the inner shell on the camera until the hooks inside the inner shell are held in the holes of the camera (until a click is heard).
Important: Put the inner shell down on the camera until the outside cover of the camera cannot be seen from the opening (from which the camera lens is visible) of the inner shell. If this integration is not successfully performed, the inner shell may be removed or the hidden part at the top of the screen may become larg- er in the WIDE mode.
Inner shell
Cover
Hook
Put on until a click is
heard
Turning the ceiling board fixing | |||
screws | clockwise provides | ceiling | |
board tightening between the bottom | |||
of the mounting base and ceiling | |||
board fixing bracket resulting in | |||
mounting base securing. |
| ||
(Recommended | tightening | torque: | |
3.1 N·m {30.5 kgf·cm}) |
| ||
9. Prepare the cables. |
|
| |
Run the cables from the cable inlet. | |||
Important: The cables shall be run from | |||
the opposite side of the mark, | |||
FRONT. | Failure | to observe this | |
makes the cables unconnectable. | |||
Ceiling board fixing bracket
Ceiling board
Turn counterclockwise
How to remove the inner shell | Press from the front and rear |
Press the inner shell from the front and rear | sides inward to bend |
sides inward (at the same vertical position as |
|
the hooks) to bend the shell and remove the |
|
shell from the camera. |
|
![]() Cable inlet
Cable inlet
8 | 9 |