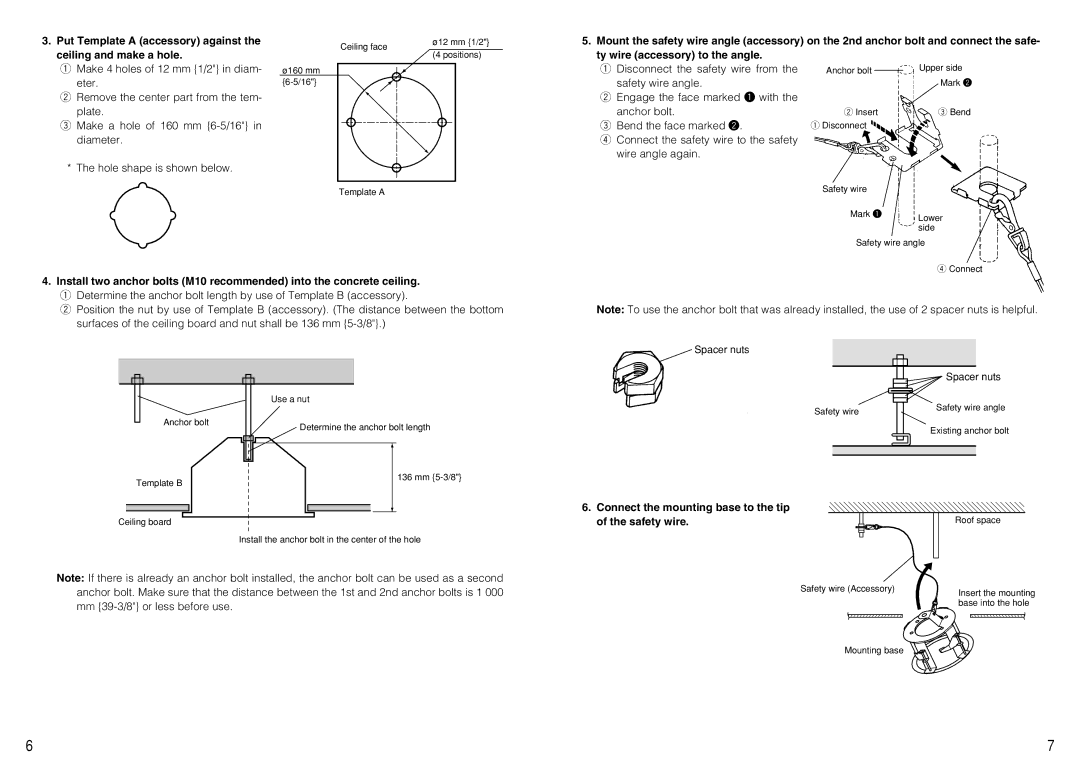
3.Put Template A (accessory) against the ceiling and make a hole.
q Make 4 holes of 12 mm {1/2"} in diam- eter.
w Remove the center part from the tem- plate.
e Make a hole of 160 mm
*The hole shape is shown below.
Ceiling face | ø12 mm {1/2"} | |
(4 positions) | ||
|
ø160 mm
Template A
5.Mount the safety wire angle (accessory) on the 2nd anchor bolt and connect the safe- ty wire (accessory) to the angle.
q Disconnect the safety wire from the | Anchor bolt | Upper side |
safety wire angle. |
| Mark w |
w Engage the face marked q with the |
|
|
anchor bolt. | w Insert | e Bend |
e Bend the face marked w. | q Disconnect |
|
r Connect the safety wire to the safety |
|
|
wire angle again. |
|
|
Safety wire |
|
Mark q | Lower |
| |
| side |
Safety wire angle | |
| r Connect |
4.Install two anchor bolts (M10 recommended) into the concrete ceiling. q Determine the anchor bolt length by use of Template B (accessory).
w Position the nut by use of Template B (accessory). (The distance between the bottom surfaces of the ceiling board and nut shall be 136 mm
Use a nut
Anchor bolt
Determine the anchor bolt length
Note: To use the anchor bolt that was already installed, the use of 2 spacer nuts is helpful.
![]() Spacer nuts
Spacer nuts
Spacer nuts
Safety wire | Safety wire angle | ||
|
| ||
|
| Existing anchor bolt | |
|
|
|
|
|
|
|
|
Template B
Ceiling board
136 mm
6. Connect the mounting base to the tip |
|
of the safety wire. | Roof space |
Install the anchor bolt in the center of the hole
Note: If there is already an anchor bolt installed, the anchor bolt can be used as a second anchor bolt. Make sure that the distance between the 1st and 2nd anchor bolts is 1 000 mm
Safety wire (Accessory) | Insert the mounting |
| |
| base into the hole |
Mounting base |
|
6 | 7 |
