DVR5100 Series Hybrid Video Recorder
Page
Contents
Managing Exported Video
Setting Service Permissions
List of Illustrations
C1697M-B 11/08
Page
List of Tables
Welcome
Function DVR5100 Remote Client
Installing the Remote Client
Installing the Remote Client Application
Minimum System Requirements
Close all programs, including any antivirus software
Getting Started
Setting UP Server Connections
Creating a NEW Connection
Dialog Box
Logging on
Main Application Window Overview
8 layout
C1697M-B 11/08
Remote Client Controls and Shortcuts
Tooltips
Shortcut Menus
Keyboard Shortcuts
Monitoring Live Video and Audio
Operating the Remote Client
Selecting Video to Display
Disconnecting Cameras
Using Filters to Limit the Camera List
To set up a filter
Filtering the Camera View
Removing Camera Locations and Group Filters
Arranging Cameras in the Explorer View
Navigation Explorer View, Sorted by Camera Number
Video Controls
Icon Description
Adjusting the Iris
Adjusting the Focus
Using Digital Zoom Controls
Controlling PTZ Cameras
Digital Zoom Controls
Presets
Using PATTERNS, PRESETS, and Scans
Patterns
Scans
To scan is to view an area by automatically panning a camera
Rotate the Camera
Stopping a Scan
Zoom In and Out
Activating the Wiper Command
Motion Detection
Device Properties and Settings
Viewing Device Properties
Viewing Advanced Device Properties
Click OK to close this screen
Viewing Diagnostic Properties
Camera Settings
DVR5100 can be queried for diagnostic information
Accessing a Camera Menu
Using Camera Menus
Exiting a Camera Menu
Executing Scripts
Action Description
Activating a Script Manually
Stopping a Script
Alarms, Relays, and Manual Recording
Working with Alarms
Alarm Notification
Acknowledging AN Alarm
Snoozing AN Alarm
Reading Alarm Comments
Adding a Note to the System LOG
Sending ALL Associated Cameras to the Workspace
C1697M-B 11/08
Activating Relays
Activating a Relay
Manually Recording a Video Segment
Manually Recording Video and Audio
Stopping a Manual Recording
Quick Search
Searching for Video
Perform one of the following options
Performing AN Enhanced Search
Enhanced Search
Scroll backward by rotating your mouse wheel Click zoom out
To specify the time range manually, do one of the following
Enhanced Search Filters Area
Specifying Cameras AS Search Criteria
Removing Cameras
Specifying Recording Type Filters
Reviewing Enhanced Search Results
Locking and Unlocking Search Results
Printing Enhanced Search Results
Locking a Search Result
Unlocking a Search Result
Playing Back Video
Number of Clicks Speed
Standard Playback
4X normal speed 15X normal speed 60X normal speed
Synchronous Playback
Synchronous Playback
Exporting Video
Exporting Live or Recorded Video
Starting AN Export Process
Stopping AN Export Process
Go to Live Command
Exporting Recorded Video During Playback
Exporting ALL Video Frames
Capturing and Exporting Snapshots
Managing Exported Video
Capturing a Snapshot
C1697M-B 11/08
Working with System Logs
Logged Main Events Logged Sub Events
Searching the System LOG
Viewing the System LOG
Click Search Log
C1697M-B 11/08
Exporting a System LOG
Printing a System LOG
Adding Manual LOG Entries
Setup Using the Remote Client
Remote Client Setup Screen
Configuring Devices
AlarmArray Camera
Selecting a Device
Icon Device Type
Restoring Device Defaults
Copying Device Settings
Naming Devices
Assigning a Device Location
Table H. Devices
Working with Devices
Device Icon Description
Cameras
Working with the General TAB
Selecting Video Termination
Operating a Camera in Covert Mode
Creating a Camera Group
Adding Cameras to a Camera Group
Selecting a Camera Group
Deleting a Camera Group
Modifying a Camera Group Name
Setting Up Audio Associations
Camera Association
Setting the Noise Filter
Working with the Configuration TAB
Configuring the Camera Settings
Understanding the Motion Threshold
Working with the Motion TAB
Option Description
Understanding the Threshold Percent
Blocks. These values are derived as follows
Motion Zone and Threshold Blocks Example
Setting Up Motion Detection
Clearing Motion Detection Settings
Working with the Audio TAB
Click Clear. All three motion zones are cleared
Accessing DVR Options
Enabling Audio Service
Setting UP the Serial Port
Alarm Array
Specifying the DVR Name and Location
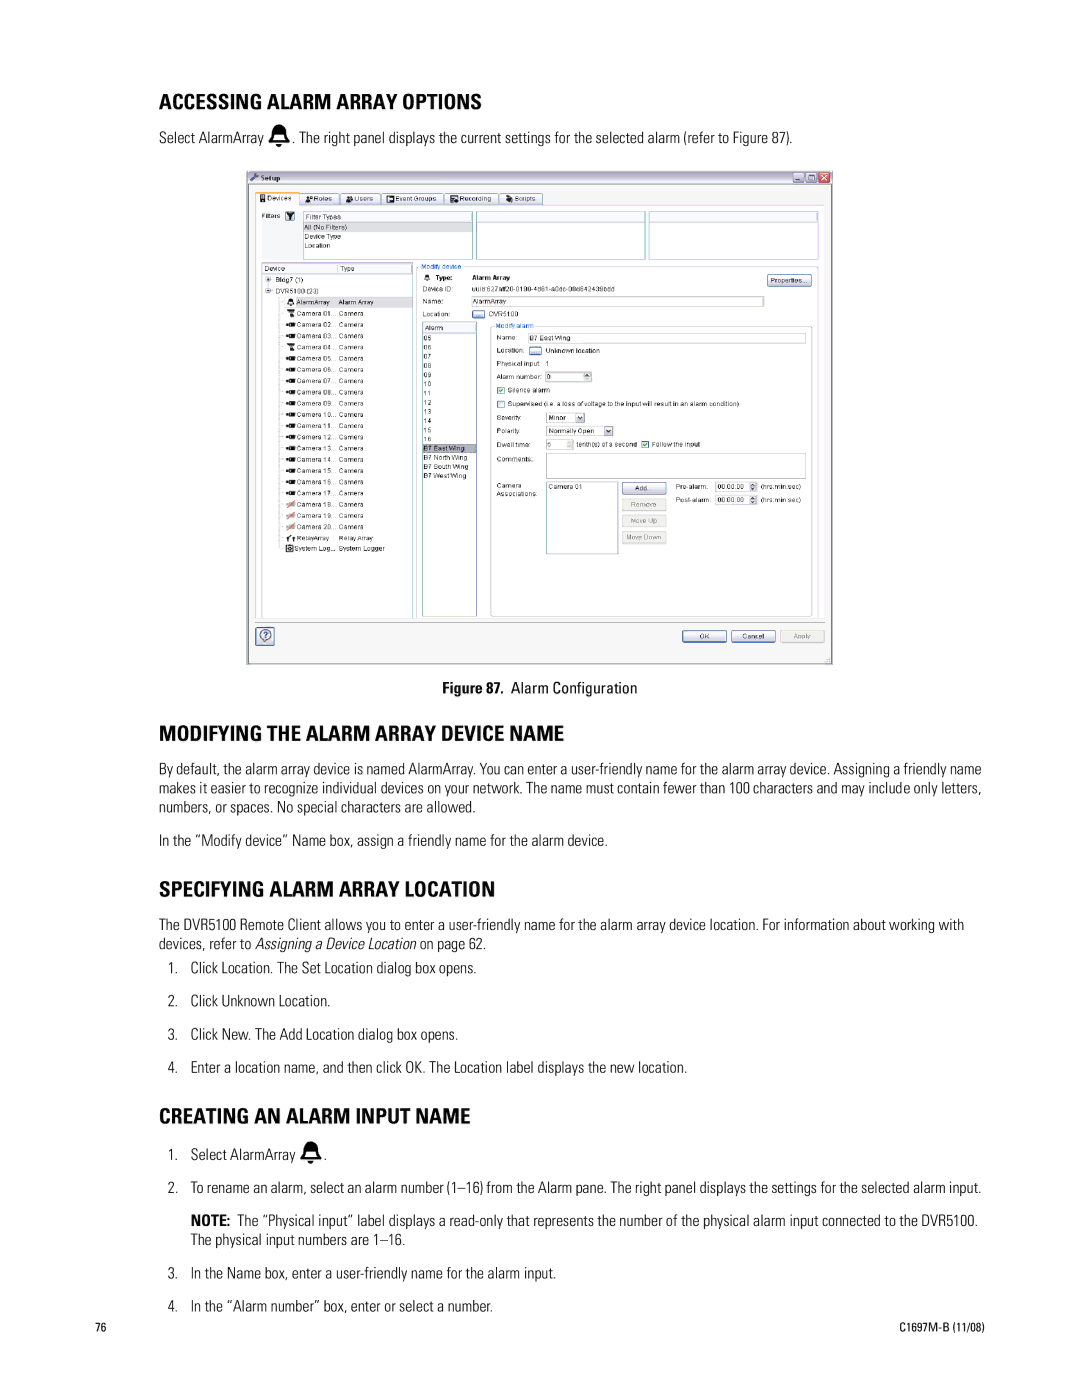
Accessing Alarm Array Options
Modifying the Alarm Array Device Name
Specifying Alarm Array Location
Creating AN Alarm Input Name
Setting Alarm Response Characteristics
Specifying AN Alarm Input Location
Setting AN Alarm Input Polarity and Dwell Time
Relay Array
Accessing Relay Array Options
Modifying the Relay Array Device Name
Setting Relay Output Characteristics
Accessing the System Logger Options
System Logger
Specifying a Relay Array Location
Modifying the System Logger Device Name
Setting the Pruning Period
Selecting the LOG Level
Using a Default Role
Administrator
Maximum Level of Access
Option Label Default Value Role Administrator
Option Label Default Value
Manager
Operator
Option Label
Adding a NEW Role
Table M. Operator Role Default Settings Sheet 2
Guest
Assigning Permissions to System Features
Assigning Permissions
Setting Service Permissions
Selecting Services
Setting Device Permissions
Excluding Devices and Services
Deleting a Role
Adding NEW Users
Managing Users
Assigning a Role to a User
Viewing User Permissions
Selecting User Notification Preferences
Setting UP Export and Snapshot Defaults
Displaying the Time Zone
Setting Up Exported Files Default Directory
Editing Default User Settings
Removing Users
Configuring Event Groups
Adding a NEW Event Group
Setting PRE- and POST-ALARM Video Recording Times
Deleting AN Event Group
Recording Schedule Setup
Recording Schedule Screen
Deleting a Recording Schedule
Clearing a Weekday Schedule
Creating a Recording Schedule
Copying and Reusing a Recording Schedule
Modifying a Recording Schedule
Recording Storage Setup
Global Settings
Endurastor Settings
Privacy Settings
Estimated Alarm Video
Estimated Storage
Creating Scripts
Adding a Script
Modifying Script Content
104 C1697M-B 11/08
Modifying a Script Schedule
Deleting a Script
Accessing Exported Files
Tools Setup
Working with the Endura Player
Playing Back Exported Files
Volume Control
Opening a File
Authenticating a File
ON-SCREEN Playback Controls
Authentication Succeeded
Exported File Properties
112 C1697M-B 11/08
Modifying Player Settings
Go to Tools Setup. a dialog box appears
Using Extended View
Player with Motion Overlays
Index
Setting up 69 notification
Features, access to 81 filters Camera
Access to devices, limiting 86 assigning
Preconfigured Service permissions, setting
Unlock video 81 unsupervised alarm mode 75 user
Activating 27 script
Selecting devices 90 permissions, viewing 89 profile
Page
Product Warranty and Return Information