' Apply sill flashing tape #2. Cut a piece of flashing tape 12" longer

THAN THE OPENING WIDTHE!PPLY ATYTHEABOTTOM HOVERLAPPINGPTAPE BYY

at least 1". DO NOT allow the tape to extend past the interior face of

THEHFRAMINGR' 

Note: The flashing tape may not fully cover the framing members.

H. Install and level sill spacers. 0LACE EWIDE BYY THICK SPACERS ONK the bottom of the window opening 1/2" from each side. Spacers are also required at points where windows are joined in multiple window applications. Add shims as necessary to ensure the spacers are level. Once level, attach spacers and shims to prevent movement.

Note: Improper placement of shims or spacers may result in bowing the bottom of the window.

2 PREPARE THE WINDOW

1G

1H

A.Remove plastic wrap and cardboard packaging from window. DO NOT cut the checkrail bands or remove plastic shipping spacers located between the window sash and frame. The shipping spacers will help keep the window square during installation. DO NOT open the window until it is fully fastened.

Note: If screens, grilles or hardware are removed from


the window at this time, label them and store them in a

2B

protected area.


B. Fold out installation fin to 90°. Be careful not to remove


or tear the fin corners.


Note: If the fin is not at 90°, the window will not line up


correctly on the interior.

PLACEMENT DIAGRAM


Note: If installing the window using frame screws, proceed to Step 3 - SETTING THE WINDOW.

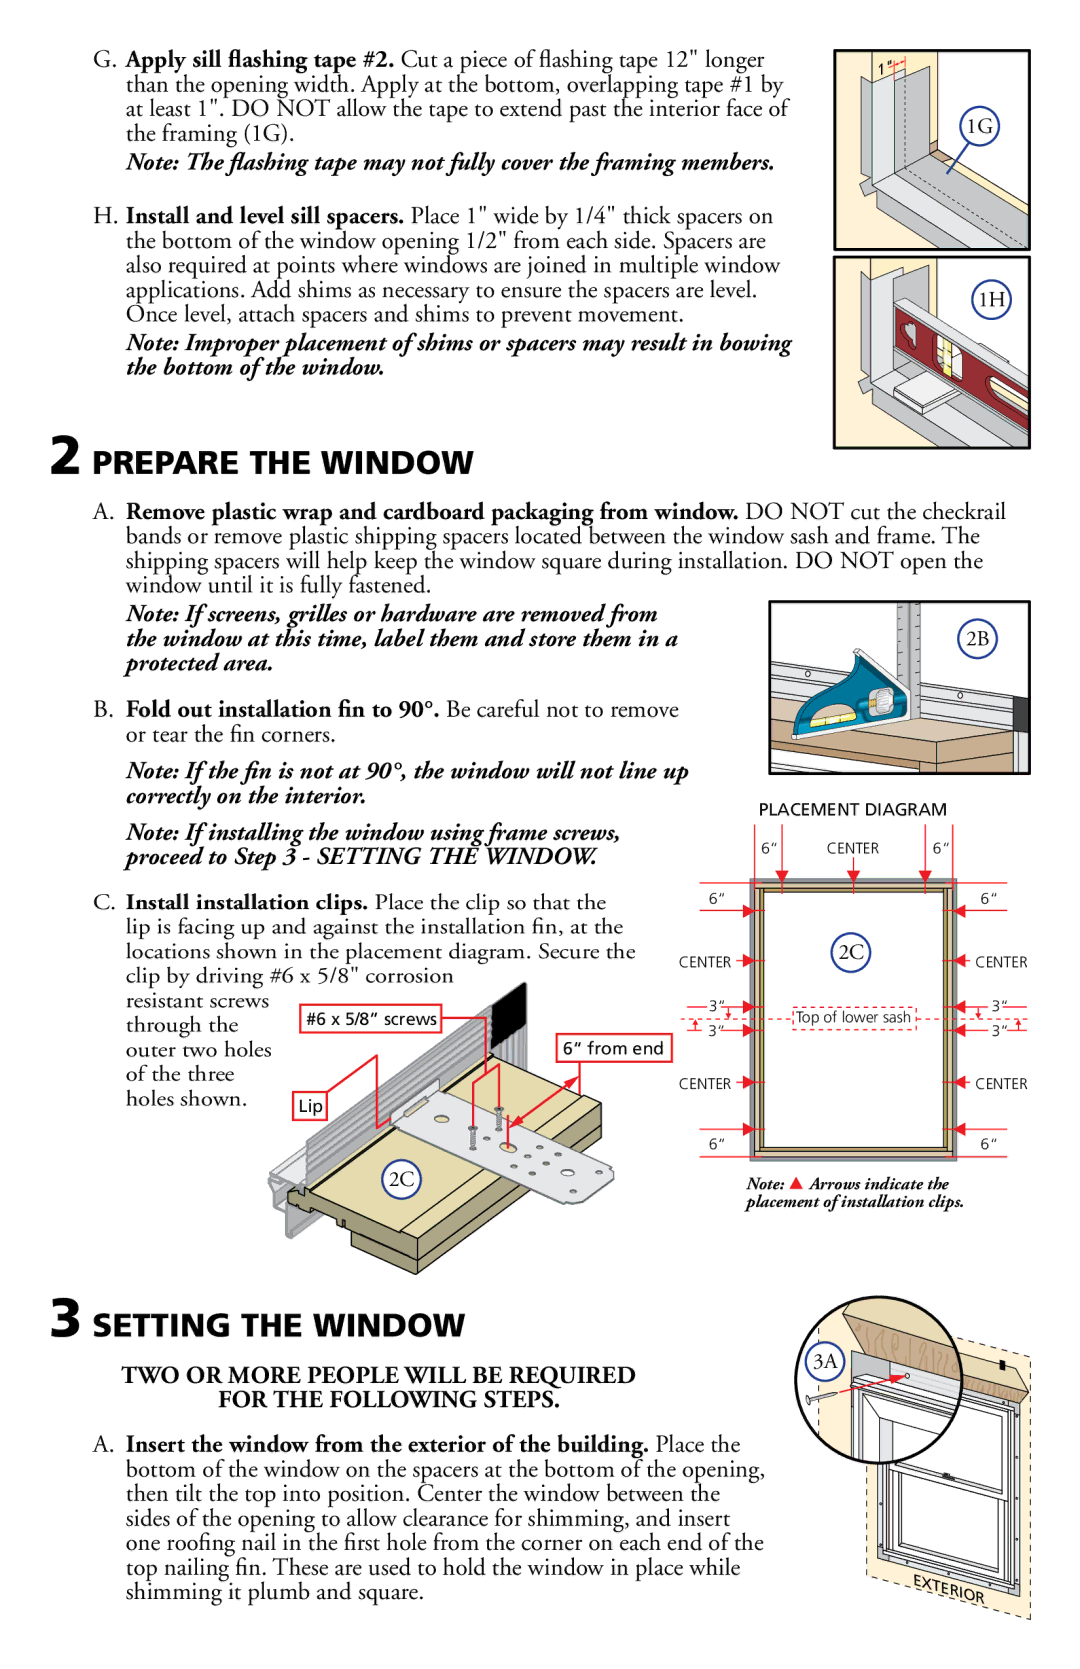
C.Install installation clips. Place the clip so that the lip is facing up and against the installation fin, at the

locations shown in the placement diagram. Secure the

CLIP BYYDRIVINGI X  CORROSIONI

resistant screws

#6 x 5/8” screws

through the

outer two holes

6“ from end

of the three


holes shown.

Lip


2C

6“

CENTER

6“

6“


6“

CENTER


2C


CENTER


3“


3“


3“


Top of lower sash


3“


CENTER


CENTER


6“


6“


Note: Arrows indicate the placement of installation clips.

3 SETTING THE WINDOW

TWO OR MORE PEOPLE WILL BE REQUIRED FOR THE FOLLOWING STEPS.

3A

A.Insert the window from the exterior of the building. Place the

bottom of the window on the spacers at the bottom of the opening, then tilt the top into position. Center the window between the sides of the opening to allow clearance for shimming, and insert one roofing nail in the first hole from the corner on each end of the top nailing fin. These are used to hold the window in place while shimming it plumb and square.

Page 3
Image 3
Pella 80ED0101 Prepare the Window, Setting the Window, Insert the window from the exterior of the building. Place

80ED0101 specifications

The Pella 80ED0101 is a remarkable door model that exemplifies Pella's commitment to quality, innovation, and aesthetic appeal. Specifically designed for both residential and commercial applications, this door is intrinsic to enhancing the overall functionality and appearance of an entryway.

One of the standout features of the Pella 80ED0101 is its robust construction. The door is engineered with a sturdy fiberglass exterior, making it highly resistant to warping, cracking, and splitting. This not only results in longevity but also ensures low maintenance over the years, as fiberglass can withstand extreme weather conditions without significant deterioration.

In terms of energy efficiency, the Pella 80ED0101 excels in providing superior insulation. The door includes a core of high-density polyurethane foam, which significantly reduces thermal transfer, keeping interiors comfortable in both hot and cold climates. Furthermore, the door is equipped with double or triple-pane insulated glass options that reduce energy consumption, making the Pella 80ED0101 an environmentally-friendly choice.

Appearance plays a crucial role in entryway selection, and the Pella 80ED0101 does not disappoint. Available in customizable options, homeowners can choose from a variety of finishes, colors, and sizes to fit their specific aesthetic preferences. The door's sleek design can seamlessly blend with various architectural styles, enhancing curb appeal and property value.

Security is also a priority with the Pella 80ED0101. It features an advanced locking system that provides enhanced security against forced entry, making it ideal for protecting homes and businesses. The lock system works in conjunction with a heavy-duty frame and reinforced hinges, ensuring a secure fit in the doorframe.

Moreover, the Pella 80ED0101 is equipped with innovative technologies such as the Easy-Glide roller system for smooth operation in sliding doors and the SmartKey security feature for convenient re-keying of locks.

In summary, the Pella 80ED0101 is a multifaceted door option that combines durability, energy efficiency, aesthetic appeal, and security. Its advanced design and technology cater to the modern homeowner, offering peace of mind and style in one package. With its impressive characteristics, the Pella 80ED0101 stands out as a top choice for anyone looking to enhance their entryways.