8
Section 2: Replacing light fixture in existing pools (Continued)
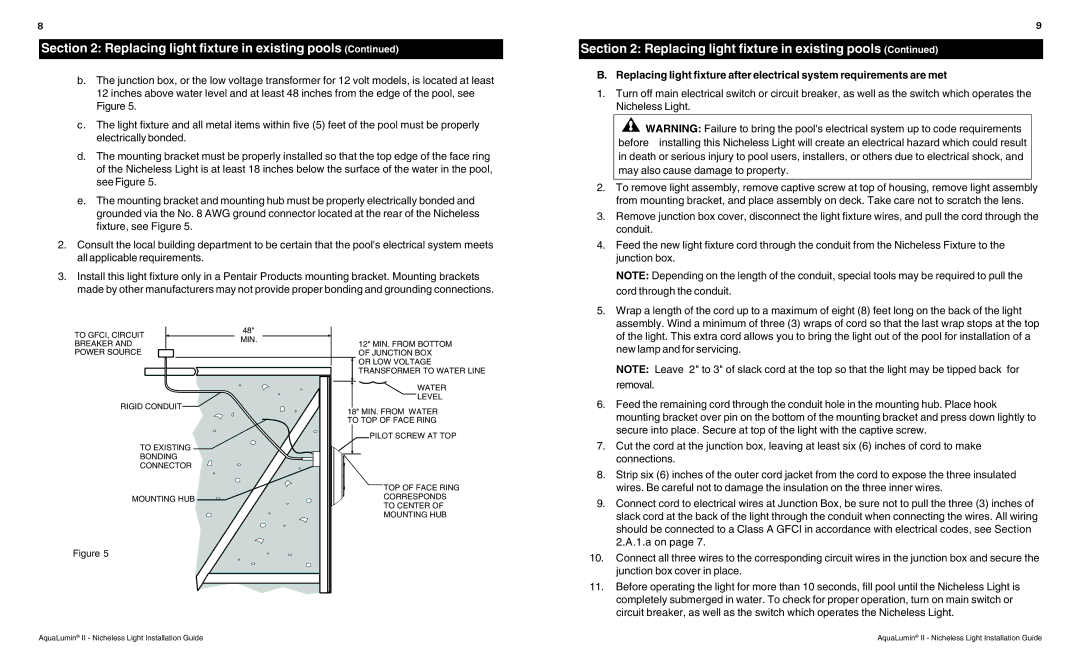
b.The junction box, or the low voltage transformer for 12 volt models, is located at least 12 inches above water level and at least 48 inches from the edge of the pool, see Figure 5.
c.The light fixture and all metal items within five (5) feet of the pool must be properly electrically bonded.
d.The mounting bracket must be properly installed so that the top edge of the face ring of the Nicheless Light is at least 18 inches below the surface of the water in the pool, see Figure 5.
e.The mounting bracket and mounting hub must be properly electrically bonded and grounded via the No. 8 AWG ground connector located at the rear of the Nicheless fixture, see Figure 5.
2.Consult the local building department to be certain that the pool's electrical system meets all applicable requirements.
3.Install this light fixture only in a Pentair Products mounting bracket. Mounting brackets made by other manufacturers may not provide proper bonding and grounding connections.
9
Section 2: Replacing light fixture in existing pools (Continued)
B. Replacing light fixture after electrical system requirements are met
1.Turn off main electrical switch or circuit breaker, as well as the switch which operates the Nicheless Light.
![]() WARNING: Failure to bring the pool's electrical system up to code requirements before installing this Nicheless Light will create an electrical hazard which could result in death or serious injury to pool users, installers, or others due to electrical shock, and may also cause damage to property.
WARNING: Failure to bring the pool's electrical system up to code requirements before installing this Nicheless Light will create an electrical hazard which could result in death or serious injury to pool users, installers, or others due to electrical shock, and may also cause damage to property.
2. | To remove light assembly, remove captive screw at top of housing, remove light assembly |
| from mounting bracket, and place assembly on deck. Take care not to scratch the lens. |
3. | Remove junction box cover, disconnect the light fixture wires, and pull the cord through the |
| conduit. |
4. | Feed the new light fixture cord through the conduit from the Nicheless Fixture to the |
| junction box. |
| NOTE: Depending on the length of the conduit, special tools may be required to pull the |
| cord through the conduit. |
5. | Wrap a length of the cord up to a maximum of eight (8) feet long on the back of the light |
| assembly. Wind a minimum of three (3) wraps of cord so that the last wrap stops at the top |
TO GFCI, CIRCUIT | 48" | |
MIN. | ||
BREAKER AND | ||
| ||
POWER SOURCE |
| |
RIGID CONDUIT |
| |
TO EXISTING |
| |
BONDING |
| |
CONNECTOR |
| |
MOUNTING HUB |
|
12" MIN. FROM BOTTOM OF JUNCTION BOX OR LOW VOLTAGE TRANSFORMER TO WATER LINE
WATER
LEVEL
18" MIN. FROM WATER TO TOP OF FACE RING
PILOT SCREW AT TOP
TOP OF FACE RING
CORRESPONDS
TO CENTER OF
MOUNTING HUB
| of the light. This extra cord allows you to bring the light out of the pool for installation of a |
| new lamp and for servicing. |
| NOTE: Leave 2" to 3" of slack cord at the top so that the light may be tipped back for |
| removal. |
6. | Feed the remaining cord through the conduit hole in the mounting hub. Place hook |
| mounting bracket over pin on the bottom of the mounting bracket and press down lightly to |
| secure into place. Secure at top of the light with the captive screw. |
7. | Cut the cord at the junction box, leaving at least six (6) inches of cord to make |
| connections. |
8. | Strip six (6) inches of the outer cord jacket from the cord to expose the three insulated |
| wires. Be careful not to damage the insulation on the three inner wires. |
9. | Connect cord to electrical wires at Junction Box, be sure not to pull the three (3) inches of |
| slack cord at the back of the light through the conduit when connecting the wires. All wiring |
| should be connected to a Class A GFCI in accordance with electrical codes, see Section |
| 2.A.1.a on page 7. |
Figure 5
10. | Connect all three wires to the corresponding circuit wires in the junction box and secure the |
| junction box cover in place. |
11. | Before operating the light for more than 10 seconds, fill pool until the Nicheless Light is |
| completely submerged in water. To check for proper operation, turn on main switch or |
| circuit breaker, as well as the switch which operates the Nicheless Light. |
AquaLumin® II - Nicheless Light Installation Guide | AquaLumin® II - Nicheless Light Installation Guide |