8
MONITOR OUT(PUT) CONNECTIONS
The Audio/Video (Monitor) Output jacks are great for recording with
a VCR or used to connect an exter- nal audio system for better sound reproduction.
AUDIO SYSTEM
CONNECTION:
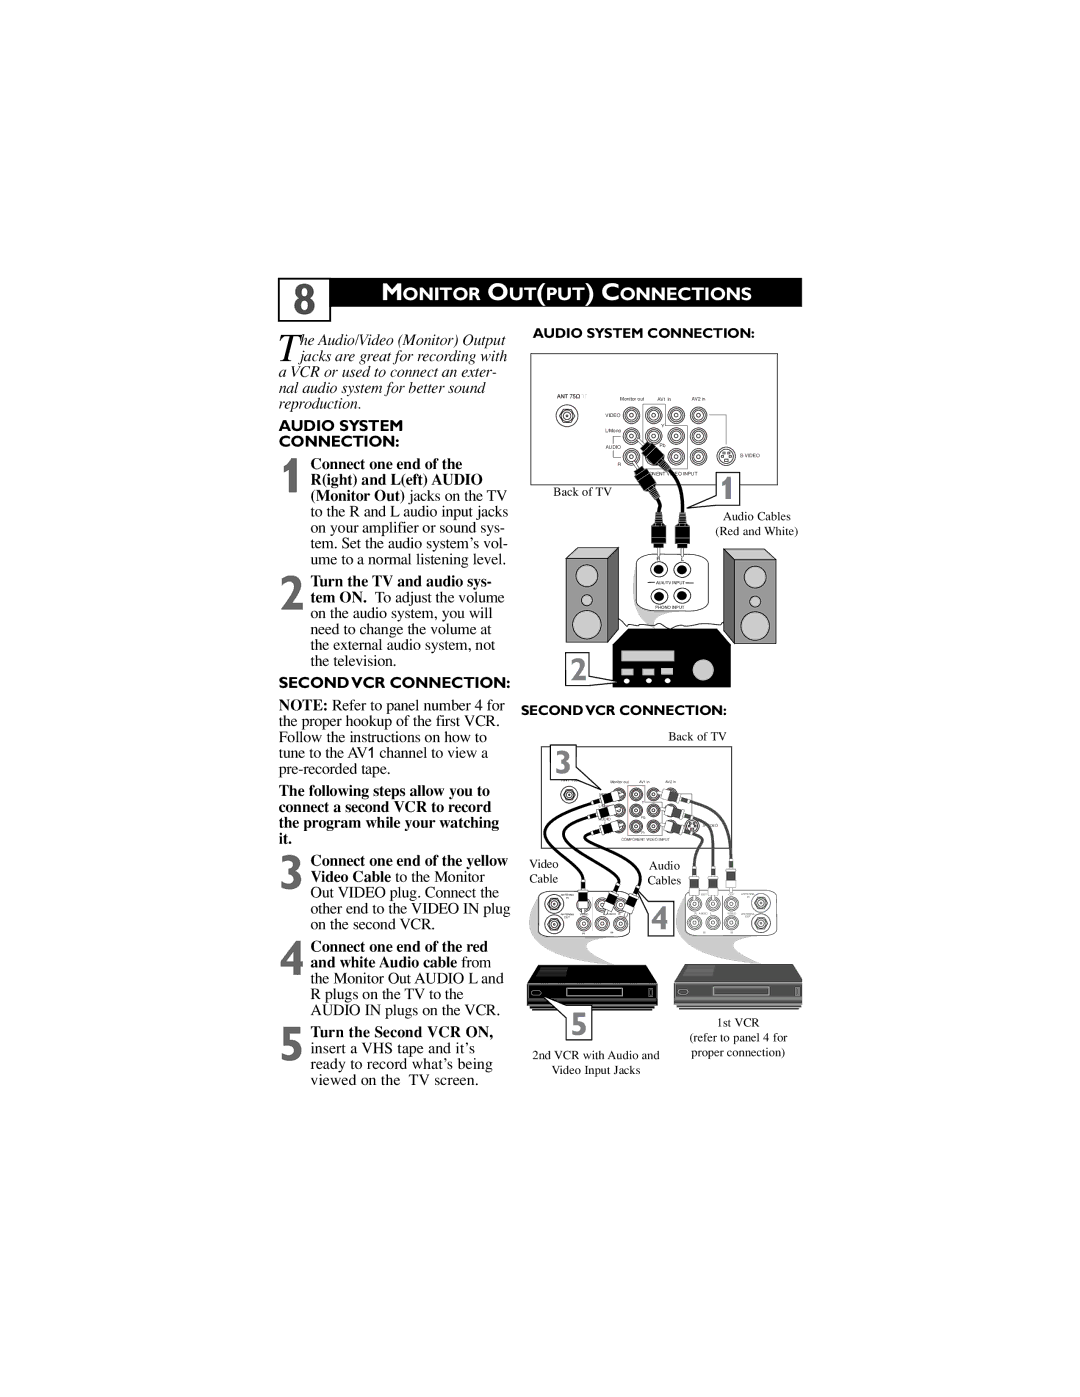
1 Connect one end of the R(ight) and L(eft) AUDIO (Monitor Out) jacks on the TV to the R and L audio input jacks on your amplifier or sound sys- tem. Set the audio system’s vol- ume to a normal listening level.
2 Turn the TV and audio sys- tem ON. To adjust the volume on the audio system, you will need to change the volume at the external audio system, not the television.
SECOND VCR CONNECTION:
NOTE: Refer to panel number 4 for the proper hookup of the first VCR. Follow the instructions on how to tune to the AV1 channel to view a
The following steps allow you to connect a second VCR to record the program while your watching it.
3 Connect one end of the yellow Video Cable to the Monitor Out VIDEO plug. Connect the other end to the VIDEO IN plug on the second VCR.
4 Connect one end of the red and white Audio cable from the Monitor Out AUDIO L and R plugs on the TV to the AUDIO IN plugs on the VCR.
5 Turn the Second VCR ON, insert a VHS tape and it’s ready to record what’s being viewed on the TV screen.
AUDIO SYSTEM CONNECTION:
Monitor out AV1 in AV2 in
VIDEO
Y
L/Mono
AUDIO | Pb |
| |
R |
|
| VIDEO INPUT |
Back of TV | 1 |
|
Audio Cables
(Red and White)
R L
AUX/TV INPUT
PHONO INPUT
2
SECOND VCR CONNECTION:
Back of TV
3
Monitor out | AV1 in | AV2 in |
VIDEO
Y
L/Mono
![]() AUDIOPb
AUDIOPb
RPr
COMPONENT VIDEO INPUT
Video |
|
| Audio |
|
|
|
Cable |
|
| Cables |
|
|
|
ANTENNA | OUT | OUT |
| OUT | OUT | ANTENNA |
IN |
|
| 4 |
|
| IN |
ANTENNA | VIDEO | L AUDIO R | R AUDIO L | VIDEO | ANTENNA | |
OUT |
|
|
|
| OUT | |
| IN | IN | IN | IN |
|
5 | 1st VCR |
|
(refer to panel | 4 for | |
2nd VCR with Audio and | proper connection) | |
Video Input Jacks |
|
|
