HOW TO USE THE INSTALLATION FEATURES
AUTO PROGRAM
Your TV can automatically set itself for local area (or Cable TV) channels. This makes it easy for you to select only the TV
stations in your area when the CHANNEL (+),
Note: Make sure the antenna or cable signal connection has been completed before AUTO PROGRAM is activated.
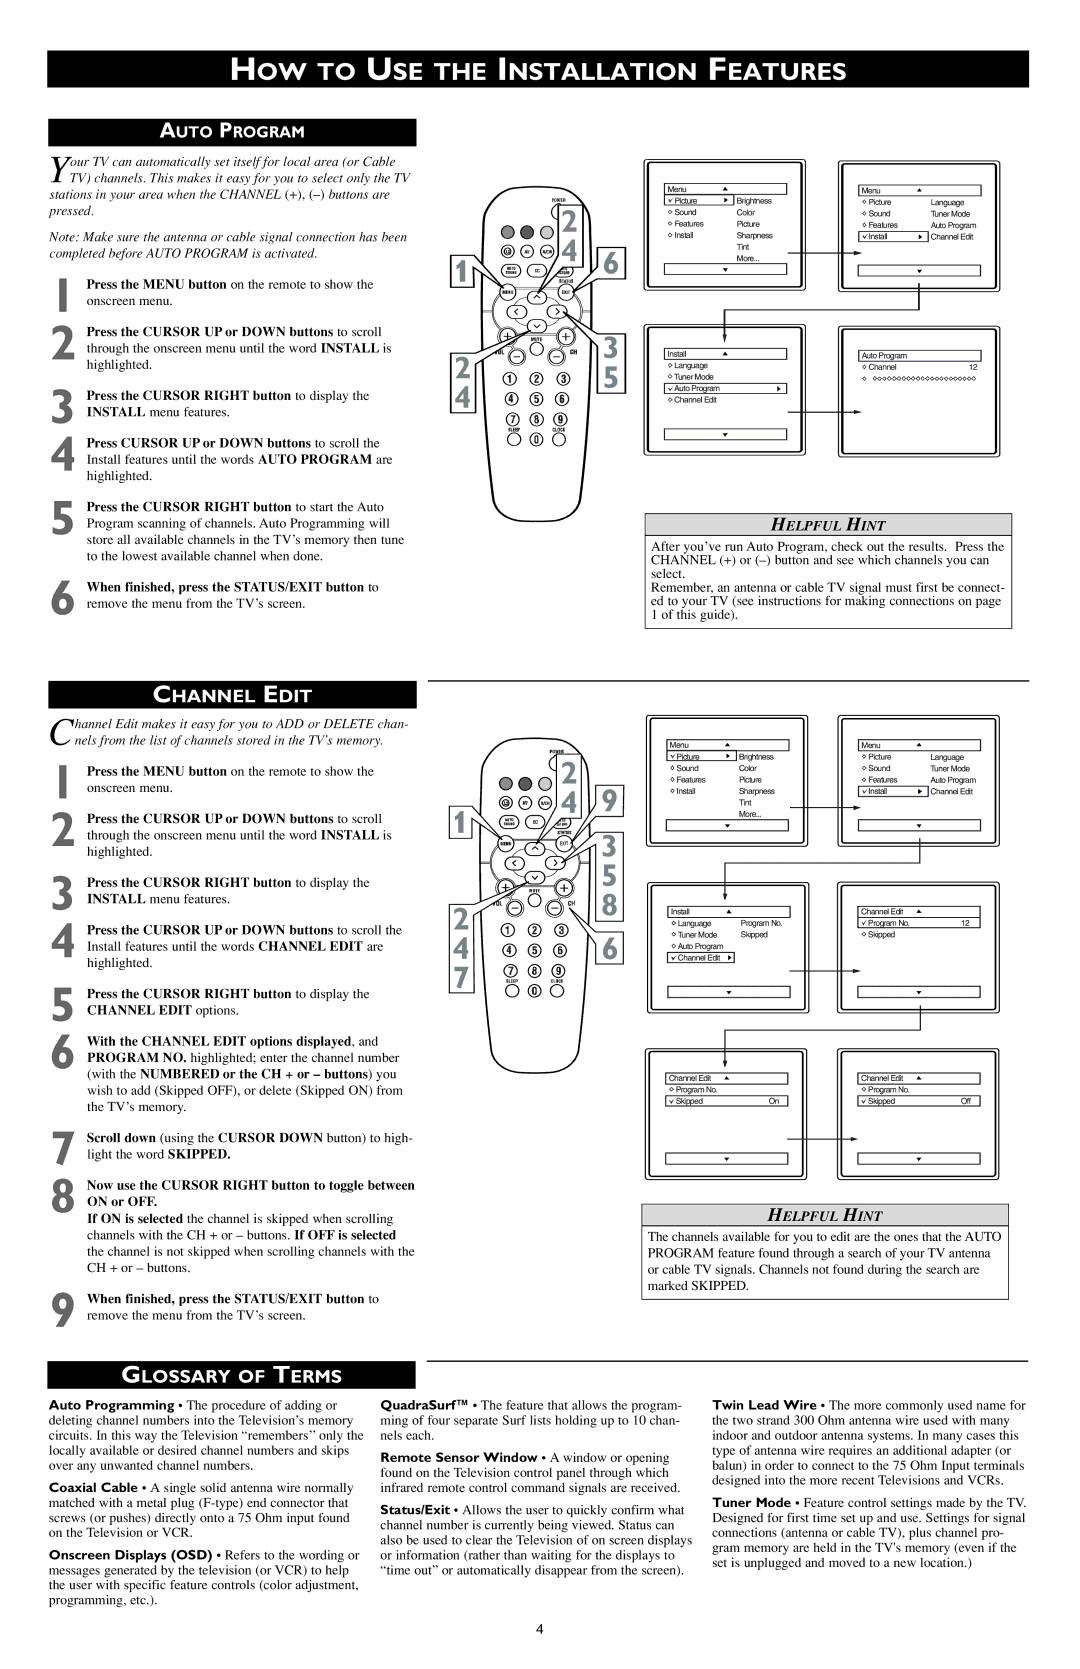
1 Press the MENU button on the remote to show the onscreen menu.
2 Press the CURSOR UP or DOWN buttons to scroll through the onscreen menu until the word INSTALL is highlighted.
3 Press the CURSOR RIGHT button to display the INSTALL menu features.
4 Press CURSOR UP or DOWN buttons to scroll the Install features until the words AUTO PROGRAM are highlighted.
2
1 ![]()
![]()
![]()
![]()
![]()
![]()
![]()
![]() 4 6
4 6
3
2 ![]()
![]()
![]() 5
5
4
Menu |
| Menu |
|
Picture | Brightness | Picture | Language |
Sound | Color | Sound | Tuner Mode |
Features | Picture | Features | Auto Program |
Install | Sharpness | Install | Channel Edit |
| Tint |
|
|
| More... |
|
|
Install | Auto Program |
|
Language | Channel | 12 |
![]() Tuner Mode
Tuner Mode
![]()
![]() Auto Program
Auto Program
![]() Channel Edit
Channel Edit
5 Press the CURSOR RIGHT button to start the Auto Program scanning of channels. Auto Programming will store all available channels in the TV’s memory then tune to the lowest available channel when done.
6 When finished, press the STATUS/EXIT button to remove the menu from the TV’s screen.
CHANNEL EDIT
Channel Edit makes it easy for you to ADD or DELETE chan-
nels from the list of channels stored in the TV’s memory.
1 Press the MENU button on the remote to show the
2 Press the CURSOR UP or DOWN buttons to scroll
3 Press the CURSOR RIGHT button to display the INSTALL menu features.
4 Press the CURSOR UP or DOWN buttons to scroll the Install features until the words CHANNEL EDIT are highlighted.
5 Press the CURSOR RIGHT button to display the CHANNEL EDIT options.
6 With the CHANNEL EDIT options displayed, and PROGRAM NO. highlighted; enter the channel number (with the NUMBERED or the CH + or – buttons) you wish to add (Skipped OFF), or delete (Skipped ON) from the TV’s memory.
7 Scroll down (using the CURSOR DOWN button) to high- light the word SKIPPED.
8 Now use the CURSOR RIGHT button to toggle between ON or OFF.
If ON is selected the channel is skipped when scrolling channels with the CH + or – buttons. If OFF is selected the channel is not skipped when scrolling channels with the CH + or – buttons.
9 When finished, press the STATUS/EXIT button to remove the menu from the TV’s screen.
GLOSSARY OF TERMS
HELPFUL HINT
After you’ve run Auto Program, check out the results. Press the CHANNEL (+) or
Remember, an antenna or cable TV signal must first be connect- ed to your TV (see instructions for making connections on page 1 of this guide).
|
|
| Menu |
| Menu |
|
| 2 |
| Picture | Brightness | Picture | Language |
|
| Sound | Color | Sound | Tuner Mode | |
|
|
| ||||
| 4 | 9 | Features | Picture | Features | Auto Program |
| Install | Sharpness | Install | Channel Edit | ||
1 |
| Tint |
|
| ||
| More... |
|
| |||
|
|
|
| |||
|
| 3 |
|
|
|
|
|
| 5 |
|
|
|
|
2 |
| 8 | Install |
| Channel Edit |
|
|
|
| Language | Program No. | Program No. | 12 |
4 |
| 6 | Tuner Mode | Skipped | Skipped |
|
| Auto Program |
|
|
| ||
| Channel Edit |
|
|
| ||
7 |
|
|
|
|
|
|
Channel Edit |
|
|
| Channel Edit |
|
Program No. |
|
|
| Program No. |
|
Skipped | On |
|
| Skipped | Off |
|
|
|
|
|
|
|
|
|
|
|
|
|
|
|
|
|
|
HELPFUL HINT
The channels available for you to edit are the ones that the AUTO PROGRAM feature found through a search of your TV antenna or cable TV signals. Channels not found during the search are marked SKIPPED.
Auto Programming • The procedure of adding or deleting channel numbers into the Television’s memory circuits. In this way the Television “remembers’’ only the locally available or desired channel numbers and skips over any unwanted channel numbers.
Coaxial Cable • A single solid antenna wire normally matched with a metal plug
Onscreen Displays (OSD) • Refers to the wording or messages generated by the television (or VCR) to help the user with specific feature controls (color adjustment, programming, etc.).
QuadraSurf™ • The feature that allows the program- ming of four separate Surf lists holding up to 10 chan- nels each.
Remote Sensor Window • A window or opening found on the Television control panel through which infrared remote control command signals are received.
Status/Exit • Allows the user to quickly confirm what channel number is currently being viewed. Status can also be used to clear the Television of on screen displays or information (rather than waiting for the displays to “time out” or automatically disappear from the screen).
Twin Lead Wire • The more commonly used name for the two strand 300 Ohm antenna wire used with many indoor and outdoor antenna systems. In many cases this type of antenna wire requires an additional adapter (or balun) in order to connect to the 75 Ohm Input terminals designed into the more recent Televisions and VCRs.
Tuner Mode • Feature control settings made by the TV. Designed for first time set up and use. Settings for signal connections (antenna or cable TV), plus channel pro- gram memory are held in the TV's memory (even if the set is unplugged and moved to a new location.)
4