Switching on and initial setup
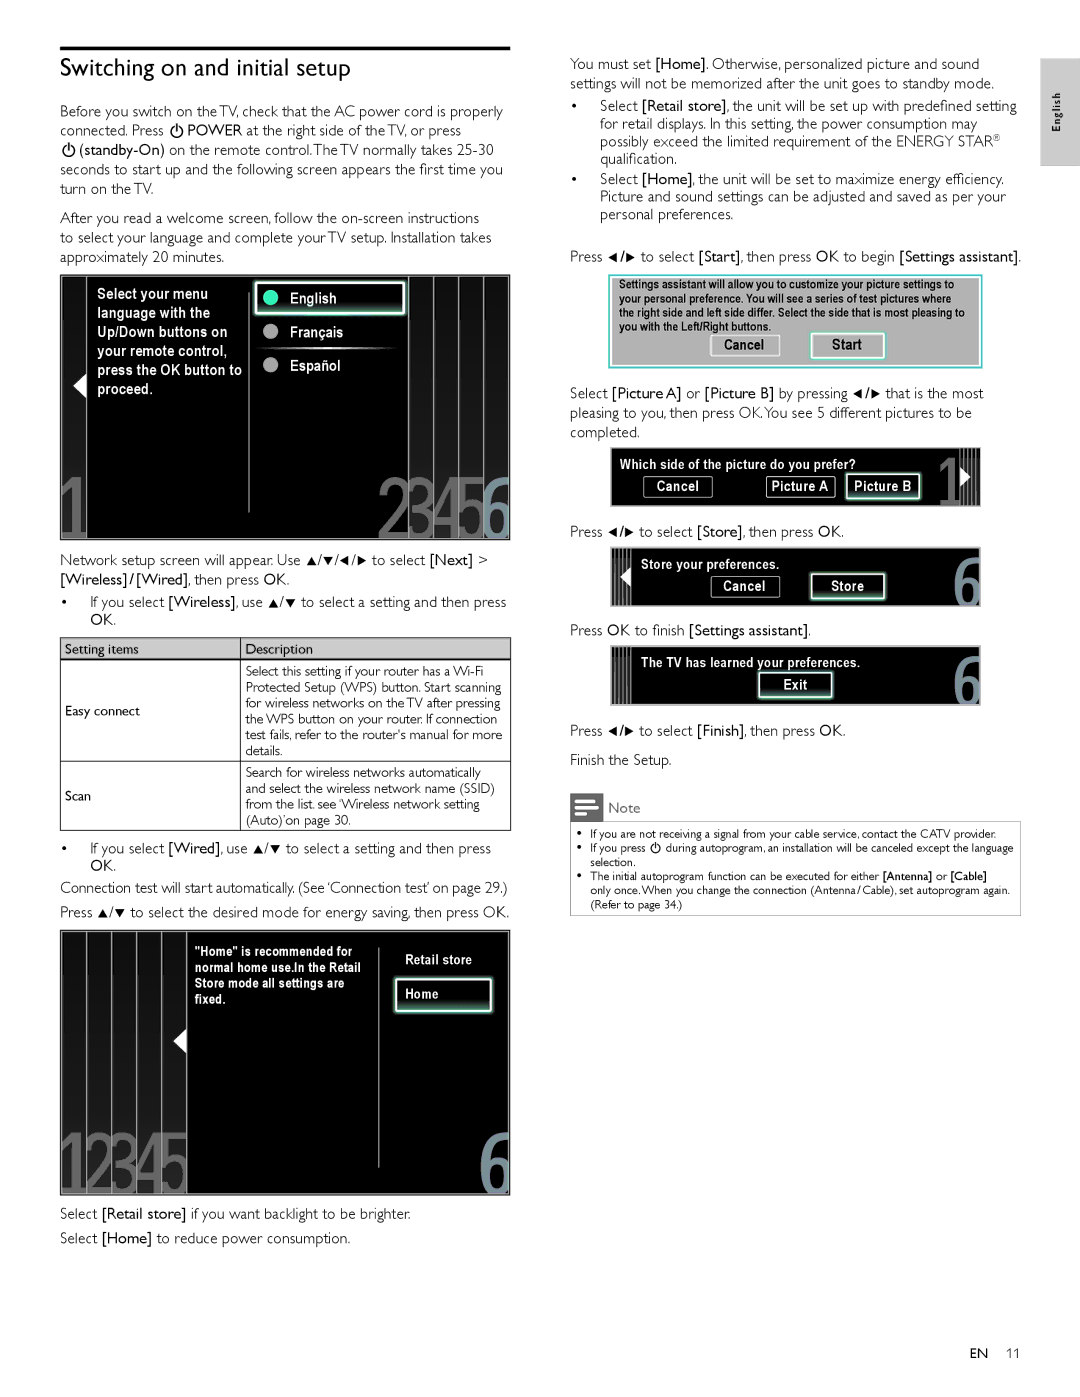
Before you switch on the TV, check that the AC power cord is properly connected. Press .POWER at the right side of the TV, or press
.
After you read a welcome screen, follow the
| Select your menu | ● English |
|
|
| ||
| language with the |
| |
| Up/Down buttons on | ● Français |
|
| your remote control, | ● Español |
|
| press the OK button to |
| |
| proceed. |
|
|
|
|
|
|
|
|
|
|
Network setup screen will appear. Use Î/ï/Í/Æ to select [Next] > [Wireless] / [Wired], then press OK.
•If you select [Wireless], use Î/ï to select a setting and then press OK.
Setting items | Description | |
| Select this setting if your router has a | |
| Protected Setup (WPS) button. Start scanning | |
Easy connect | for wireless networks on the TV after pressing | |
the WPS button on your router. If connection | ||
| ||
| test fails, refer to the router's manual for more | |
| details. | |
| Search for wireless networks automatically | |
Scan | and select the wireless network name (SSID) | |
from the list. see ‘Wireless network setting | ||
| ||
| (Auto)’on page 30. |
•If you select [Wired], use Î/ï to select a setting and then press OK.
Connection test will start automatically. (See ‘Connection test’ on page 29.) Press Î/ï to select the desired mode for energy saving, then press OK.
|
| "Home" is recommended for | Retail store |
|
|
|
| ||
|
| |||
|
| normal home use.In the Retail |
| |
|
|
|
| |
|
| Store mode all settings are | Home |
|
|
| fixed. |
| |
|
|
|
|
|
|
|
|
|
|
|
|
|
|
|
Select [Retail store] if you want backlight to be brighter. Select [Home] to reduce power consumption.
You must set [Home]. Otherwise, personalized picture and sound settings will not be memorized after the unit goes to standby mode.
•Select [Retail store], the unit will be set up with predefined setting for retail displays. In this setting, the power consumption may possibly exceed the limited requirement of the ENERGY STAR® qualification.
•Select [Home], the unit will be set to maximize energy efficiency. Picture and sound settings can be adjusted and saved as per your personal preferences.
Press Í/Æ to select [Start], then press OK to begin [Settings assistant].
Settings assistant will allow you to customize your picture settings to your personal preference. You will see a series of test pictures where the right side and left side differ. Select the side that is most pleasing to you with the Left/Right buttons.
Cancel Start
Select [Picture A] or [Picture B] by pressing Í/Æ that is the most pleasing to you, then press OK.You see 5 different pictures to be completed.
Which side of the picture do you prefer?
Cancel | Picture A | Picture B |
Press Í/Æ to select [Store], then press OK.
Store your preferences.
Cancel Store
Press OK to finish [Settings assistant].
The TV has learned your preferences.
Exit
Press Í/Æ to select [Finish], then press OK.
Finish the Setup.
![]() Note
Note
•If you are not receiving a signal from your cable service, contact the CATV provider.
•If you press . during autoprogram, an installation will be canceled except the language selection.
•The initial autoprogram function can be executed for either [Antenna] or [Cable] only once. When you change the connection (Antenna / Cable), set autoprogram again. (Refer to page 34.)
English
EN 11
