General description (fig. 1, page 3)
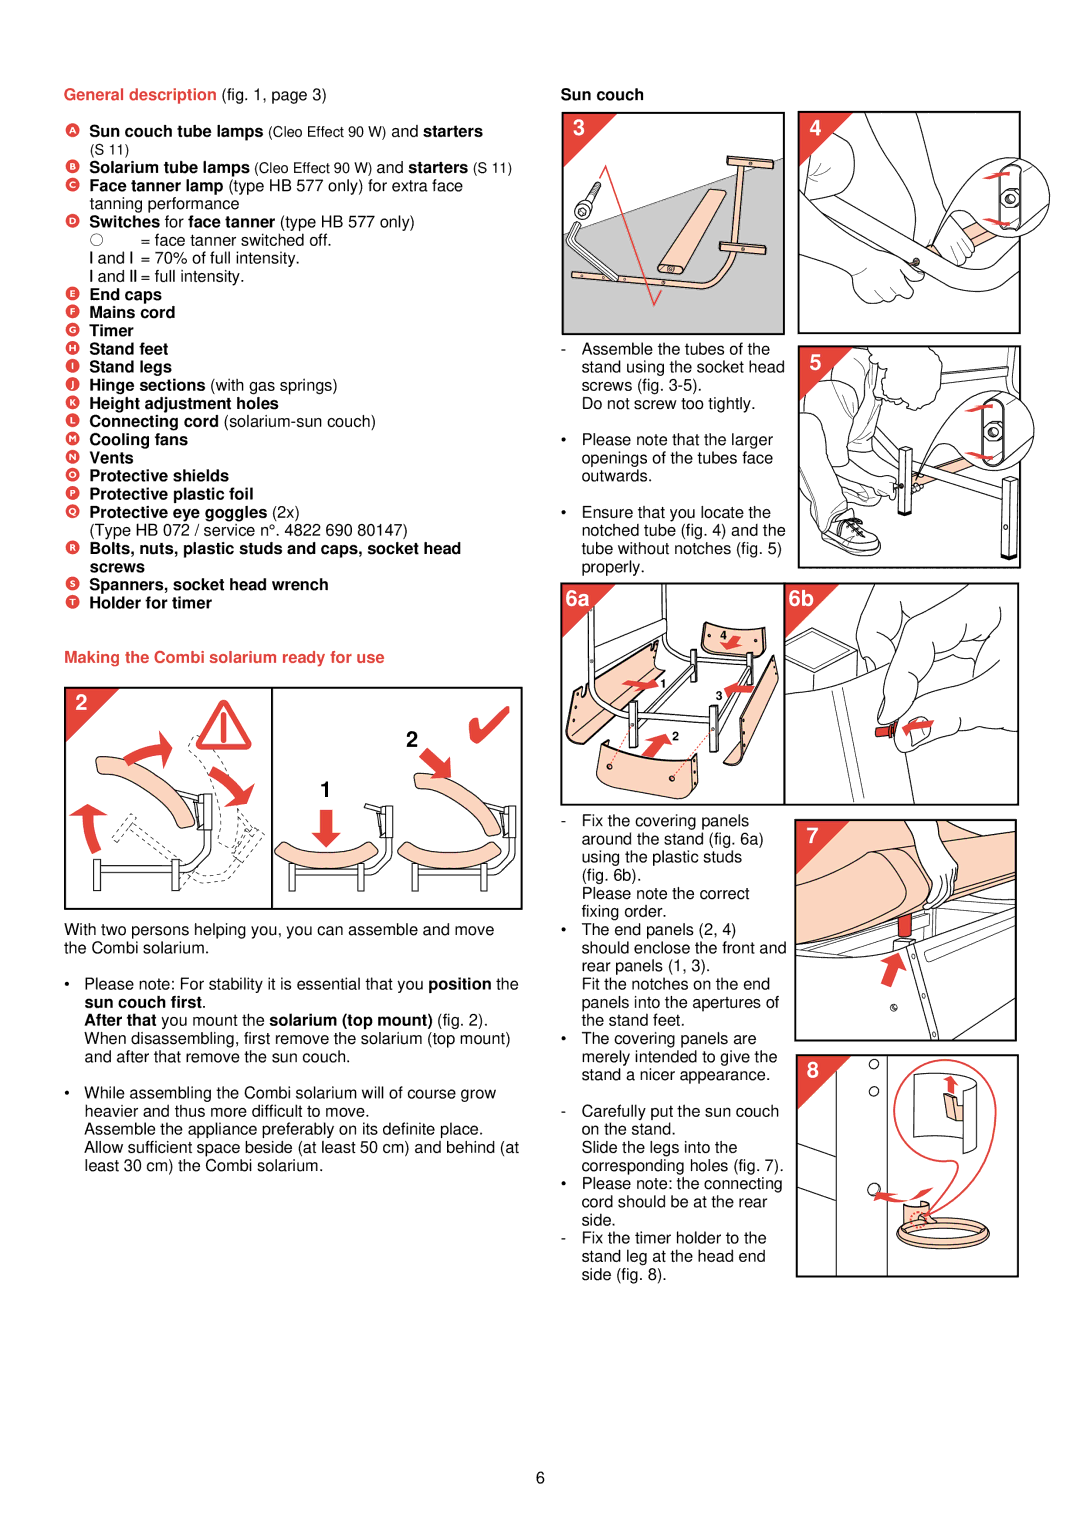
Sun couch
ASun couch tube lamps (Cleo Effect 90 W) and starters
(S 11)
BSolarium tube lamps (Cleo Effect 90 W) and starters (S 11)
C Face tanner lamp (type HB 577 only) for extra face tanning performance
D Switches for face tanner (type HB 577 only)
‚= face tanner switched off.
Aand A = 70% of full intensity.
Aand AA = full intensity.
E End caps |
F Mains cord |
G Timer |
H Stand feet |
I Stand legs |
J Hinge sections (with gas springs) |
K Height adjustment holes |
L Connecting cord |
M Cooling fans |
N Vents |
O Protective shields |
P Protective plastic foil |
Q Protective eye goggles (2x) |
(Type HB 072 / service n°. 4822 690 80147) |
R Bolts, nuts, plastic studs and caps, socket head |
screws |
3 |
-Assemble the tubes of the stand using the socket head screws (fig.
Do not screw too tightly.
•Please note that the larger openings of the tubes face outwards.
•Ensure that you locate the notched tube (fig. 4) and the tube without notches (fig. 5) properly.
4 |
5 |
S Spanners, socket head wrench |
T Holder for timer |
Making the Combi solarium ready for use
2 | ✔ |
2 | |
1 |
|
6a | 6b |
| 4 |
| 1 |
| 3 |
| 2 |
With two persons helping you, you can assemble and move the Combi solarium.
•Please note: For stability it is essential that you position the sun couch first.
After that you mount the solarium (top mount) (fig. 2). When disassembling, first remove the solarium (top mount) and after that remove the sun couch.
•While assembling the Combi solarium will of course grow heavier and thus more difficult to move.
Assemble the appliance preferably on its definite place. Allow sufficient space beside (at least 50 cm) and behind (at least 30 cm) the Combi solarium.
-Fix the covering panels around the stand (fig. 6a) using the plastic studs
(fig. 6b).
Please note the correct fixing order.
•The end panels (2, 4) should enclose the front and rear panels (1, 3).
Fit the notches on the end panels into the apertures of the stand feet.
•The covering panels are merely intended to give the stand a nicer appearance.
-Carefully put the sun couch on the stand.
Slide the legs into the
corresponding holes (fig. 7).
•Please note: the connecting cord should be at the rear
side.
-Fix the timer holder to the stand leg at the head end side (fig. 8).
7 |
8 |
6