E n g l i s h

Connections

Step 3: Connecting TV


COMPONENT


COMPONENT


S-VIDEO

VIDEO IN


S-VIDEO

VIDEO IN


AUDIO

IN

Pr/Cr

AUDIO

IN

Pr/Cr


OUT


OUT


Pb/Cb


Pb/Cb


VIDEO IN


VIDEO IN


Y


Y

FRONT

L


AM


FRONT

L


AM


1


R


FM ANTENNA


R


FM ANTENNA


CENTER

C


AUDIO


1


CENTER

C


AUDIO


VIDEO


VIDEO


DIGITAL

AUX

TV

LINE

OUT


TV

LINE

OUT


SURROUND

SL

CVBS


SURROUND

SL

DIGITAL

AUX

Pr


OUT

IN

IN

OUT


OUT

IN

IN

OUT

CVBS


SR


L


Pb


SR


L


Pb


WOOFER

SUB


R


P-SCAN

WOOFER

SUB


R


P-SCAN


Y

ON

OFF


Y

ON

OFF


DIGITAL


S-VIDEO


DIGITAL


S-VIDEO


IN


IN


2


3


2


3

IMPORTANT!

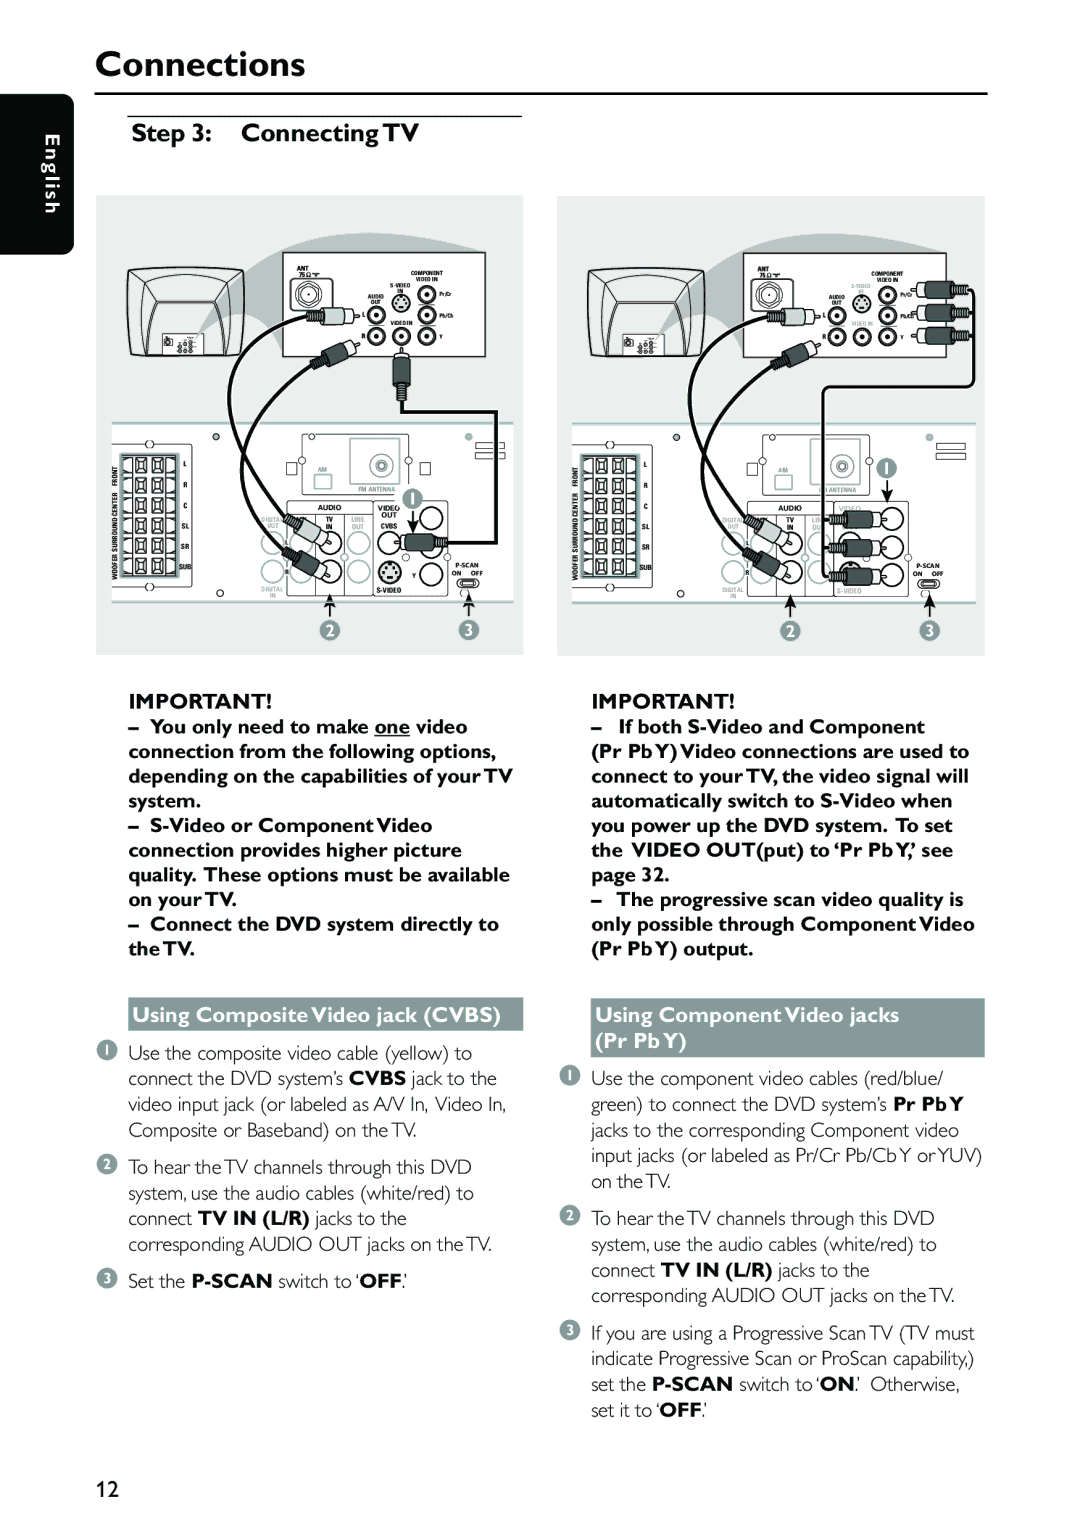
You only need to make one video connection from the following options, depending on the capabilities of your TV system.

S-Video or Component Video connection provides higher picture quality. These options must be available on your TV.

Connect the DVD system directly to the TV.

IMPORTANT!

If both S-Video and Component

(Pr Pb Y) Video connections are used to connect to your TV, the video signal will automatically switch to S-Video when you power up the DVD system. To set the VIDEO OUT(put) to ‘Pr Pb Y,’ see page 32.

The progressive scan video quality is only possible through Component Video (Pr Pb Y) output.

Using Composite Video jack (CVBS)

1Use the composite video cable (yellow) to connect the DVD system’s CVBS jack to the video input jack (or labeled as A/V In, Video In, Composite or Baseband) on the TV.

2To hear the TV channels through this DVD system, use the audio cables (white/red) to connect TV IN (L/R) jacks to the corresponding AUDIO OUT jacks on the TV.

3 Set the P-SCANswitch to ‘OFF.’

Using Component Video jacks (Pr Pb Y)

1Use the component video cables (red/blue/ green) to connect the DVD system’s Pr Pb Y jacks to the corresponding Component video input jacks (or labeled as Pr/Cr Pb/Cb Y or YUV) on the TV.

2To hear the TV channels through this DVD system, use the audio cables (white/red) to connect TV IN (L/R) jacks to the corresponding AUDIO OUT jacks on the TV.

3If you are using a Progressive Scan TV (TV must indicate Progressive Scan or ProScan capability,) set the P-SCANswitch to ‘ON.’ Otherwise, set it to ‘OFF.’

12

Page 14
Image 14
Philips MX5500D owner manual Connections, Connecting TV, Using Composite Video jack Cvbs, Set the P-SCANswitch to ‘OFF.’

MX5500D specifications

The Philips MX5500D is a cutting-edge home audio system designed to deliver a rich and immersive listening experience. Known for its sleek design and powerful performance, the MX5500D caters to both music enthusiasts and casual listeners alike.

One of the standout features of the Philips MX5500D is its integrated CD player. This allows users to enjoy their favorite CDs with excellent sound quality. The device supports various disc formats, providing versatility for a range of music collections. Additionally, the system features a built-in FM tuner, enabling users to access their favorite radio stations with ease.

The MX5500D distinguishes itself with its digital sound processing technology, which optimizes audio output for different types of content. Whether users are listening to music, watching movies, or playing video games, this technology enhances the overall sound quality, ensuring clarity and depth that brings content to life.

Connectivity options are another highlight of the Philips MX5500D. With USB ports and auxiliary inputs, users can easily link their devices to the audio system. This feature allows for music playback directly from smartphones, tablets, or USB drives. Furthermore, Bluetooth connectivity is often included in this model, allowing for seamless wireless streaming from compatible devices without the hassle of tangled wires.

The MX5500D also boasts a powerful amplifier that drives the built-in speakers, delivering robust and dynamic sound. The speaker system is designed to produce rich bass and clear treble, resulting in a well-balanced audio profile that suits various music genres. The design of the speakers complements the overall aesthetics of the system, making it a stylish addition to any living room or entertainment space.

Another noteworthy aspect of the Philips MX5500D is its user-friendly interface. The intuitive remote control and easy-to-navigate on-screen menus provide a hassle-free experience for users. Whether adjusting the volume, changing tracks, or switching inputs, the system is designed for simplicity and convenience.

In summary, the Philips MX5500D is an impressive audio system that brings together advanced technology and user-friendly features. Its combination of versatile playback options, enhanced sound processing, and stylish design makes it a strong contender in the home audio market. Whether for everyday listening or special occasions, the MX5500D has the capabilities to elevate any audio experience.