The RECORD MODE SET UP menu will appear.
RECORD MODE SET UP
| < RECORD MODE SETUP > | |
| ALARM REC MODE | A6H |
| ALARM REC TIME | 30SEC |
| 1SHOT REC | 1SEC |
| VEXT OUT | 1FIELD |
| SERIES REC | OFF |
| REPEAT: |
|
| STOP AT EOT. |
|
[↓ | →] | [END:MENU] |
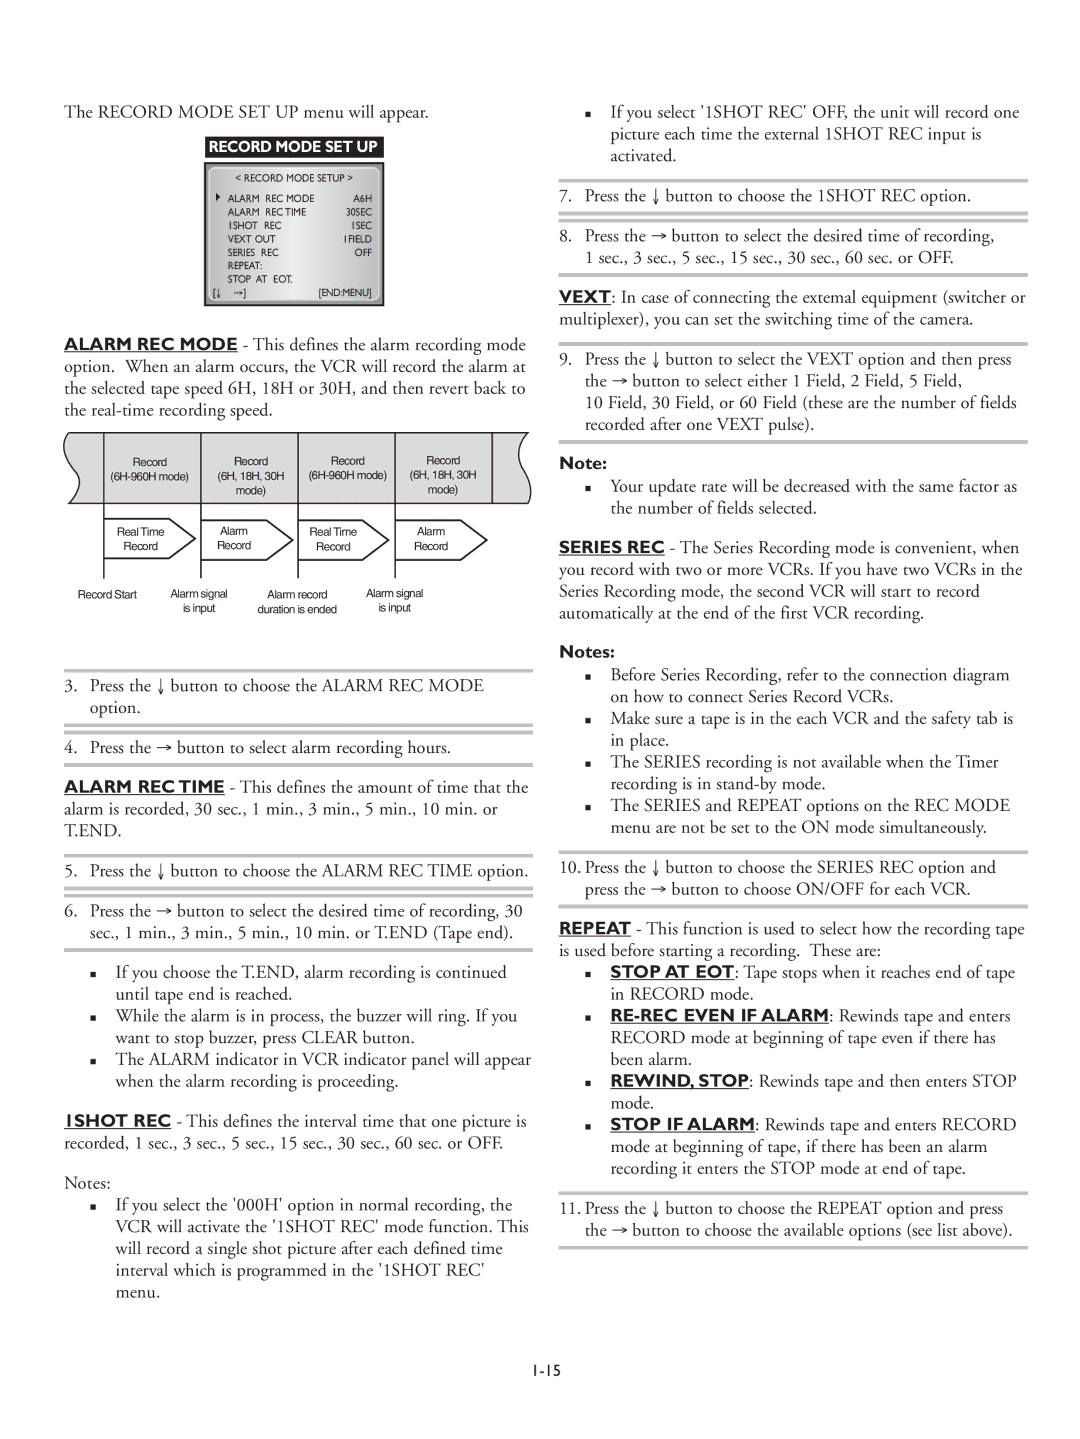
ALARM REC MODE - This defines the alarm recording mode option. When an alarm occurs, the VCR will record the alarm at the selected tape speed 6H, 18H or 30H, and then revert back to the
|
|
|
|
|
|
|
|
|
| Record |
| Record |
|
|
| Record |
| Record |
|
| |
|
| (6H, 18H, 30H | (6H | (6H, 18H, 30H | ||||||
|
|
|
|
| mode) |
|
|
|
| mode) |
| Real Time |
|
| Alarm | Real Time |
|
| Alarm | ||
| Record |
|
| Record | Record |
|
| Record | ||
|
|
|
|
|
|
|
|
|
| |
Record Start | Alarm signal | Alarm record | Alarm signal | |||||||
|
| is input |
| duration is ended |
| is input | ||||
3.Press the ↓ button to choose the ALARM REC MODE option.
4.Press the → button to select alarm recording hours.
ALARM REC TIME - This defines the amount of time that the alarm is recorded, 30 sec., 1 min., 3 min., 5 min., 10 min. or T.END.
5.Press the ↓ button to choose the ALARM REC TIME option.
6.Press the → button to select the desired time of recording, 30 sec., 1 min., 3 min., 5 min., 10 min. or T.END (Tape end).
If you choose the T.END, alarm recording is continued until tape end is reached.
While the alarm is in process, the buzzer will ring. If you want to stop buzzer, press CLEAR button.
The ALARM indicator in VCR indicator panel will appear when the alarm recording is proceeding.
1SHOT REC - This defines the interval time that one picture is recorded, 1 sec., 3 sec., 5 sec., 15 sec., 30 sec., 60 sec. or OFF.
Notes:
If you select the '000H' option in normal recording, the VCR will activate the '1SHOT REC' mode function. This will record a single shot picture after each defined time interval which is programmed in the '1SHOT REC' menu.
If you select '1SHOT REC' OFF, the unit will record one picture each time the external 1SHOT REC input is activated.
7.Press the ↓ button to choose the 1SHOT REC option.
8.Press the → button to select the desired time of recording, 1 sec., 3 sec., 5 sec., 15 sec., 30 sec., 60 sec. or OFF.
VEXT: In case of connecting the extemal equipment (switcher or multiplexer), you can set the switching time of the camera.
9.Press the ↓ button to select the VEXT option and then press the → button to select either 1 Field, 2 Field, 5 Field,
10 Field, 30 Field, or 60 Field (these are the number of fields recorded after one VEXT pulse).
Note:
Your update rate will be decreased with the same factor as the number of fields selected.
SERIES REC - The Series Recording mode is convenient, when you record with two or more VCRs. If you have two VCRs in the Series Recording mode, the second VCR will start to record automatically at the end of the first VCR recording.
Notes:
Before Series Recording, refer to the connection diagram on how to connect Series Record VCRs.
Make sure a tape is in the each VCR and the safety tab is in place.
The SERIES recording is not available when the Timer recording is in
The SERIES and REPEAT options on the REC MODE menu are not be set to the ON mode simultaneously.
10.Press the ↓ button to choose the SERIES REC option and press the → button to choose ON/OFF for each VCR.
REPEAT - This function is used to select how the recording tape is used before starting a recording. These are:
STOP AT EOT: Tape stops when it reaches end of tape in RECORD mode.
REWIND, STOP: Rewinds tape and then enters STOP mode.
STOP IF ALARM: Rewinds tape and enters RECORD mode at beginning of tape, if there has been an alarm recording it enters the STOP mode at end of tape.
11.Press the ↓ button to choose the REPEAT option and press the → button to choose the available options (see list above).
