6 SETTING THE ON-SCREEN DISPLAY
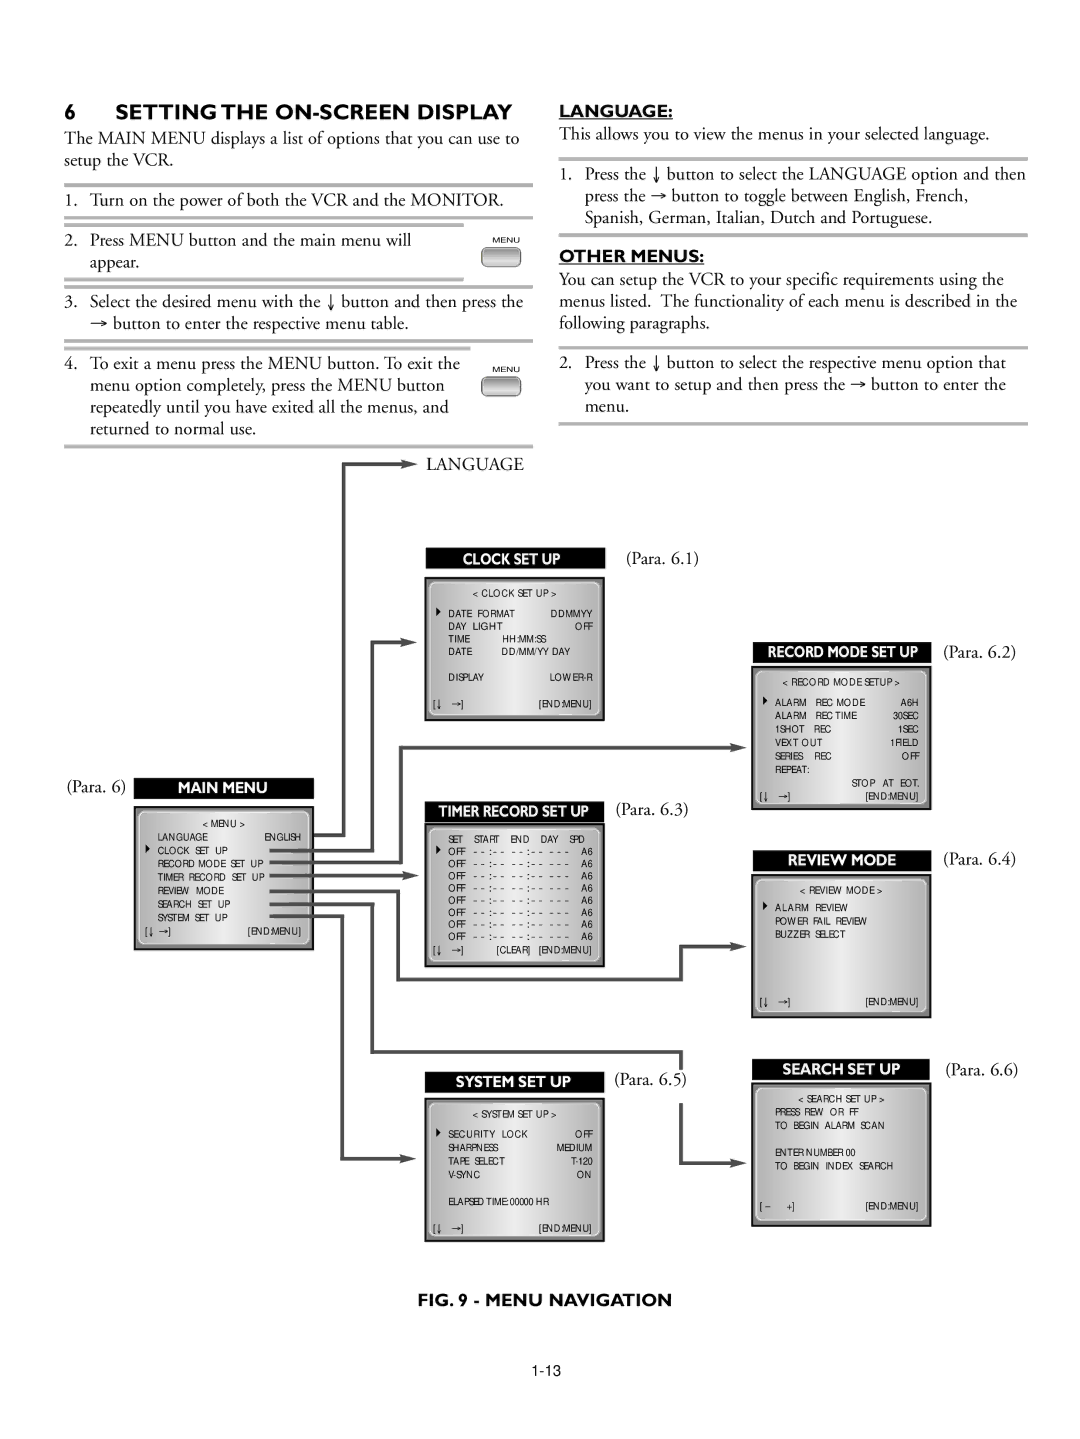
The MAIN MENU displays a list of options that you can use to setup the VCR.
1. Turn on the power of both the VCR and the MONITOR.
2. Press MENU button and the main menu will | MENU |
appear. |
|
|
|
|
|
3.Select the desired menu with the ↓ button and then press the
→ button to enter the respective menu table.
4. To exit a menu press the MENU button. To exit the | MENU |
menu option completely, press the MENU button |
|
repeatedly until you have exited all the menus, and |
|
returned to normal use. |
|
|
|
LANGUAGE:
This allows you to view the menus in your selected language.
1.Press the ↓ button to select the LANGUAGE option and then press the → button to toggle between English, French, Spanish, German, Italian, Dutch and Portuguese.
OTHER MENUS:
You can setup the VCR to your specific requirements using the menus listed. The functionality of each menu is described in the following paragraphs.
2.Press the ↓ button to select the respective menu option that you want to setup and then press the → button to enter the menu.
(Para. 6) |
|
|
|
|
|
|
|
|
|
|
|
|
|
|
|
|
|
|
|
|
|
|
|
|
|
|
|
|
|
|
|
|
|
| |
|
|
|
|
|
|
|
|
|
|
|
|
|
|
|
|
| |
|
|
|
| MAIN MENU |
|
|
| ||||||||||
|
|
|
|
|
|
|
|
|
|
|
|
|
|
|
|
|
|
|
|
|
|
|
| < |
| MENU |
| > |
|
|
|
|
|
|
|
|
|
|
|
| LANGUAGE |
|
|
|
|
|
|
| ENGLISH |
|
|
|
|
|
|
|
| ||||||||||||||
|
|
|
|
| CLOCK | SET |
| UP |
|
|
|
|
|
|
|
|
|
|
|
|
|
|
|
|
|
|
|
|
|
|
|
| |||
|
|
|
|
| RECORD | MODE |
| SET | UP |
|
|
|
|
|
| ||
|
|
|
|
| TIMER | RECORD |
| SET | UP |
|
|
|
|
|
| ||
|
|
|
|
| REVIEW | MODE |
|
|
|
|
|
|
|
|
| ||
|
|
|
|
| SEARCH | SET UP |
|
|
|
|
|
|
|
|
| ||
|
|
|
|
| SYSTEM | SET UP |
|
|
|
|
|
|
|
|
| ||
|
|
|
|
|
|
|
|
|
|
|
|
|
| ||||
|
| [ | ↓ | →] |
|
|
|
|
|
| [END:MENU] |
|
|
|
| ||
|
|
|
|
|
|
|
|
|
|
|
|
|
|
|
|
|
|
|
|
|
|
|
|
|
|
|
|
|
|
|
|
|
|
|
|
|
|
|
|
|
|
|
|
|
|
|
|
|
|
|
|
|
|
LANGUAGE
CLOCK SET UP | (Para. 6.1) |
|
| < CLOCK SET UP > | |
| DATE FORMAT | DDMMYY | |
| DAY LIGHT | OFF | |
| TIME | HH:MM:SS | |
| DATE | DD/MM/YY DAY | |
| DISPLAY | ||
[↓ | →] |
| [END:MENU] |
|
| TIMER RECORD SET UP | (Para. 6.3) | |||||||||||||||
|
|
| SET |
| START |
|
| END |
|
|
| DAY |
|
| SPD |
|
|
|
|
|
| OFF | - | - | - | - | : | - | - | - | - | - |
| A6 |
|
| |
|
|
| OFF | - | - | - | - | : | - | - | - | - | - |
| A6 |
|
| |
|
|
| OFF | - | - | - | - | : | - | - | - | - | - |
| A6 |
|
| |
|
|
| OFF | - | - | - | - | : | - | - | - | - | - |
| A6 |
|
| |
|
|
| OFF | - | - | - | - | : | - | - | - | - | - |
| A6 |
|
| |
|
|
| OFF | - | - | - | - | : | - | - | - | - | - |
| A6 |
|
| |
|
|
| OFF | - | - | - | - | : | - | - | - | - | - |
| A6 |
|
| |
|
|
| OFF | - | - | - | - | : | - | - | - | - | - |
| A6 |
|
| |
| [ | ↓ | →] |
|
|
| [CLEAR] |
|
|
| [END:MENU] |
|
|
| ||||
|
|
|
|
|
|
|
|
|
| |||||||||
|
|
|
|
|
|
|
|
|
|
|
|
|
|
|
|
|
|
|
|
|
|
|
|
|
|
|
|
|
|
|
|
|
|
|
|
|
|
RECORD MODE SET UP (Para. 6.2)
| < RECORD MODE SETUP > | |||
| ALARM | REC MODE |
| A6H |
| ALARM | REC TIME |
| 30SEC |
| 1SHOT | REC |
| 1SEC |
| VEXT OUT |
| 1FIELD | |
| SERIES | REC |
| OFF |
| REPEAT: |
|
|
|
|
| STOP | AT EOT. | |
[↓ | →] |
| [END:MENU] | |
REVIEW MODE | (Para. 6.4) |
| < REVIEW MODE > | |
| ALARM REVIEW |
|
| POWER FAIL REVIEW | |
| BUZZER SELECT |
|
[↓ | →] | [END:MENU] |
SYSTEM SET UP | (Para. 6.5) |
| < SYSTEM SET UP > | |
| SECURITY LOCK | OFF |
| SHARPNESS | MEDIUM |
| TAPE SELECT | |
| ON | |
| ELAPSED TIME: 00000 HR | |
[↓ | →] | [END:MENU] |
SEARCH SET UP | (Para. 6.6) |
<SEARCH SET UP >
PRESS REW OR FF
TO BEGIN ALARM SCAN
ENTER NUMBER 00
TO BEGIN INDEX SEARCH
[ – | +] | [END:MENU] |