Your television comes with an onscreen clock. During normal
operation the clock appears on the screen when the STATUS/EXIT but- ton is pressed or when a channel change occurs.
BEGIN
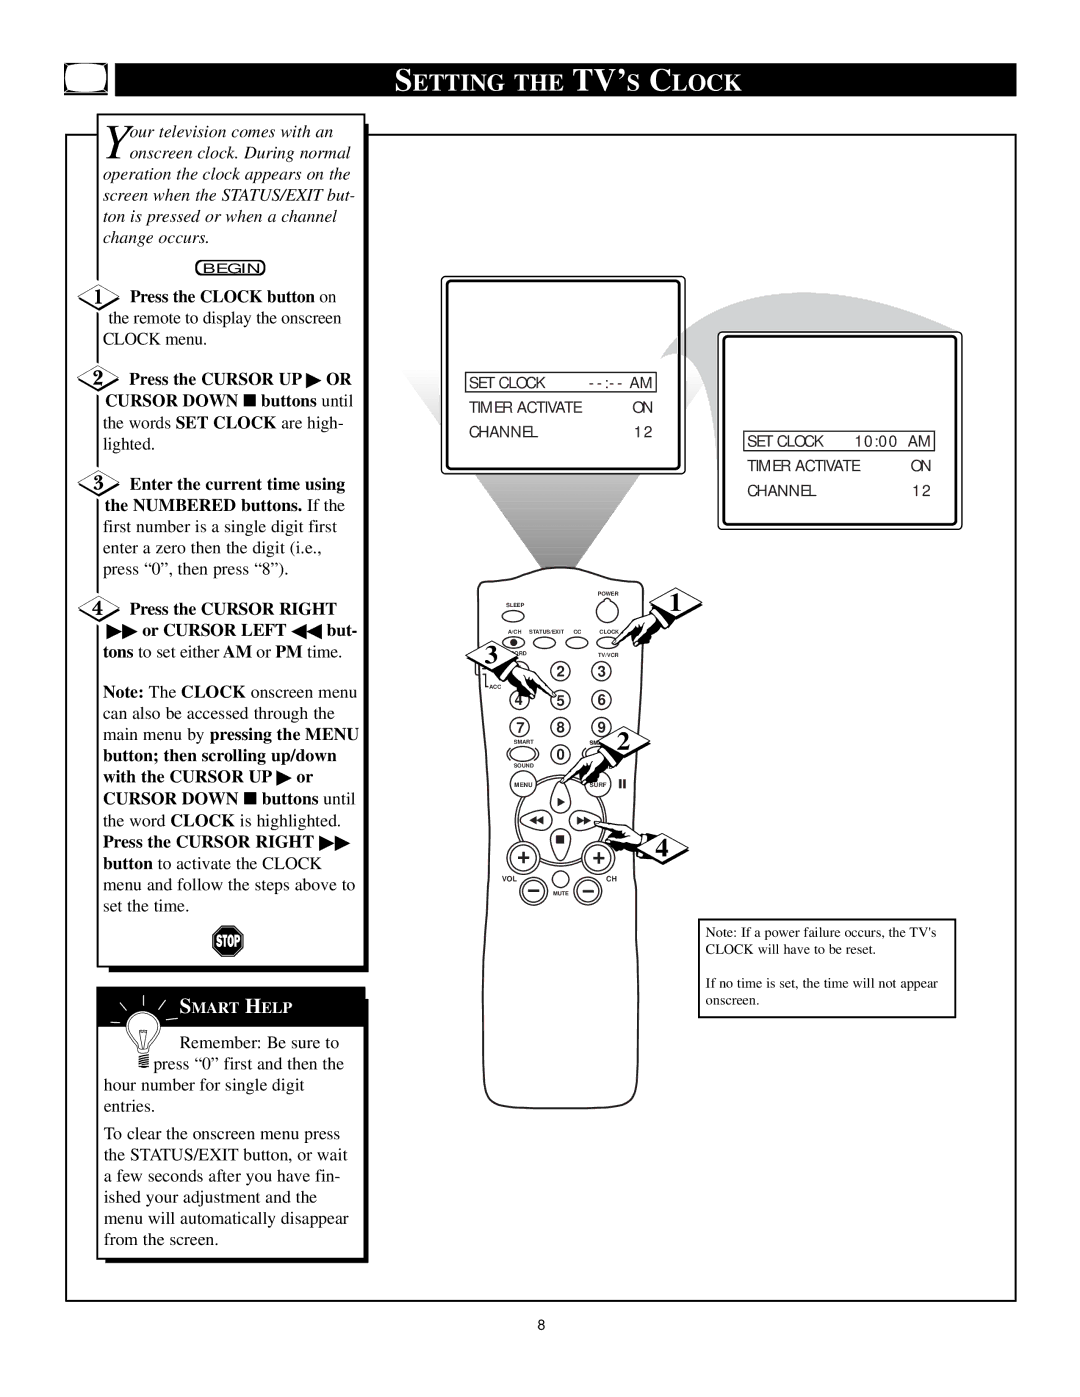
![]() Press the CLOCK button on the remote to display the onscreen CLOCK menu.
Press the CLOCK button on the remote to display the onscreen CLOCK menu.
![]() Press the CURSOR UP ▶ OR CURSOR DOWN ■ buttons until the words SET CLOCK are high-
Press the CURSOR UP ▶ OR CURSOR DOWN ■ buttons until the words SET CLOCK are high-
lighted.
![]() Enter the current time using the NUMBERED buttons. If the first number is a single digit first enter a zero then the digit (i.e., press “0”, then press “8”).
Enter the current time using the NUMBERED buttons. If the first number is a single digit first enter a zero then the digit (i.e., press “0”, then press “8”).
Press the CURSOR RIGHT
▶▶or CURSOR LEFT ◀◀ but- tons to set either AM or PM time.
Note: The CLOCK onscreen menu can also be accessed through the main menu by pressing the MENU
button; then scrolling up/down with the CURSOR UP ▶ or CURSOR DOWN ■ buttons until
the word CLOCK is highlighted.
Press the CURSOR RIGHT ▶▶
button to activate the CLOCK menu and follow the steps above to set the time.
SMART HELP
![]()
![]()
![]() Remember: Be sure to
Remember: Be sure to ![]() press “0” first and then the
press “0” first and then the
hour number for single digit entries.
To clear the onscreen menu press the STATUS/EXIT button, or wait a few seconds after you have fin- ished your adjustment and the menu will automatically disappear from the screen.
SETTING THE TV’S CLOCK
| SET CLOCK | - |
|
|
|
|
|
|
|
|
| ||
|
|
|
|
|
|
|
| TIMER ACTIVATE | ON |
|
|
|
|
|
|
|
|
|
|
|
| CHANNEL | 12 |
|
|
|
|
|
|
|
|
| SET CLOCK 10:00 AM | |
|
|
|
|
| TIMER ACTIVATE | ON |
|
|
|
|
| ||
|
|
|
| |||
|
|
|
|
| CHANNEL | 12 |
|
|
|
|
| ||
|
|
|
| |||
|
|
|
|
|
|
|
|
|
|
|
|
|
|
|
|
|
|
|
|
|
|
|
|
|
|
|
|
|
|
|
|
|
|
|
|
|
|
|
|
|
|
|
|
|
|
|
|
|
|
|
|
|
|
|
|
|
|
|
|
|
|
|
|
|
|
|
|
|
|
|
|
|
|
|
|
|
|
|
|
|
|
|
|
|
|
|
|
|
|
|
|
|
|
|
|
|
|
|
| POWER | 1 | |
SLEEP |
|
|
| |
A/CH | STATUS/EXIT CC | CLOCK |
| |
3 RD | 2 | TV/VCR |
| |
1 | 3 |
|
| |
ACC |
|
|
|
|
4 | 5 | 6 |
|
|
7 | 8 | 9 | 2 |
|
SMART | SM |
| ||
| 0 |
|
|
|
SOUND | PICTURE |
|
| |
MENU ![]() SURF
SURF
![]() 4
4
VOL | CH |
MUTE
Note: If a power failure occurs, the TV's
CLOCK will have to be reset.
If no time is set, the time will not appear onscreen.
8
