Connecting for HDMI output
If you have an HDMI or DVI (with HDCP) equipped monitor or display, you can connect it to this player using a commercially available HDMI cable that supports the HDMI 1.3 specification (Category 2) or later.
The HDMI connector outputs uncompressed digital video, as well as most digital audio formats.
![]() Important
Important
•This unit has been designed to be compliant with HDMI
•If you change the display connected to the HDMI output, you will also need to change the output video resolution settings to match the new display (see Changing the output video resolution on page 14 to do this).
•The HDMI connection is compatible with
•Depending on the HDMI cable being used, 1080p output may not appear correctly.
•If you connect a DVI device to the HDMI output of this player, ensure that it is compliant with
Protection (HDCP). If you choose to connect to a DVI connector, you will need a separate adaptor (DVIHDMI) to do so. A DVI connection, however, does not support audio signals. Consult your local audio dealer for more information.
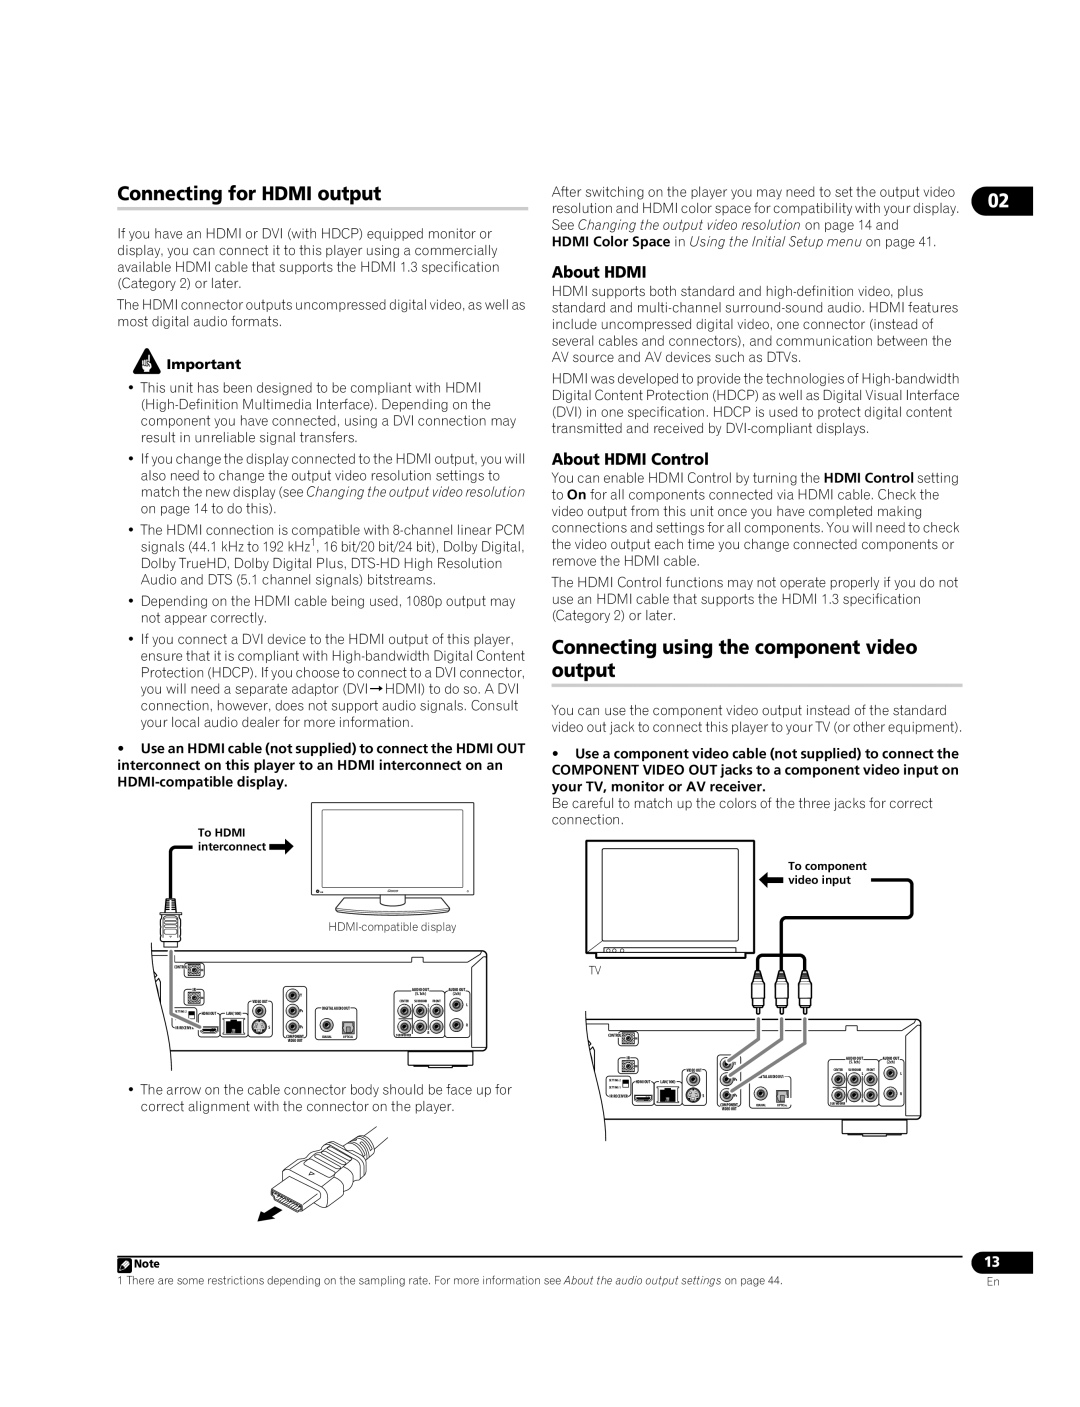
•Use an HDMI cable (not supplied) to connect the HDMI OUT interconnect on this player to an HDMI interconnect on an
To HDMI interconnect 
|
|
|
|
| ||||
CONTROL | IN |
|
|
|
|
|
|
|
|
|
|
|
|
|
|
| |
IR |
|
|
|
|
|
| AUDIO OUT | AUDIO OUT |
| IN |
| Y |
|
|
| (5.1ch) | (2ch) |
| VIDEO OUT |
|
|
| CENTER | SURROUND | FRONT | |
|
|
|
|
| ||||
|
|
|
| DIGITAL AUDIO OUT |
| L | L | |
SETTING 2 |
|
| PB |
|
|
| ||
HDMI OUT | LAN(100) |
|
|
|
|
| ||
|
|
|
|
|
|
| ||
SETTING 1 |
|
|
|
|
|
|
|
|
IR RECEIVER |
| S | PR |
|
|
|
| R |
|
|
|
|
|
| |||
|
|
| COMPONENT |
|
| SUB WOOFER | R |
|
|
|
| COAXIAL | OPTICAL |
|
| ||
|
|
| VIDEO OUT |
|
|
|
|
|
•The arrow on the cable connector body should be face up for correct alignment with the connector on the player.
After switching on the player you may need to set the output video resolution and HDMI color space for compatibility with your display. 02 See Changing the output video resolution on page 14 and
HDMI Color Space in Using the Initial Setup menu on page 41.
About HDMI
HDMI supports both standard and
HDMI was developed to provide the technologies of
About HDMI Control
You can enable HDMI Control by turning the HDMI Control setting to On for all components connected via HDMI cable. Check the video output from this unit once you have completed making connections and settings for all components. You will need to check the video output each time you change connected components or remove the HDMI cable.
The HDMI Control functions may not operate properly if you do not use an HDMI cable that supports the HDMI 1.3 specification (Category 2) or later.
Connecting using the component video output
You can use the component video output instead of the standard video out jack to connect this player to your TV (or other equipment).
•Use a component video cable (not supplied) to connect the COMPONENT VIDEO OUT jacks to a component video input on your TV, monitor or AV receiver.
Be careful to match up the colors of the three jacks for correct connection.
|
|
|
|
|
| To component | ||
|
|
|
|
|
| video input |
| |
TV |
|
|
|
|
|
|
|
|
CONTROL | IN |
|
|
|
|
|
|
|
|
|
|
|
|
|
|
| |
IR |
|
|
|
|
|
| AUDIO OUT | AUDIO OUT |
| IN |
| Y |
|
|
| (5.1ch) | (2ch) |
| VIDEO OUT |
|
|
| CENTER | SURROUND | FRONT | |
|
|
|
|
| ||||
|
|
|
| DIGITAL AUDIO OUT |
| L | L | |
SETTING 2 |
|
| PB |
|
|
| ||
HDMI OUT | LAN(100) |
|
|
|
|
| ||
|
|
|
|
|
|
| ||
SETTING 1 |
|
|
|
|
|
|
|
|
IR RECEIVER |
| S | PR |
|
|
|
| R |
|
|
|
|
|
| |||
|
|
| COMPONENT |
|
| SUB WOOFER | R |
|
|
|
| COAXIAL | OPTICAL |
|
| ||
|
|
| VIDEO OUT |
|
|
|
|
|
Note | 13 |
1 There are some restrictions depending on the sampling rate. For more information see About the audio output settings on page 44. | En |