DV-696AV-SDV-696AV-K
Risk of Electric Shock Do not Open
Operating Environment
English
Contents
Before you start
Features
Before you start Chapter
What’s in the box
Before you start
Putting the batteries in the remote
Energy saving design
Disc / content format playback
Before you start Hints on installation
Compatibility
Is a trademark of DVD Format/Logo Licensing Corporation
DVD+R/DVD+RW compatibility
CD-R/RW compatibility
DVD-R/RW compatibility
Compressed audio compatibility
About DivX
About WMA
Jpeg file compatibility
DivX video compatibility
PC-created disc compatibility
File format used by digital still cameras
Connecting up Chapter
Connecting up
Easy connections
Connecting using a Scart AV cable
Connecting up
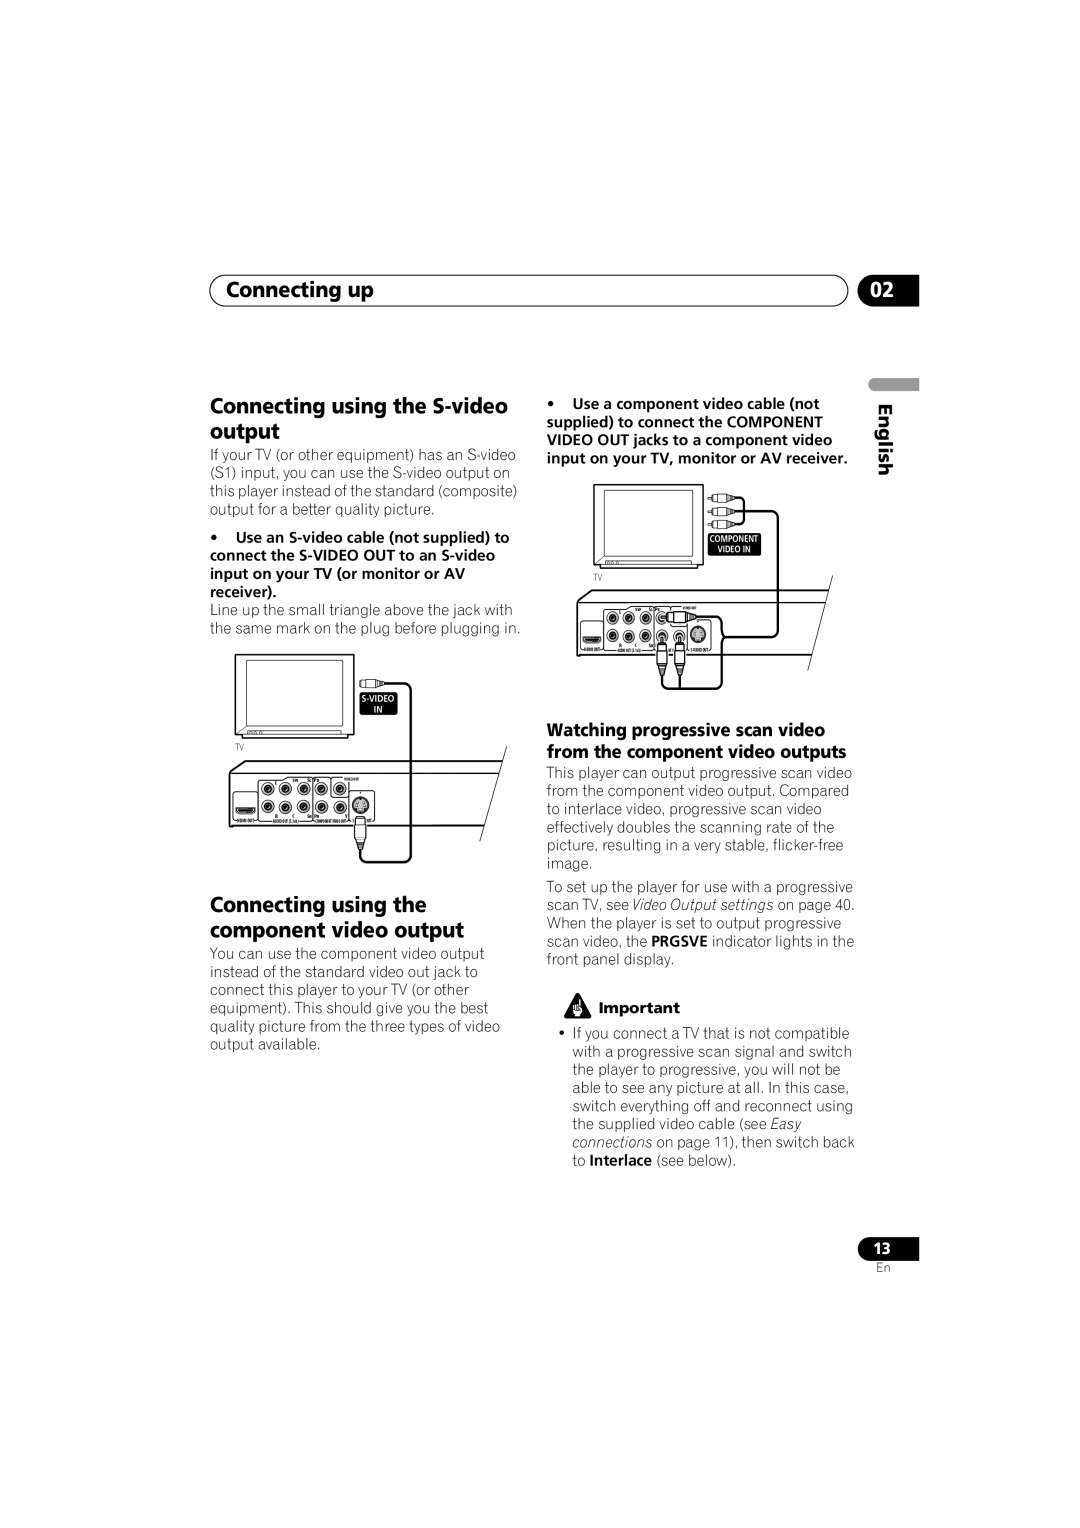
Connecting using the component video output
Connecting up Connecting using the S-video output
Use a component video cable not
Supplied to connect the Component
Connecting the multichannel analog outputs
Connecting to an AV receiver
Interlace
Tip
Connecting the digital output
About Hdmi
Connecting up Connecting using Hdmi
576P/480P
Controls and displays Chapter
Controls and displays
Front panel
Using the remote control
Controls and displays Remote control
Using the on-screen displays
Switching on
Getting started
Getting started Chapter
Setting the language of this
Setting up the player for your
Getting started
Player’s on-screen displays
Press OPEN/CLOSE to open the disc tray Load a disc
Getting started Playing discs
Press play to start playback
Resume and Last Memory
Basic playback controls
Button What it does
Numbers
Return
DVD and DivX disc menus
Video CD/Super VCD PBC menus
FAQ
My DVD-Audio disc starts playing, but then suddenly stops
Why can’t I hear Sacd audio through the digital outputs?
There’s no picture from the Hdmi output
Playing discs Chapter
Playing discs
Scanning discs
Playing in slow motion
Viewing a Jpeg slideshow
Playing discs Frame advance/frame reverse
During playback, press pause
Press
Select the thumbnail image for what you want to play
Select a view option
Use the cursor buttons Enter to navigate
Looping a section of a disc
Using repeat play
To resume normal playback, select ‘Off’ from the menu
Select a repeat play option
Using random play
Select a random play option
To play the program list, press play
Creating a program list
Searching a disc
Select a search mode
Other functions available from the program menu
Press Enter to start playback
Switching audio language/ channels
Playing discs Switching subtitles
Zooming the screen
Press Subtitle repeatedly to select a subtitle option
During playback or when paused, press Angle to switch angle
Playing discs Switching camera angles
Displaying disc information
Audio Settings and Video Adjust menus Chapter
Audio Settings and Video Adjust menus
Audio Settings menu
Audio DRC
Video Adjust menu
Audio Settings and Video Adjust menus
Make settings using Cursor buttons, and Enter
Dialog
Initial Settings menu Chapter
Initial Settings menu
Using the Initial Settings menu
Setting Option What it means
Initial Settings menu Digital Audio Out settings
Initial Settings menu Video Output settings
Display settings
Initial Settings menu Language settings
Registering a new password
Initial Settings menu Options settings
Parental Lock
Changing your password
Initial Settings menu
Setting/changing the Parental Lock
Setting/changing the Country/Area code
Playing DivX VOD content
About DivX VOD content
Displaying your DivX VOD registration code
Select ‘Display’
Audio Output Mode
Initial Settings menu Speakers settings
DTS CD
About the audio output settings
Mpeg *1
Initial Settings menu About the Hdmi output settings
Hdmi output with DVD-Audio sources
Component specification
Example Disc Format
Use
Speaker Distance
Speaker distance for the highlighted
Speaker Use Cursor up/down to Change the distance
Default settings L/R Large C Large SL SR LargeSW On
Speaker Installation
To change the current setting
Use the cursor up/down buttons to select a speaker
Additional information Chapter
Additional information
Taking care of your player and discs
Screen sizes and disc formats
Additional information
Resetting the player
Setting the TV system
DVD-Video regions
Problem
Troubleshooting
Remedy
Problem Remedy
No audio, or audio is
DVD and CD volume
Distorted
Cannot output 192kHz or
ProblemRemedy
Hdmi troubleshooting
DivX*1
Glossary
Hdmi *4
Country/Area code list
Additional information Language code list
Country/Area, Country/Area code, Country/Area code letter
General
Additional information Specifications
Digital output
Condizioni ambientali di funzionamento
Importante
Italiano
Indice
Prima di iniziare Capitolo
Prima di iniziare
Caratteristiche
Contenuto della confezione
Prima di iniziare
Inserimento delle batterie nel telecomando
Risparmio energetico
Non possono venire usati con questo lettore
Prima di iniziare Suggerimenti per l’installazione
Tenere anche presente che i dischi registrabili
Compatibilità DVD+R/DVD+RW
Compatibilità con dischi CD-R/RW
Compatibilità con DVD-R/RW
Compatibilità con audio compresso
Compatibilità DivX video
Informazioni su DivX
Compatibilità con dischi creati con personal computer
Compatibilità con file Jpeg
Formato file utilizzato da fotocamere digitali
Collegamento Capitolo
Collegamento
Collegamenti facili
Collegamento tramite cavo AV Scart
Collegamento
Collegamento con l’uscita video Component
Collegamento Collegamento con l’uscita S- Video
Collegamento delle uscite analogiche multicanale
Collegamento a un ricevitore
Suggerimento
Ingresso digitale del ricevitore AV
Collegamento di un’uscita digitale
Informazioni su Hdmi
Collegamento Collegamento con Hdmi
STANDBY/ON
Controlli e display Capitolo
Controlli e display
Pannello anteriore
Utilizzo del telecomando
Controlli e display Telecomando
Pulsanti numerici pagina
Come iniziare Capitolo
Come iniziare
Accensione
Utilizzo dei display su schermo
Impostazione della lingua delle schermate visualizzate
Come iniziare
Premere riproduzione per avviare la riproduzione
Come iniziare Riproduzione di dischi
Funzioni di ripresa della riproduzione e di ultima memoria
Controlli di riproduzione fondamentali
Pulsante a cosa serve
Pulsante Cosa serve
TOP Menu
Menu dei DVD e dei dischi DivX
Perché il disco caricato non viene riprodotto?
Menu PBC di Video CD/Super VCD
Non appare nessuna immagine dall’uscita Hdmi
Il mio DVD-Audio inizia la riproduzione, ma si ferma subito
Riproduzione di dischi Capitolo
Riproduzione di dischi
Scansione dei dischi
Riproduzione al rallentatore
Scegliere un’opzione di visualizzazione
Riproduzione di dischi Visione di uno slideshow Jpeg
Scegliere l’anteprima del materiale che si vuole riprodurre
Utilizzo della riproduzione ripetuta
Ripetizione ripetuta di una sezione di un disco
Utilizzo della riproduzione casuale
Selezionare un’opzione di riproduzione casuale
Creazione di una lista programmi
Ripetere il passaggio 3 per creare una lista programmi
Altre funzioni disponibili dal menu di programmazione
Ricerche sul disco
Premere Enter per avviare la riproduzione
Cambio della lingua/canale audio
Riproduzione di dischi Cambio di sottotitoli
Zoom su schermo
Cambio dell’angolo di visuale
Italiano
Menu delle impostazioni audio Audio Settings
Premere Home Menu e scegliere ‘Video Adjust’ dallo schermo
Menu delle impostazioni video Video Adjust
Menu delle impostazioni iniziali Initial Settings Capitolo
Menu delle impostazioni iniziali Initial Settings
Utilizzo del menu Initial Settings
Impostazione Opzioni Cosa significa
Predefinita cambia a 1280x720p
’impostazione
Seconda del formato
Del televisore PAL
Lingue come indicato
Impostazioni del display
Scegliere ‘Options’, quindi ‘Password’
Registrazione di una nuova password
Premere Enter per memorizzare la password
Modifica della password
Menu delle impostazioni iniziali Initial Settings
Impostazione/modifica del livello Parental Lock
Informazioni sul contenuto DivX
Riproduzione di contenuto DivX
Visualizzazione del codice di registrazione DivX VOD
Scegliere ‘Display’
Se si imposta 5.1 Channel, non viene
DVD-RW
Le impostazioni di uscita audio
Formato dischi audio
Specifiche dei componenti
Elaborazione Hdmi con fonti DVD audio
Componente Formato del disco Esempio
Impostazione predefinita tutti gli altoparlanti 3,0 m
Large SL/SR LargeSW On
Informazioni aggiuntive Capitolo
Informazioni aggiuntive
Manutenzione del lettore e dei dischi
Informazioni aggiuntive
Dimensioni dello schermo e formati dei dischi
Reinizializzazione del lettore
Impostazione del sistema di colore
Regioni dei DVD-Video
Problema Rimedio
Diagnostica
Problema
Distorto
Audio mancante o
’audio analogico è
Assente
DTS in uscita
Nessun segnale audio
’audio rimissato non
Dialoghi sono inaudibili
ProblemaRimedio
Risoluzione dei problemi con Hdmi
Elaborazione Hdmi con fonti DVD audio a pagina
Informazioni aggiuntive
Forma
Informazioni aggiuntive Glossario
Video a
Lista codici paesi/aree
Informazioni aggiuntive Lista di codici delle lingue
Lingua sigla, codice della lingua
Paese/Area, codice Paese/Area, lettera codice Paese/Area
Generali
Informazioni aggiuntive Dati tecnici
Page
Italiano
Pioneer Corporation