INTERFACE |
| INTERFACE |
|
|
|
FRONT VIEW/VUE AVANT/VORDERANSICHT
A
1
6
PHONES | BUSY |
|
2 3 4 5
Fig. 1/Abb.1
SCHNITTSTELLE
REAR VIEW/VUE DE LA FACE ARRIERE/RÜCKANSICHT
|
|
|
| 3 9 | 1 |
|
|
4 | 1 | 5 | 1 | 4 0 | 2 | 4 | 1 |
7 | 8 |
| 9 |
|
| 0 | |
Fig. 2/Abb.2
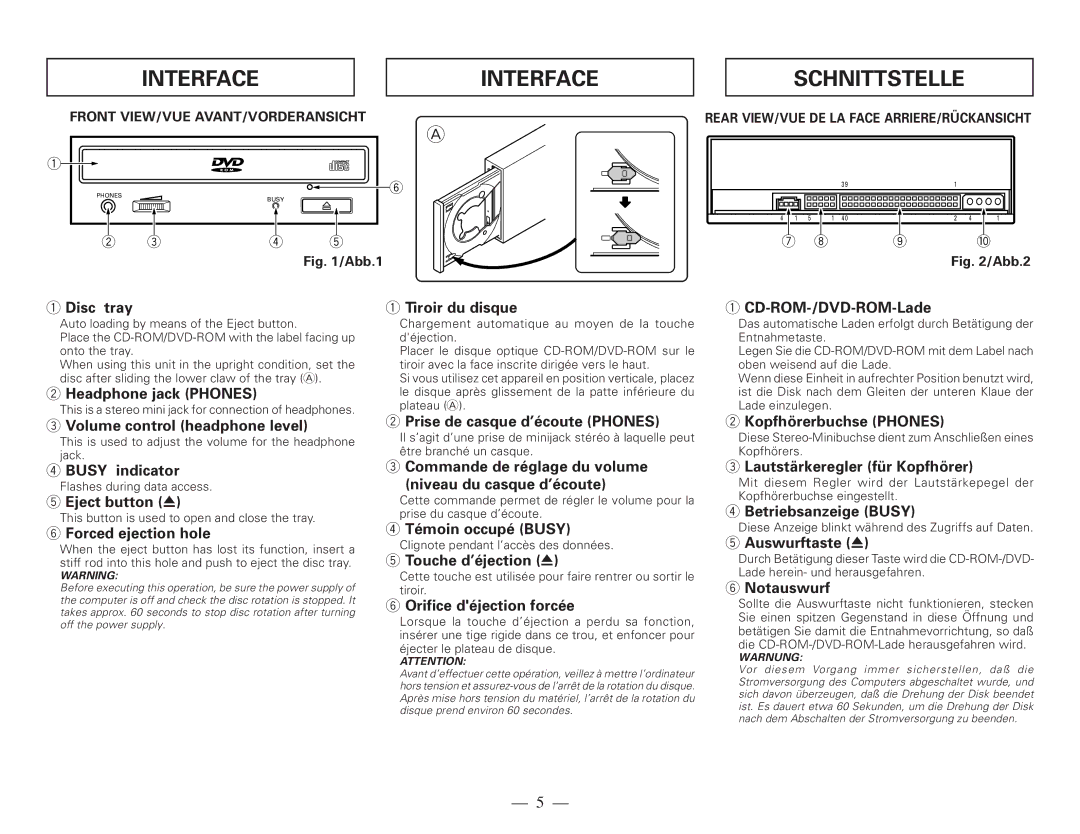
1Disc tray
Auto loading by means of the Eject button.
Place the
When using this unit in the upright condition, set the disc after sliding the lower claw of the tray (A).
2Headphone jack (PHONES)
This is a stereo mini jack for connection of headphones.
3Volume control (headphone level)
This is used to adjust the volume for the headphone jack.
4BUSY indicator
Flashes during data access.
5Eject button (0)
This button is used to open and close the tray.
6Forced ejection hole
When the eject button has lost its function, insert a stiff rod into this hole and push to eject the disc tray.
WARNING:
Before executing this operation, be sure the power supply of the computer is off and check the disc rotation is stopped. It takes approx. 60 seconds to stop disc rotation after turning off the power supply.
1Tiroir du disque
Chargement automatique au moyen de la touche d'éjection.
Placer le disque optique
Si vous utilisez cet appareil en position verticale, placez le disque après glissement de la patte inférieure du plateau (A).
2Prise de casque d’écoute (PHONES)
Il s’agit d’une prise de minijack stéréo à laquelle peut être branché un casque.
3Commande de réglage du volume
(niveau du casque d’écoute)
Cette commande permet de régler le volume pour la prise du casque d’écoute.
4Témoin occupé (BUSY)
Clignote pendant l’accès des données.
5Touche d’éjection (0)
Cette touche est utilisée pour faire rentrer ou sortir le tiroir.
6Orifice d'éjection forcée
Lorsque la touche d’éjection a perdu sa fonction, insérer une tige rigide dans ce trou, et enfoncer pour éjecter le plateau de disque.
ATTENTION:
Avant d’effectuer cette opération, veillez à mettre l’ordinateur hors tension et
1CD-ROM-/DVD-ROM-Lade
Das automatische Laden erfolgt durch Betätigung der Entnahmetaste.
Legen Sie die
Wenn diese Einheit in aufrechter Position benutzt wird, ist die Disk nach dem Gleiten der unteren Klaue der Lade einzulegen.
2Kopfhörerbuchse (PHONES)
Diese
3Lautstärkeregler (für Kopfhörer)
Mit diesem Regler wird der Lautstärkepegel der Kopfhörerbuchse eingestellt.
4Betriebsanzeige (BUSY)
Diese Anzeige blinkt während des Zugriffs auf Daten.
5Auswurftaste (0)
Durch Betätigung dieser Taste wird die
6Notauswurf
Sollte die Auswurftaste nicht funktionieren, stecken Sie einen spitzen Gegenstand in diese Öffnung und betätigen Sie damit die Entnahmevorrichtung, so daß die
WARNUNG:
Vor diesem Vorgang immer sicherstellen, daß die Stromversorgung des Computers abgeschaltet wurde, und sich davon überzeugen, daß die Drehung der Disk beendet ist. Es dauert etwa 60 Sekunden, um die Drehung der Disk nach dem Abschalten der Stromversorgung zu beenden.