7Setting the SCSI ID

The SCSI ID is set using the switch on the device’s rear panel.

The computer will recognize each connected SCSI device by its SCSI ID.

Generally, the SCSI IDs are set as follows: “0” for a hard disk, “3” for a CD-ROM and “7” for a SCSI interface board (card). Refer to the operating instructions that accompany each device to verify that all SCSI devices have different IDs.

SCSI 0

ID

Press “+” to increase the number (0, 1, 2,...7) and “–” to decrease the ID setting (7, 6, 5,...0).

NOTES:

ÖThe SCSI ID is preset to “0” at the factory.

ÖTo prevent the switch from breaking, do not press “+” when the SCSI ID selection is set to “7” or “–” when it is set to “0”.

ÖThis device will recognize setting the SCSI ID when the power is turned on.

CONNECTION

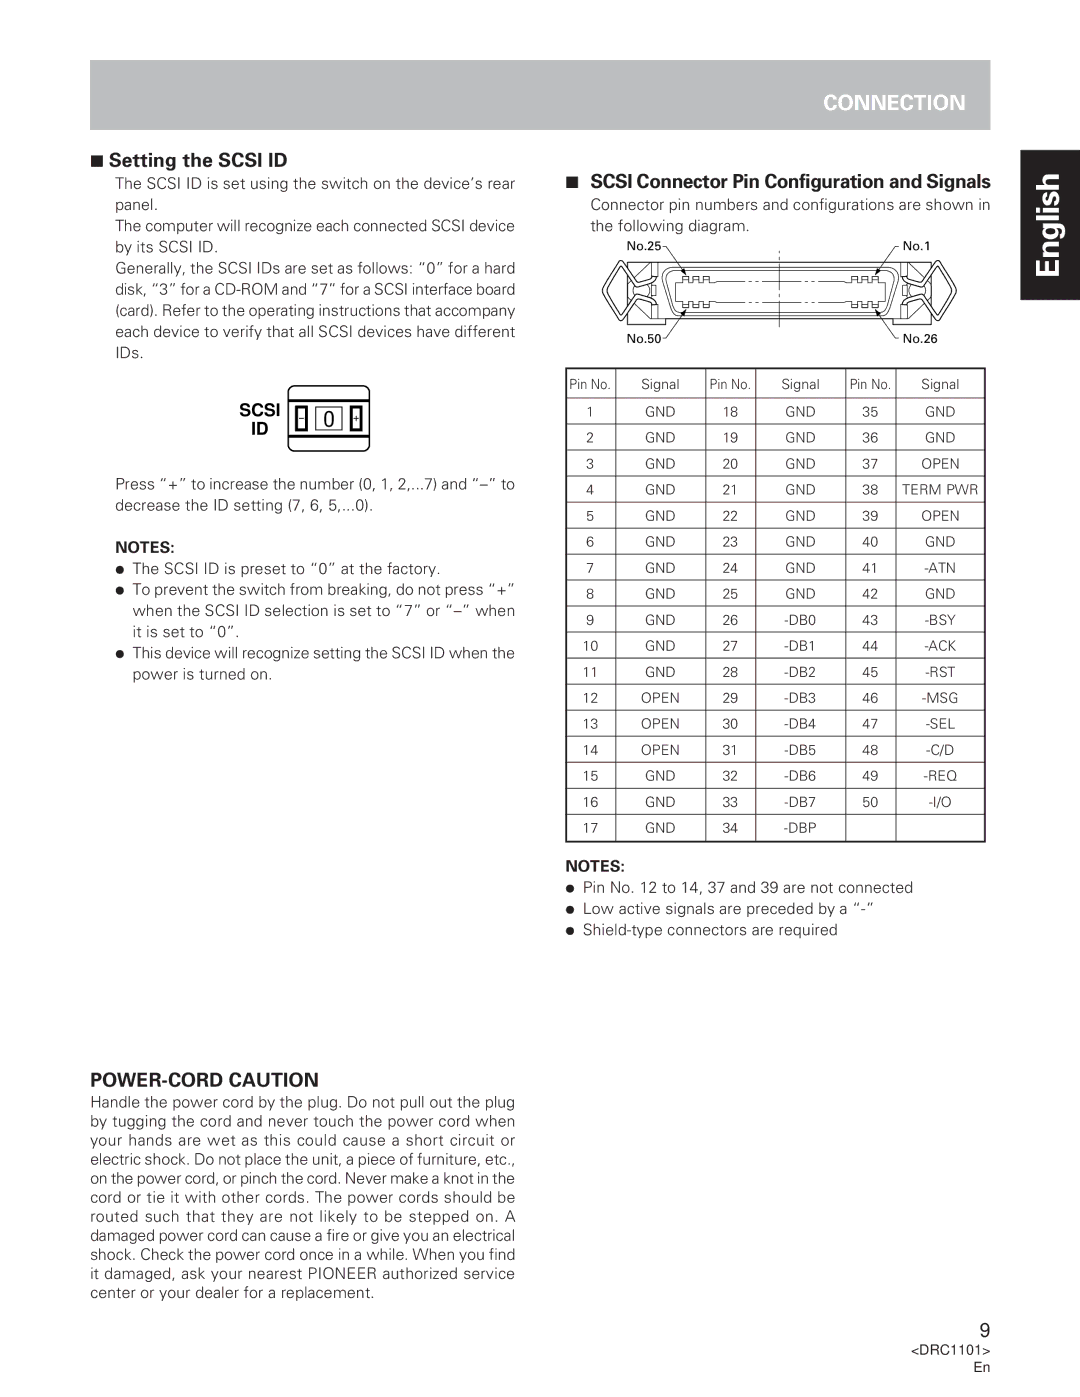
7SCSI Connector Pin Configuration and Signals

Connector pin numbers and configurations are shown in the following diagram.

No.25

No.1

No.50

No.26

Pin No.

Signal

Pin No.

Signal

Pin No.

Signal


1

GND

18

GND

35

GND


2

GND

19

GND

36

GND


3

GND

20

GND

37

OPEN


4

GND

21

GND

38

TERM PWR


5

GND

22

GND

39

OPEN


6

GND

23

GND

40

GND


7

GND

24

GND

41

-ATN


8

GND

25

GND

42

GND


9

GND

26

-DB0

43

-BSY


10

GND

27

-DB1

44

-ACK


11

GND

28

-DB2

45

-RST


12

OPEN

29

-DB3

46

-MSG


13

OPEN

30

-DB4

47

-SEL


14

OPEN

31

-DB5

48

-C/D


15

GND

32

-DB6

49

-REQ


16

GND

33

-DB7

50

-I/O


17

GND

34

-DBP


NOTES:

ÖPin No. 12 to 14, 37 and 39 are not connected

ÖLow active signals are preceded by a “-”

ÖShield-type connectors are required

English

POWER-CORD CAUTION

Handle the power cord by the plug. Do not pull out the plug by tugging the cord and never touch the power cord when your hands are wet as this could cause a short circuit or electric shock. Do not place the unit, a piece of furniture, etc., on the power cord, or pinch the cord. Never make a knot in the cord or tie it with other cords. The power cords should be routed such that they are not likely to be stepped on. A damaged power cord can cause a fire or give you an electrical shock. Check the power cord once in a while. When you find it damaged, ask your nearest PIONEER authorized service center or your dealer for a replacement.

9

<DRC1101> En

Page 9
Image 9
Pioneer DVR-S201 manual Setting the Scsi ID, Scsi Connector Pin Configuration and Signals

DVR-S201 specifications

The Pioneer DVR-S201 is a versatile and reliable internal DVD-RW drive designed for users who seek high-quality performance in optical storage devices. As part of Pioneer's esteemed line of optical drives, the DVR-S201 showcases an array of features that cater to both casual users and professionals alike.

One of the standout characteristics of the DVR-S201 is its advanced recording capabilities. The drive supports a wide range of disc formats, including DVD-R, DVD-RW, DVD+R, DVD+RW, CD-R, and CD-RW. This compatibility allows users to easily replicate and create multimedia content, whether it be for data storage, video recording, or audio disc creation. The drive offers a maximum DVD writing speed of 24x and CD writing speed of 48x, ensuring fast and efficient data transfer.

In terms of technology, the DVR-S201 incorporates Pioneer's proprietary engineering innovations. With the use of Fluid Dynamic Bearing (FDB) motors, the drive operates with minimal noise and vibration, ensuring a smooth and stable recording process. This technology also enhances the longevity of the drive, making it a dependable option for continuous use. The drive’s built-in error correction technology further contributes to its reliability by detecting and correcting data errors during the writing and reading processes.

The DVR-S201 is designed for ease of use and installation. Its slim form factor makes it an excellent choice for systems with limited space, while the straightforward SATA interface allows for quick and simple connectivity to modern PCs. The drive is also compatible with various operating systems, including Windows and macOS, broadening its utility across different platforms.

Additionally, the DVR-S201 boasts a sleek and modern aesthetic, featuring a compact design that fits seamlessly into any computer case. Its simplicity in setup and maintenance makes it user-friendly, making it an ideal choice for users who may not be tech-savvy.

Overall, the Pioneer DVR-S201 is an impressive internal DVD-RW drive that combines speed, reliability, and versatility. With its wide range of supported formats, innovative technologies, and user-friendly design, it serves as an excellent solution for anyone looking to handle optical media with ease and confidence. Whether for casual disc burning or professional data management, the DVR-S201 stands out as a valuable asset in any computing environment.