Pioneer PDA-5002 manual Clamp Position setup, Setup of Clamp Position, Press SET to select Locked

Models: PDA-5002

1 33
Download 33 pages 44.67 Kb
Page 15
Image 15

Setting Up the System

The table below shows what settings are appropriate and available for the type of connections made.

Set SETTING and VIDEO SIGNAL as follows.

SET UP

SETTING

SIGNAL

Connected


component


Component video output

VIDEO

COMPONENT

of a DVD player, etc.


RGB video output of a

VIDEO

RGB

video deck etc., with RGB


output


RGB video output of a PC

VGA

Not supported


WIDE VGA


XGA


WIDE XGA


10When the setup is completed, press MENU to exit the menu screen.

Notes

÷Make this setup for each input (INPUT1 and INPUT2).

÷The VIDEO SIGNAL setting is not supported when inputting a computer signal, or when the SETTINGS function has been used to select a signal other than VIDEO.

2Press 2/3 to select SET UP.

MAIN

MENU


INPUT1

PICTURE

SCREEN

SET UP

OPTION


I N P UT L A B E L


: I N P UT 1


POWE R

MA NAGEME NT : OF F


C L AMP

P O S I T I O N

: A U T O


S E T T I N G


: V GA


SELECT

SET

ENTER

MENU

EXIT

3Press 5/to select CLAMP POSITION.

MAIN

MENU


INPUT1

PICTURE

SCREEN

SET UP

OPTION


I NP UT L A B E L


: I NP UT 1


POWE R

MA NAGEME NT : OF F


C L A MP P O S I T I O N

: A U T O


S E T T I N G


: V GA


SELECT

SET

CHANGE

MENU

EXIT

English

CLAMP POSITION setup

Depending on the signal, analog RGB signals may result in the screen image appearing with a whitish or greenish cast. In such cases, set “CLAMP POSITION” to LOCKED.

Normally, leave this setting at AUTO.

Setup of CLAMP POSITION

1Press MENU to display the menu screen. The menu screen appears.

MAIN MENU


INPUT1

PICTURE

SCREEN

SET UP

OPTION

C O N T R A S T


:

0


BR I GHT .


:

0


R. L E V E L


: + 6 0


G. L E V E L


: + 6 0


B. L E V E L


: + 6 0


H. E NHAN CE

:

0


V . E NHAN CE

:

0


RE S E T


SELECT


SET

ENTER

MENU

EXIT

4Press SET to select LOCKED.

MAIN

MENU


INPUT1

PICTURE

SCREEN

SET UP

OPTION


I NP UT L A B E L


: I NP UT 1


POWE R

MA NAGEME NT : OF F

SystemtheUpSetting


C L A MP P O S I T I O N

: L O C K E D


S E T T I N G


: V GA


SELECT

SET

CHANGE

MENU

EXIT

Mode selection will change as follows each time SET is pressed.

3AUTO

LOCKED 2

5When the setup is completed, press MENU to exit the menu screen.

Notes

÷Make this CLAMP POSITION setting for each applicable input (INPUT1 and INPUT2).

÷When using this setup, be sure to carefully check the signal output of the component that you are using. For details, please refer to the instruction manual supplied with the component you are connecting.

15

En

Page 15
Image 15
Pioneer PDA-5002 manual Clamp Position setup, Setup of Clamp Position, Press 5/∞ to select Clamp Position

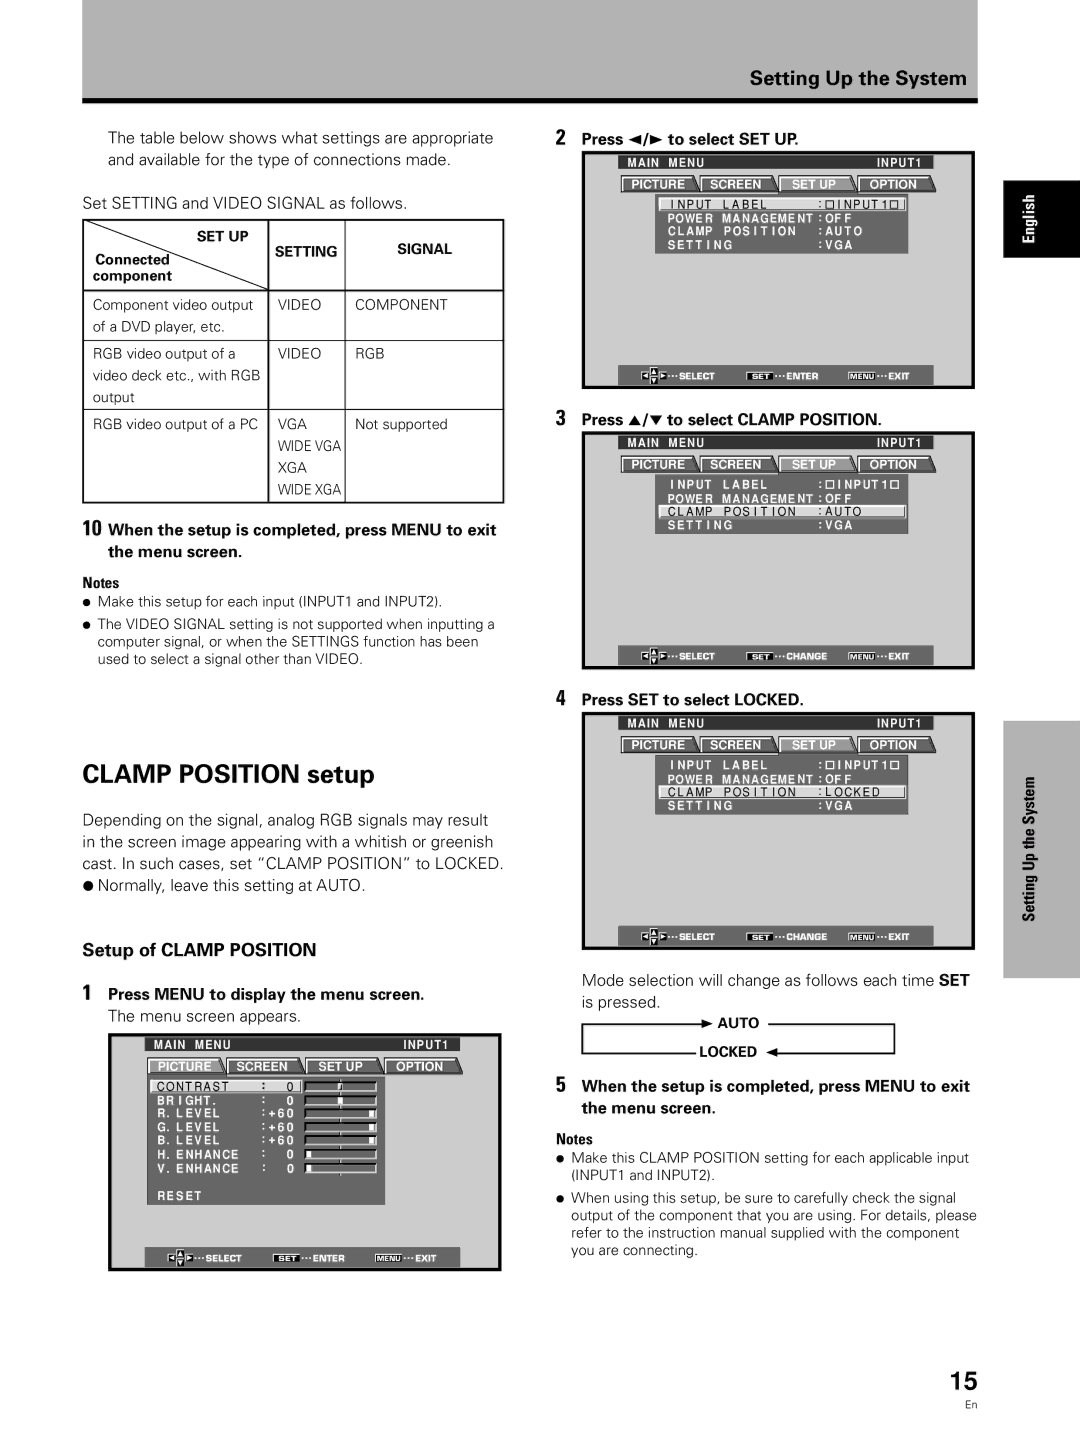
PDA-5002 specifications

The Pioneer PDA-5002 is a hallmark of modern audio technology, designed for enthusiasts who seek high-quality sound and versatile performance in their vehicles. This advanced digital amplifier integrates innovation and functionality to enhance the driving experience, making it a popular choice among car audio aficionados.

At the heart of the PDA-5002 is its powerful Class D amplifier architecture. This technology not only provides high efficiency, reducing the load on your vehicle’s electrical system, but it also ensures minimal heat generation, allowing for continuous use without the risk of overheating. With a maximum output power of 500 watts, the PDA-5002 delivers an impressive audio performance, capable of driving multiple speakers while maintaining clarity and dynamic range.

One of the key features of the PDA-5002 is its multi-channel configuration. It includes four channels, allowing users to connect a wide range of speaker setups, from simple front and rear speakers to more complex multi-speaker arrangements. This versatility makes the amplifier ideal for both casual listeners and serious audiophiles who demand high fidelity.

The unit supports a variety of audio signal inputs, including RCA and speaker-level inputs, ensuring compatibility with numerous head units and aftermarket systems. This flexibility is essential for users looking to upgrade their audio without overhauling their entire system.

Pioneer has also incorporated advanced signal processing technologies into the PDA-5002. Features such as adjustable crossover settings allow users to tailor the amplifier’s output to match their specific speakers and personal preferences. Bass boost and high-pass filter settings further enhance the audio experience, enabling users to achieve the perfect sound profile.

Durability is another hallmark of the PDA-5002. Built with robust components and a compact, heat-resistant chassis, it is designed to withstand the rigors of automotive environments, ensuring longevity and reliable performance. Its sleek design allows for easy installation in tight spaces, making it a practical choice for various vehicle models.

In summary, the Pioneer PDA-5002 stands out with its powerful Class D amplification, multi-channel capability, versatile input options, advanced signal processing features, and durable construction. It represents a perfect fusion of innovation and performance, catering to those who seek an enhanced listening experience on the road. For anyone looking to elevate their car audio system, the PDA-5002 is certainly worth considering.