Installation
You can attach your optional mounts or stand to the plasma monitor in one of the following two ways: * While it is upright. (See Drawing A)
English | * As it is laid down with the screen face down (See Drawing B). Lay the protective sheet, which was wrapped around the |
| |
| monitor when it was packaged, beneath the screen surface so as not to scratch the screen face. |
| * Do not touch or hold the screen face when carrying the unit. |
•This device cannot be installed on its own. Be sure to use a stand or original mounting unit. (Wall mount unit, Stand, etc.)
* See page 1.
•For correct installation and mounting it is strongly recommended to use a trained, authorized dealer.
Failure to follow correct mounting procedures could result in damage to the equipment or injury to the installer.
Product warranty does not cover damage caused by improper installation.
* Use only the mounting kit or stand provided by manufacturer and listed under Options.
|
|
|
| When installing or carrying, use the | |||
Drawing A |
| Drawing B |
| ||||
|
|
|
| handles attached to the upper back | |||
|
|
|
| of the display. | |||
|
|
|
|
|
|
|
|
|
|
|
|
|
|
|
|
|
|
|
|
|
|
|
|
|
|
|
|
|
|
|
|
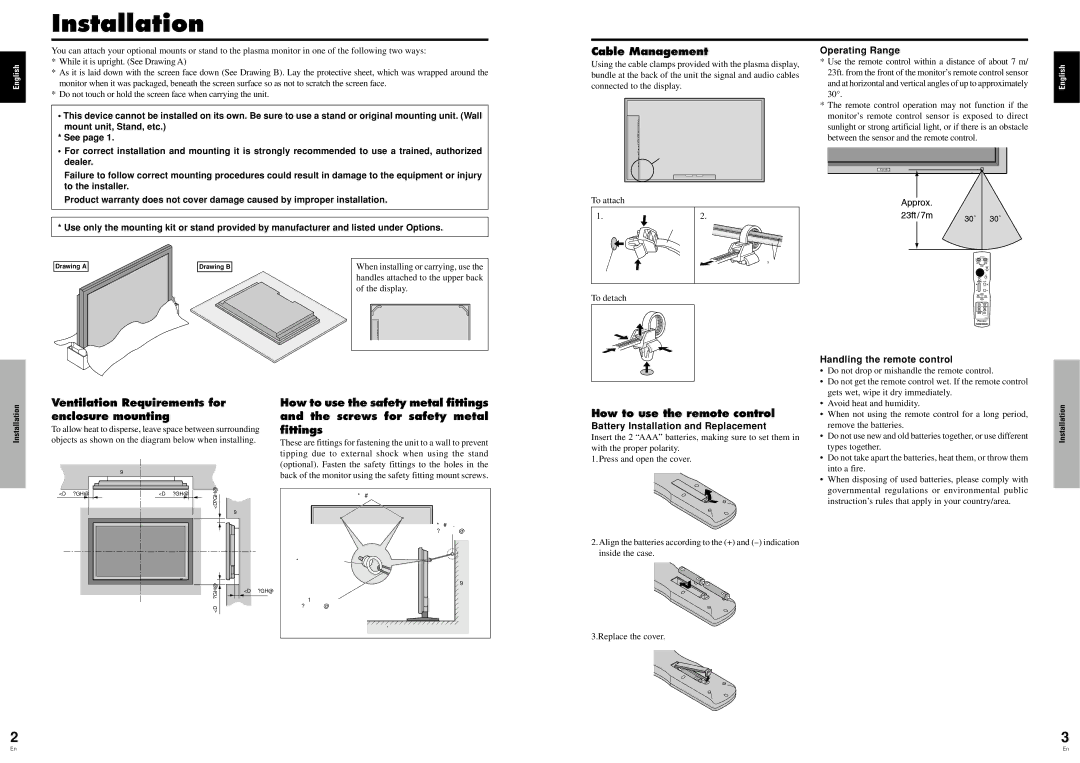
Cable Management
Using the cable clamps provided with the plasma display, bundle at the back of the unit the signal and audio cables connected to the display.
Back of the unit |
mounting holes |
To attach
1. | 2. |
clamp
![]()
![]()
![]() cables mounting hole
cables mounting hole
To detach
Operating Range
*Use the remote control within a distance of about 7 m/ 23ft. from the front of the monitor’s remote control sensor and at horizontal and vertical angles of up to approximately 30°.
*The remote control operation may not function if the monitor’s remote control sensor is exposed to direct sunlight or strong artificial light, or if there is an obstacle between the sensor and the remote control.
English
Handling the remote control
Installation
Ventilation Requirements for enclosure mounting
To allow heat to disperse, leave space between surrounding objects as shown on the diagram below when installing.
Wall |
How to use the safety metal fittings and the screws for safety metal fittings
These are fittings for fastening the unit to a wall to prevent tipping due to external shock when using the stand (optional). Fasten the safety fittings to the holes in the back of the monitor using the safety fitting mount screws.
How to use the remote control
Battery Installation and Replacement
Insert the 2 “AAA” batteries, making sure to set them in with the proper polarity.
1.Press and open the cover.
• | Do not drop or mishandle the remote control. |
• | Do not get the remote control wet. If the remote control |
| gets wet, wipe it dry immediately. |
• | Avoid heat and humidity. |
• | When not using the remote control for a long period, |
| remove the batteries. |
• Do not use new and old batteries together, or use different | |
| types together. |
• | Do not take apart the batteries, heat them, or throw them |
| into a fire. |
• | When disposing of used batteries, please comply with |
| governmental regulations or environmental public |
Installation
50mm (2") |
|
|
|
|
| 50mm (2") |
| (2") | |||
|
|
|
|
|
|
|
|
|
|
| |
| 50mm |
|
| Wall | ||
|
|
|
|
|
|
|
|
|
|
|
|
|
|
|
|
|
|
|
|
|
|
|
|
|
|
|
|
|
|
|
|
|
|
|
|
|
|
|
|
|
|
|
|
|
|
|
|
|
50mm (2") (2")mm 50
Screw hole
Safty metal fittings
Metal chain (Not supplied)
Screw or Hook etc. (Not supplied)
Wall
2.Align the batteries according to the (+) and
instruction’s rules that apply in your country/area. |
Table Top
3.Replace the cover.
2 | 3 |
En | En |