Connecting your equipment

Connecting the speakers

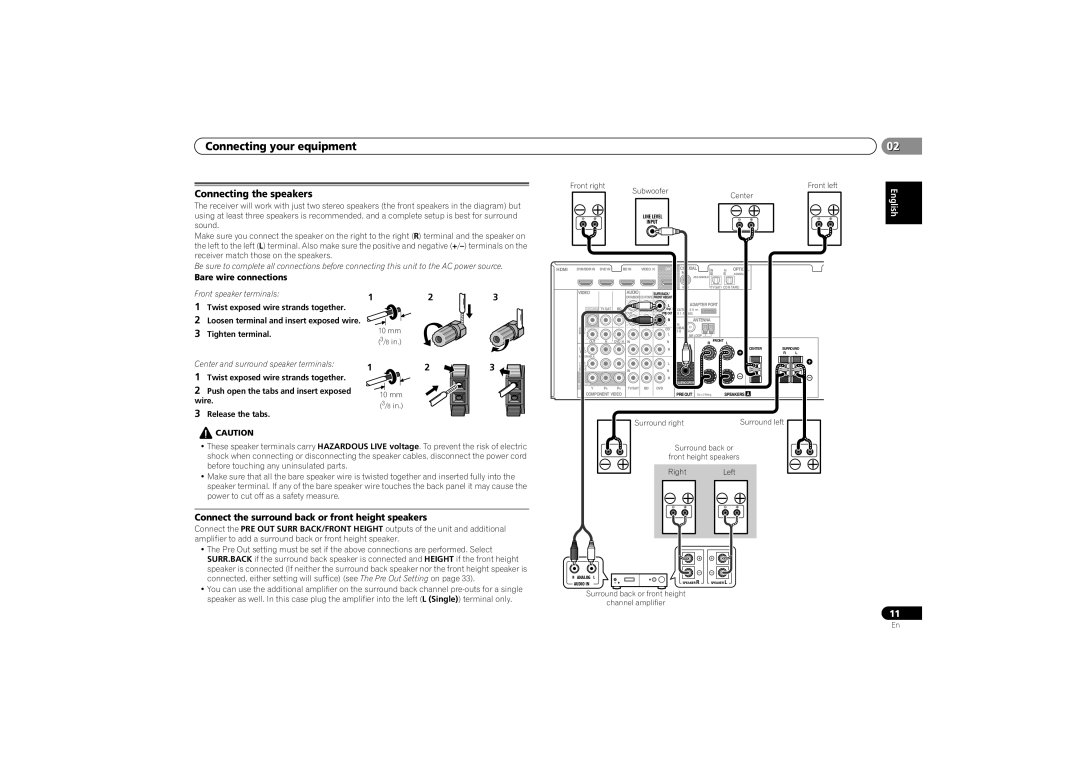
The receiver will work with just two stereo speakers (the front speakers in the diagram) but using at least three speakers is recommended, and a complete setup is best for surround sound.

Make sure you connect the speaker on the right to the right (R) terminal and the speaker on the left to the left (L) terminal. Also make sure the positive and negative (+/) terminals on the receiver match those on the speakers.

Be sure to complete all connections before connecting this unit to the AC power source.

Front right

Subwoofer

Front left


Center


LINE LEVEL


INPUT


HDMI DVR/BDR IN DVD IN

BD IN VIDEO N OUT CO XIAL

IN N OPTIC L


IN


0202

English

Bare wire connections

Front speaker terminals:

1Twist exposed wire strands together.

2Loosen terminal and insert exposed wire.

3Tighten terminal.

Center and surround speaker terminals:

1Twist exposed wire strands together.

2Push open the tabs and insert exposed wire.

3Release the tabs.

123

10 mm (3/8 in.)

1

2

3

10 mm (3/8 in.)


1

2

ASSIGNA


ASS GNABLE


(C )

(TV SAT) CD R TAPE)

VIDEO

AUDIO

SURR BACK/


DVR/BDR CD R/TAPE FRONT HEIGHT


MONITOR TV SAT

BD

L


ADAPTER PORT


Singl )

OUTP

5 V


OUT

PRE OUT

0 1 A AX)


R

M

ANTENNA


D R/


CD

UNBAL


B R


L

5


AM LOOP


OUT

N

DVD N

IN


N

R FRONT

L


I


R


CENTER

SURROUND

D D


R

L

A

GNABLE


I


L


D R/


B R)


IN


N


R


M

TOR


SUBWOOFER


O

Y

PB

PR

TV/SAT

BD

DVD


COMPONENT VIDEO

PRE OUT Cla s 2 Wiring

SPEAKERS

A

Surround right

Surround left

CAUTION

These speaker terminals carry HAZARDOUS LIVE voltage. To prevent the risk of electric shock when connecting or disconnecting the speaker cables, disconnect the power cord before touching any uninsulated parts.

Make sure that all the bare speaker wire is twisted together and inserted fully into the speaker terminal. If any of the bare speaker wire touches the back panel it may cause the power to cut off as a safety measure.

Connect the surround back or front height speakers

Connect the PRE OUT SURR BACK/FRONT HEIGHT outputs of the unit and additional amplifier to add a surround back or front height speaker.

The Pre Out setting must be set if the above connections are performed. Select SURR.BACK if the surround back speaker is connected and HEIGHT if the front height speaker is connected (If neither the surround back speaker nor the front height speaker is connected, either setting will suffice) (see The Pre Out Setting on page 33).

You can use the additional amplifier on the surround back channel pre-outs for a single speaker as well. In this case plug the amplifier into the left (L (Single)) terminal only.

Surround back or

front height speakers

Right Left

R ANALOG L

SPEAKER R

SPEAKER L

AUDIO IN

Surround back or front height

channel amplifier

11

En

Page 11
Image 11
Pioneer VSX-521-K 0202, Connecting the speakers, 123, Connect the surround back or front height speakers

VSX-521-K specifications

The Pioneer VSX-521-K is a versatile and high-performance AV receiver designed to enhance your home entertainment experience. This model stands out for its impressive array of features, delivering robust audio and video capabilities, making it an ideal choice for audiophiles and casual listeners alike.

One of the key characteristics of the VSX-521-K is its 5.1 channel surround sound capability, providing an immersive experience that draws you into your favorite movies and music. With a total power output of 100 watts per channel, it ensures clear and potent sound reproduction that can fill large rooms without distortion. This model supports various surround sound formats, including Dolby TrueHD and DTS-HD Master Audio, which offer high-definition audio that brings cinematic experiences to life.

The technology behind the VSX-521-K also includes advanced audio processing features. The receiver incorporates Pioneer's proprietary Acoustic Calibration System (MCACC), which automatically calibrates your audio setup based on your room’s acoustics, optimizing sound quality for any environment. This feature, combined with its 192kHz/24-bit DACs, ensures that every note and nuance is rendered accurately.

In terms of connectivity, the VSX-521-K provides multiple HDMI inputs, allowing you to connect various devices like Blu-ray players, gaming consoles, and streaming devices, all while maintaining high-definition video quality up to 1080p. Furthermore, it features an HDMI pass-through option, enabling the transmission of HD video signals even when the receiver is off.

For those who enjoy streaming music, this receiver supports various audio formats, and its USB input allows you to connect external devices easily. The front panel display is user-friendly, and navigation through the menu is intuitive, making it accessible for users of all levels.

The receiver is also designed with energy efficiency in mind, meeting energy-saving guidelines without sacrificing performance. Its sleek black finish and compact design ensure it integrates seamlessly into any entertainment setup.

Overall, the Pioneer VSX-521-K is a well-rounded AV receiver, offering exceptional audio quality, advanced features, and flexible connectivity options, making it a worthy addition to any home theater system. Whether you're watching movies or enjoying your favorite songs, this receiver is built to enhance your audio-visual experience in a substantial way.