04Controls and displays
Remote control
| RECEIVER | INPUT |
| SYSTEM OFF |
| |
|
| SOURCE |
| |||
1 |
| SELECT |
|
| 12 | |
|
|
|
|
| ||
2 |
|
|
|
|
|
|
|
|
|
|
|
| 13 |
| USB |
|
| DVR 2 |
|
|
3 | DVD |
| TV | DVR 1 | TVCTRL |
|
HDMI 2 | CD |
| 14 | |||
| iPod | HDMI 1 | TUNER | RECEIVER | ||
|
| SLEEP | S.RETRIEVER | ANALOG |
| |
|
|
|
|
| ATT |
|
|
| SR+ |
| DIMMER | MIDNIGHT/ |
|
4 |
|
|
|
| LOUDNESS |
|
| DIALOG E |
|
|
| ||
| D.ACCESS +10 |
|
| CLASS DISC |
| |
|
|
|
|
| ENTER |
|
| AVPARAMETER |
|
| CHLEVEL |
| |
5 | TOPMENU |
|
|
| MENU |
|
|
| TUNE |
|
|
| |
6 |
| ST |
| ST | T.EDIT |
|
SETUP |
| ENTER | RETURN |
| ||
|
|
|
|
| ||
| GUIDE PTYSEARCH | TUNE | BAND |
| ||
|
| TV CONTROL |
|
| ||
7 |
| SELECT |
|
| 15 | |
| TVVOL | INPUT | TVCH | VOL |
| |
|
| A | REC |
|
| 16 |
|
|
|
| MUTE | ||
|
|
|
|
|
| |
8 | MPX | B | EON | REC STOP | JUKEBOX |
|
| C | D | E |
| ||
|
|
| ||||
| AUDIO | SUBTITLE | HDD | DVD |
| |
| DISP |
|
| CH | CH |
|
|
|
| PHOTO | STEREO/ |
| |
| STATUS | SIGNAL SEL | SBch |
| ||
9 | F.S.SURR |
| ||||
|
|
|
|
| 17 | |
10 | MULTI OPE |
| THX | STANDARD | ADV.SURR | |
|
|
|
|
|
| |
11 | SHIFT | PHASE | MCACC | S.DIRECT | 18 | |
|
|
|
|
| ||
RECEIVER
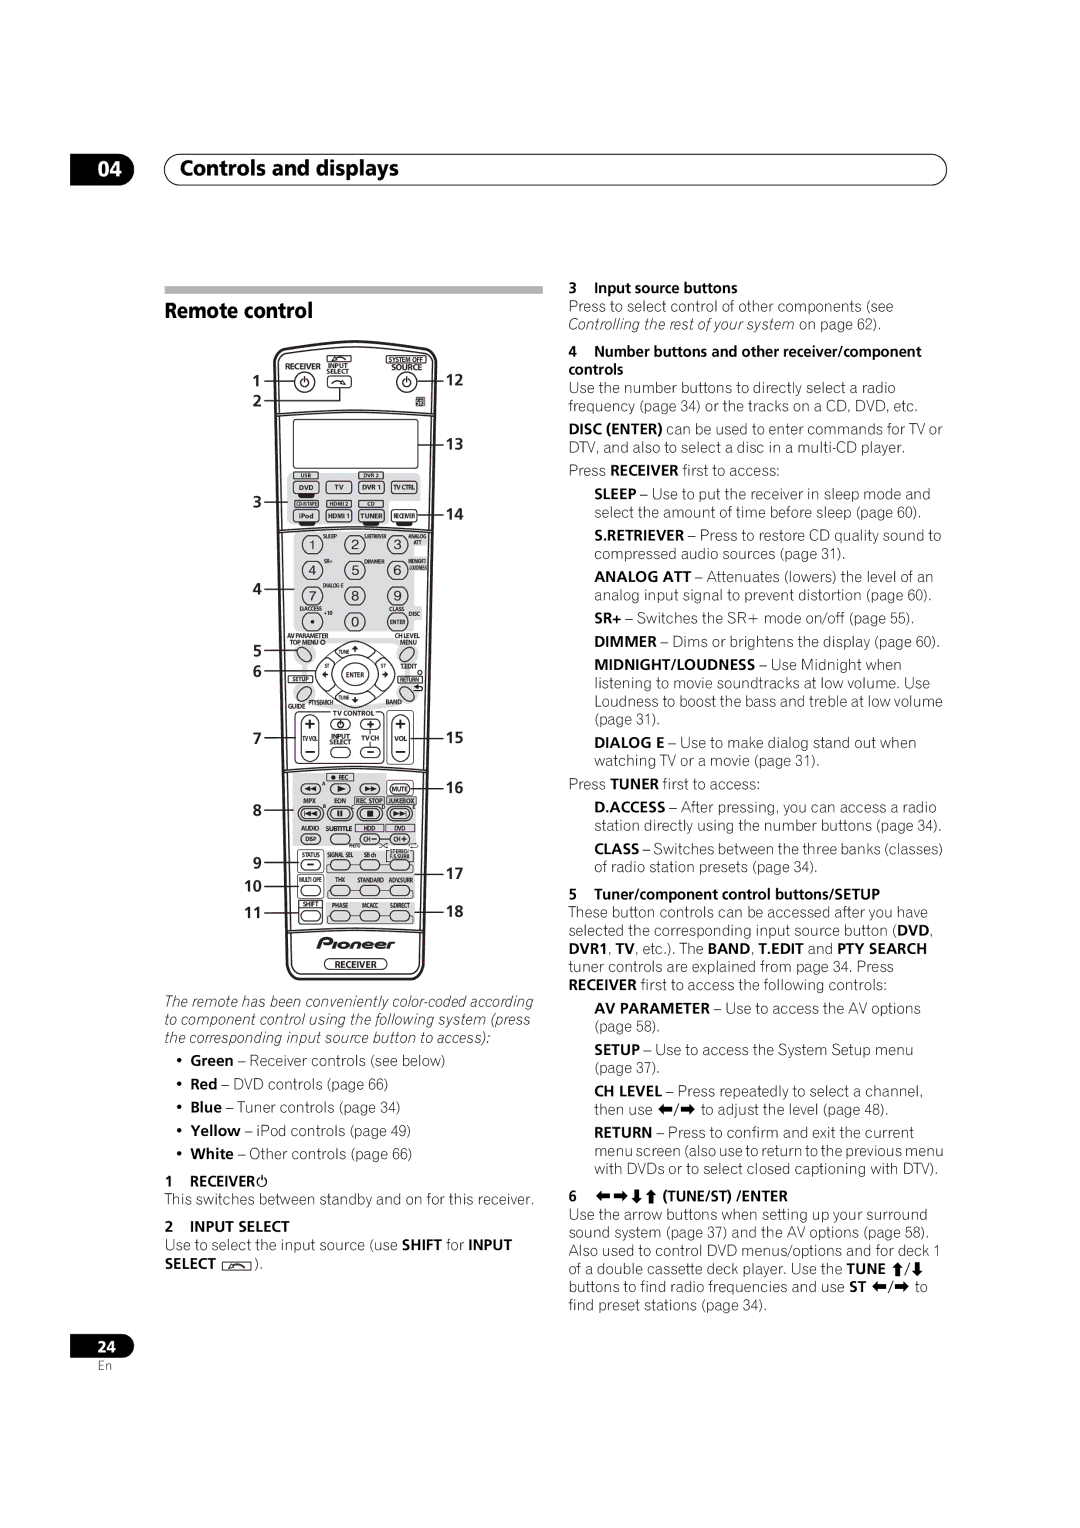
The remote has been conveniently
•Green – Receiver controls (see below)
•Red – DVD controls (page 66)
•Blue – Tuner controls (page 34)
•Yellow – iPod controls (page 49)
•White – Other controls (page 66)
1 RECEIVER
This switches between standby and on for this receiver.
2 INPUT SELECT
Use to select the input source (use SHIFT for INPUT
SELECT  ).
).
24
3 Input source buttons
Press to select control of other components (see Controlling the rest of your system on page 62).
4Number buttons and other receiver/component controls
Use the number buttons to directly select a radio frequency (page 34) or the tracks on a CD, DVD, etc.
DISC (ENTER) can be used to enter commands for TV or DTV, and also to select a disc in a
Press RECEIVER first to access:
SLEEP – Use to put the receiver in sleep mode and select the amount of time before sleep (page 60).
S.RETRIEVER – Press to restore CD quality sound to compressed audio sources (page 31).
ANALOG ATT – Attenuates (lowers) the level of an analog input signal to prevent distortion (page 60).
SR+ – Switches the SR+ mode on/off (page 55).
DIMMER – Dims or brightens the display (page 60).
MIDNIGHT/LOUDNESS – Use Midnight when listening to movie soundtracks at low volume. Use Loudness to boost the bass and treble at low volume (page 31).
DIALOG E – Use to make dialog stand out when watching TV or a movie (page 31).
Press TUNER first to access:
D.ACCESS – After pressing, you can access a radio station directly using the number buttons (page 34).
CLASS – Switches between the three banks (classes) of radio station presets (page 34).
5 Tuner/component control buttons/SETUP
These button controls can be accessed after you have selected the corresponding input source button (DVD, DVR1, TV, etc.). The BAND, T.EDIT and PTY SEARCH tuner controls are explained from page 34. Press RECEIVER first to access the following controls:
AV PARAMETER – Use to access the AV options (page 58).
SETUP – Use to access the System Setup menu (page 37).
CH LEVEL – Press repeatedly to select a channel, then use / to adjust the level (page 48).
RETURN – Press to confirm and exit the current menu screen (also use to return to the previous menu with DVDs or to select closed captioning with DTV).
6 (TUNE/ST) /ENTER
Use the arrow buttons when setting up your surround sound system (page 37) and the AV options (page 58). Also used to control DVD menus/options and for deck 1 of a double cassette deck player. Use the TUNE / buttons to find radio frequencies and use ST / to find preset stations (page 34).
En
