03Connecting your equipment

1Connect the audio/video outputs on the set-top box to the TV/SAT AUDIO and VIDEO inputs. Connect using a stereo RCA/phono jack cable and a video or S-video cable.

2Connect an optical-type1digital audio output from

your set-top box to the OPTICAL 2 (TV/SAT) input.2

Use an optical cable for the connection.

Connecting a DVD/HDD recorder, VCR and other video sources

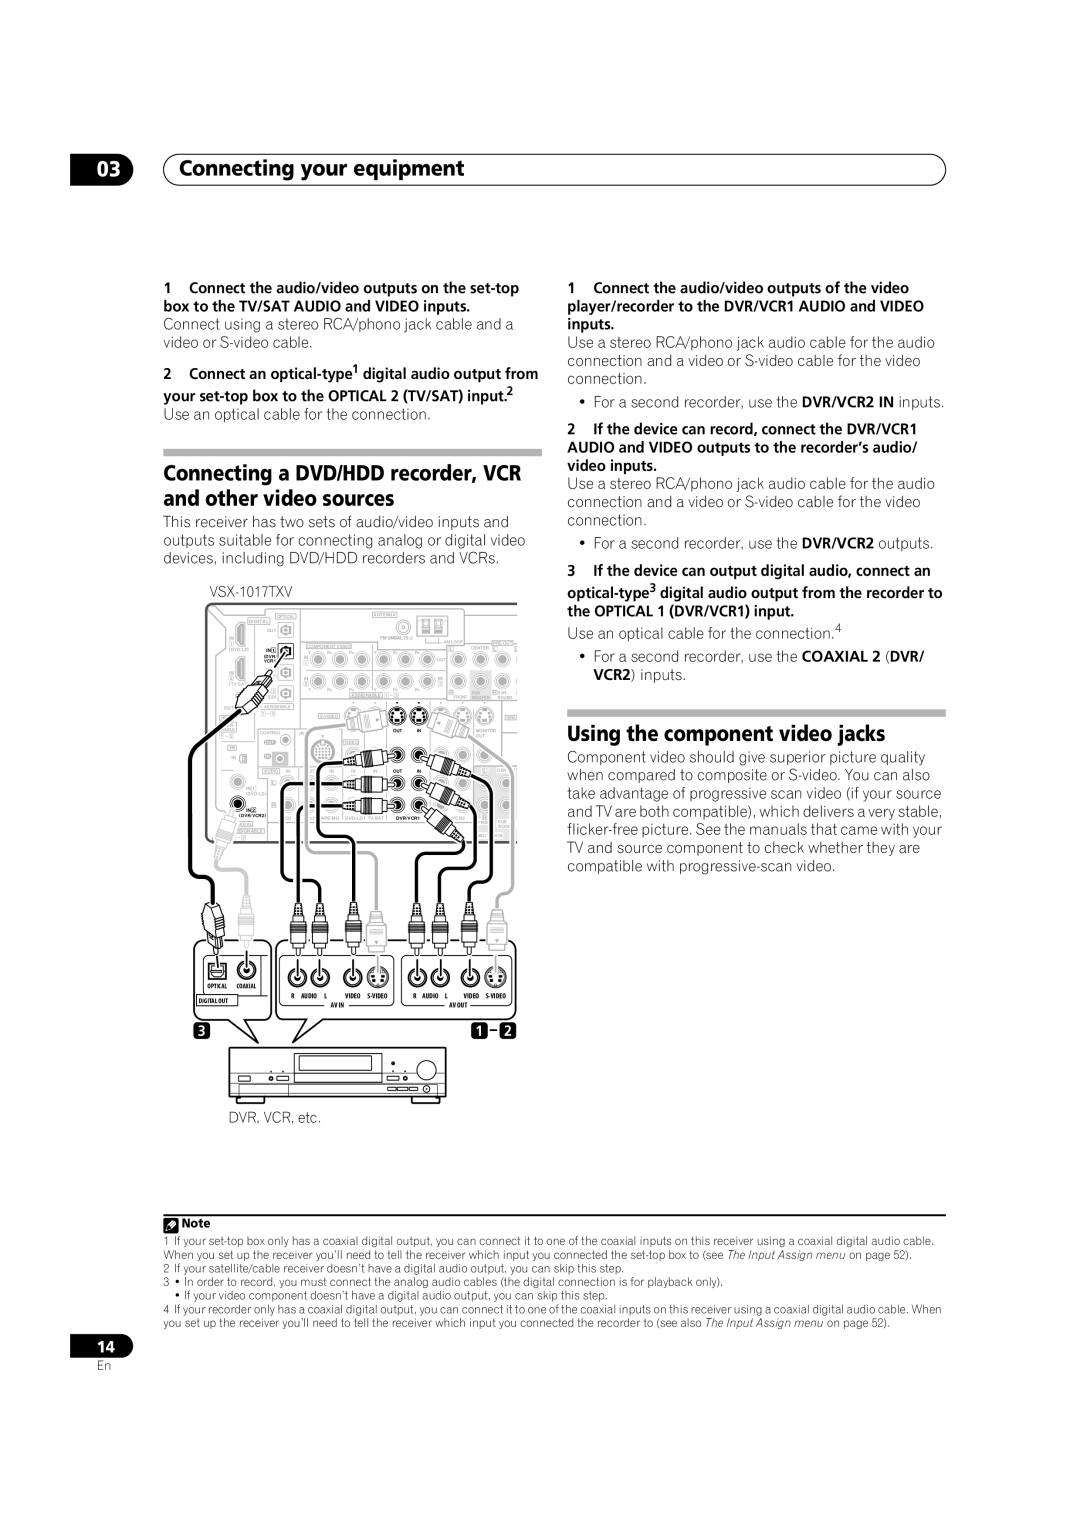
This receiver has two sets of audio/video inputs and outputs suitable for connecting analog or digital video devices, including DVD/HDD recorders and VCRs.

1Connect the audio/video outputs of the video player/recorder to the DVR/VCR1 AUDIO and VIDEO inputs.

Use a stereo RCA/phono jack audio cable for the audio connection and a video or S-video cable for the video connection.

For a second recorder, use the DVR/VCR2 IN inputs.

2If the device can record, connect the DVR/VCR1 AUDIO and VIDEO outputs to the recorder’s audio/ video inputs.

Use a stereo RCA/phono jack audio cable for the audio connection and a video or S-video cable for the video connection.

For a second recorder, use the DVR/VCR2 outputs.

3If the device can output digital audio, connect an

VSX-1017TXV


OPTICAL


ANTENNA


DIGITAL


OUT


IN


AM LOOP


PRE OUT


1


COMPONENT VIDEO


(DVD/LD)


IN 1


Y


PB

PR

L

CENTER

L

L


(DVR/


Y

PB

PR


IN


OUT


VCR1)


1


IN


)


2


IN


IN


(


2


3


3


Y

PB

PR

Y


PB

PR

R

SUB

R SUR-

S


(CD)


ASSIGNABLE

1

3


FRONT

WOOFER

ROUND


OUT

ASSIGNABLE


HDMI

1

3


S-VIDEO


SIRIU


ASSIG-


NABLE

CONTROL


iPod


IN

IN


OUT

IN

IN

MONITOR


1

2


OUT


OUT


VIDEO


XM


IN


IN


IN


AUDIO

IN

OUT

IN

IN

IN


OUT

IN


L

CENTER


IN 1


L


(DVD/LD)


IN 2


R


(DVR/VCR2)

CD

CD-R/TAPE/MD

DVD/LD

TV/SAT


DVR/VCR1


R


SUB


COAXIAL


FRONT


WOOFER


ASSIGNABLE


MULTI CH IN


2


OPTICAL COAXIAL


R AUDIO L

VIDEO S-VIDEO

R AUDIO L

VIDEO

S-VIDEO

DIGITAL OUT

AV IN


AV OUT


3


1

2

DVR, VCR, etc.

optical-type3digital audio output from the recorder to the OPTICAL 1 (DVR/VCR1) input.

Use an optical cable for the connection.4

For a second recorder, use the COAXIAL 2 (DVR/ VCR2) inputs.

Using the component video jacks

Component video should give superior picture quality when compared to composite or S-video. You can also take advantage of progressive scan video (if your source and TV are both compatible), which delivers a very stable, flicker-free picture. See the manuals that came with your TV and source component to check whether they are compatible with progressive-scan video.

Note

1If your set-top box only has a coaxial digital output, you can connect it to one of the coaxial inputs on this receiver using a coaxial digital audio cable. When you set up the receiver you’ll need to tell the receiver which input you connected the set-top box to (see The Input Assign menu on page 52).

2If your satellite/cable receiver doesn’t have a digital audio output, you can skip this step.

3• In order to record, you must connect the analog audio cables (the digital connection is for playback only).

If your video component doesn’t have a digital audio output, you can skip this step.

4If your recorder only has a coaxial digital output, you can connect it to one of the coaxial inputs on this receiver using a coaxial digital audio cable. When you set up the receiver you’ll need to tell the receiver which input you connected the recorder to (see also The Input Assign menu on page 52).

14

En

Page 14
Image 14
Pioneer VSX1017TXV manual Connecting a DVD/HDD recorder, VCR and other video sources, Using the component video jacks

VSX1017TXV specifications

The Pioneer VSX-1017TXV is a versatile and powerful home theater receiver that caters to audiophiles and casual listeners alike. This 7.1-channel receiver is known for its ability to deliver immersive audio experiences, making it an excellent choice for anyone looking to enhance their home entertainment setup.

One of the main features of the VSX-1017TXV is its robust power output. With 100 watts per channel, it is equipped to drive a wide range of speakers while providing clear and dynamic sound. The receiver supports various surround sound formats, including Dolby Digital EX, DTS-ES, and Dolby Pro Logic IIx, allowing users to fully immerse themselves in the action of their favorite movies and games.

Another key characteristic of the Pioneer VSX-1017TXV is its advanced HDMI connectivity. With multiple HDMI inputs, the receiver can easily integrate with modern devices such as Blu-ray players, gaming consoles, and streaming devices. The unit supports high-definition audio formats like Dolby TrueHD and DTS-HD Master Audio, ensuring that users experience their media in the best possible quality.

The receiver also features Pioneer's MCACC (Multi-Channel Acoustic Calibration System) technology. This innovative system automatically analyzes the acoustics of the room and calibrates the audio output accordingly. As a result, users can enjoy optimal sound quality tailored to their specific listening environment without the need for extensive manual adjustments.

In addition to its audio capabilities, the VSX-1017TXV includes a variety of practical features for everyday use. The on-screen display simplifies navigation through menus and settings, while its remote control allows for easy operation from across the room. The receiver supports multi-zone functionality, enabling users to send audio to different areas of the house simultaneously.

With a sleek design that fits seamlessly into any home entertainment setup, the Pioneer VSX-1017TXV combines style with performance. Its solid build quality and user-friendly interface make it an ideal choice for those looking to elevate their home theater experience. Overall, the VSX-1017TXV stands out as a strong contender in the home audio market, delivering impressive sound and advanced features.