HP Pavilion MX75 Monitor Guide
USA
Contents
Index
HP Pavilion monitor
Introduction
For Your Safety
Locating the Monitor
Installation
Additional Safety Information
AC Power Safety Warning
Connecting the Power and Video Cables
Connecting the Speakers
Degaussing the Display
Using the Monitor
Turning the Monitor On and Off
Minimising Energy Use
Setting the Screen Resolution
Selecting Refresh Rate
Adjusting the Viewing Angle
Cleaning the Screen
OSD Main window enables you to make
Changing Display Settings
Using the Front Panel
Using the OSD Main Window
OSD Main window, the following functions are available
Using the Size & Position Window
Using the Advanced Geometry Window
Reset Reset Exit Exit
Using the OSD Advanced Menu Window
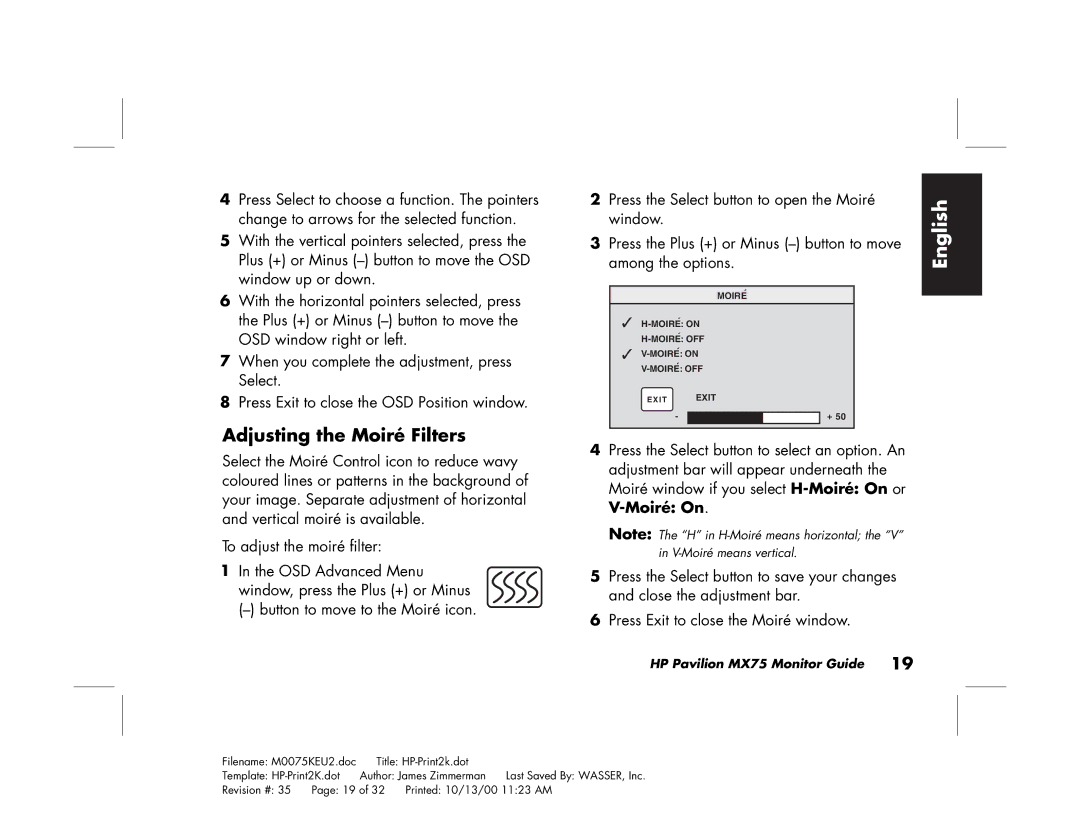
Moiré Control
Choosing the Colour Temperature
Press the Select button to open the Color Adjustment window
Setting Red, Green, and Blue Values
Or Minus button to increase or decrease
When a colour is selected, press the Plus +
Choosing a Language
Press the Plus + or Minus button to move Between options
To adjust the OSD window position OSD Advanced Menu
Choosing the OSD Position
Adjusting the Moiré Filters
Restoring Factory Adjustments
Using the Status Window
To 4572 m 15,000 ft
Technical Information
Pin Assignments
Pre-Set Video Modes
To maximise screen life
Dpms Power Management Features
Declaration of Conformity
Regulatory Information
FCC Statement
EMI Statement European Union Only
Ray Radiation Notice
General Notice
DOC Statement Canada Only
Index
Power-saving modes, 8 problems. See troubleshooting
HP Pavilion MX75 Bildskärm Användarhandbok
USA
Innehåll
Sakregister
Inledning
Säkerhet
Placera bildskärmen
Extra säkerhetsinformation
Säkerhetsvarning för växelström
Ansluta nät- och videokablar
Ansluta högtalarna
Avmagnetisera bildskärmen
Använda bildskärmen
Slå på och stänga av bildskärmen
Minska energiförbrukningen
Ställa in skärmupplösningen
Välja uppdateringsfrekvens
Justera visningsvinkeln
Rengöra skärmen
Använda OSD-huvudfönstret
Ändra Skärminställningarna
Använda frontpanelen
Följande funktioner är tillgängliga i OSD- huvudfönstret
Använda fönstret Size & Position
12 MX75 Bildskärm Användarhandbok
Använda fönstret Advanced Geometry
Exit avsluta Stänger fönstret Advanced
14 MX75 Bildskärm Användarhandbok
Använda OSD-fönstret Advanced Menu
Välja färgtemperatur
Ställa in värden för rött, grönt och blått
Obs
Välja ett språk
Välja OSD-placering
Moiré
Justera moiréfilter
Återställa de ursprungliga inställningarna
Använda statusfönstret
Teknisk information
22 MX75 Bildskärm Användarhandbok
Förinställda videolägen
Stiftstilldelningar
Vesa Dpms
DPMS-funktioner för energihantering
Konformitetsdeklaration
Information om bestämmelser
Strålningsmeddelande
FCC-meddelande
Deklaration av anpassning efter Vcci klass B Svenska
Allmänt meddelande
DOC Statement Gäller endast Kanada
EMI-meddelande endast EU
28 MX75 Bildskärm Användarhandbok
Sakregister
Svenska
30 MX75 Bildskärm Användarhandbok
Brukerhåndbok for HP Pavilion MX75-skjerm
Informasjonen i dette dokumentet kan endres uten varsel
Innhold
Stikkordregister
Norsk
Innledning
Sikkerhet
Sette skjermen på et egnet sted
Installering
Tilleggsopplysninger om sikkerhet
Sikkerhetsadvarsel om vekselstrøm
Kople til strøm- og videokabler
Kople til høyttalerne
Avmagnetisere skjermen
Bruke skjermen
Slå skjermen av og på
Minimalisere strømforbruk
Angi skjermoppløsning
Velge oppdateringsfrekvens
Justere skjermvinkelen
Rengjøre skjermen
Bruke hovedvinduet for skjermvisningen OSD
Endre skjerminnstillinger
Bruke frontpanelet
Brightness lysstyrke Justerer bildets lysstyrke
Bruke vinduet Size & Position størrelse og posisjon
Reset Nullstill
Bruke vinduet Advanced Geometry avansert geometri
Vinduet Advanced Menu avansert meny kan
Bruke vinduet Advanced Menu
Advanced Menu Avansert Meny Color Farge
Velge fargetemperatur
Angi verdier for rødt, grønt og blått
Velge språk
Angi posisjon for skjermvisningen
Justere moiré-filtrene
Slå av strømmen
Bruke Status-vinduet
Gjenopprette fabrikkinnstillingene
Skjermspesifikasjoner Bilderør
Teknisk informasjon
Norsk
Forhåndsinnstilte videomodi
Pinnetildelinger
Strømsparingsfunksjoner
Dpms
Samsvarserklæring
Informasjon om lovgivning
Melding om røntgenstråling
FCC-erklæring
Samsvarserklæring for Vcci klasse B
Generell informasjon
DOC-erklæring gjelder bare Canada
EMI-erklæring gjelder bare EU
Stikkordregister
Vesa Display Power Management Signaling DPMS, 7
HP Pavilion MX75 Monitorhandleiding
USA
Inhoud
Index
Inleiding
Veiligheid
De plaats van de monitor bepalen
Installatie
Extra informatie over veiligheid
Waarschuwing bij gebruik van wisselstroom
De voedings- en videokabel aansluiten
De luidsprekers aansluiten
De monitor in- en uitschakelen
De monitor gebruiken
De schermresolutie instellen
Het beeldscherm demagnetiseren
Energieverbruik minimaliseren
De vernieuwingsfrequentie selecteren
De weergavehoek aanpassen
Het scherm reinigen
Het hoofdvenster voor schermweergave gebruiken
De monitorinstellingen wijzigen
Het voorpaneel gebruiken
Contrast
Het hoofdvenster bevat de volgende functies
Weergave met het pictogram Exit
Het venster voor formaat en positie gebruiken
Het hoofdvenster voor schermweergave
Het venster voor geavanceerde geometrie gebruiken
Geavanceerde Geometrie
Het venster voor het geavanceerd menu weergeven
De kleurtemperatuur kiezen
+ of Minknop naar het pictogram Color
RGB-waarden instellen
Een taal kiezen
Blader door de opties met de Plusknop + Minknop
De OSD-positie kiezen
Blader door de opties met de Plusknop + of Minknop
De moiré-filters aanpassen
+ of Minknop naar het pictogram Moiré
Fabrieksinstellingen herstellen
Het statusvenster gebruiken
Energiebeheerfuncties op pagina
Technische gegevens
Pintoewijzingen
Vooraf ingestelde videomodi
Pin Toewijzing
DPMS- energiebeheerfuncties
Vesa Display Power Management Signaling Dpms Beeldsc
Verklaring van conformiteit
Overheidsvoorschriften
Kennisgeving aangaande röntgenstraling
Verklaring FCC
EMI-verklaring Alleen Europese Unie
Algemene kennisgeving
Aan-/uitschakelaar, 6 aanpassingsvensters
Trapezoid, pictogram voor verticale zijden
Verklaring FCC
Monitor HP Pavilion MX75
USA
Inhalt
Index
Des HP Pavilion-Monitors
Einführung
Sicherheitsvorkehrungen
Warnung Sicherheit beim Netzanschluss
Weitere Sicherheitsinformationen
Anschließen des Netz- und Videokabels
Aufstellen des Monitors
Deutsch
Anschließen der Lautsprecher
Ein- und Ausschalten des Monitors
Einsatz des Monitors
Einstellen der Bildschirmauflösung
Entmagnetisieren der Anzeige
HP Pavilions unterstützen Vesa Dpms Display
Auswählen der Wiederholfrequenz
Minimieren des Stromverbrauchs
Einstellen des Sichtwinkels
Reinigen des Bildschirms
Verwenden des OSD-Hauptfensters
Ändern der Anzeigeeinstellungen
Verwenden der Frontplatte
Größe und Position Öffnet das
Falls Sie eine andere Option wählen, wird
Um das OSD-Hauptfenster zu Schließen, wählen Sie das Symbol
Verwenden des Fensters „Größe und Position
„Erweiterte Geometrie
Verwenden des Fensters
Parallelogramm Macht das Bild
Verwenden des OSD-Fensters „Menü „Erweitert
Wählen der Farbtemperatur
Einstellen der Rot-, Grün- und Blauwerte
Sie das Symbol Beenden
Benutzerfarbe ZURÜCK- Zurücksetzen
Wählen einer Sprache
Links zu verschieben
Wählen der Position des OSD- Fensters
Einstellen der Moiré-Filter
Wiederherstellen der Werkseinstellungen
Verwenden des Statusfensters
Monitordaten Bildröhre
Technische Daten
640 x 720 x 800 x 1024 x 1280 x
Voreingestellte Videomodi
Anschlussbelegung
Bild Hor Vert Leistungs Modus Schirm Synch Aufnahme
DPMS- Energiesparfunktionen
Konformitätserklärung
Informationen über die Einhaltung gesetzlicher Vorschriften
Hinweis zu Röntgenstrahlen
FCC-Erklärung
EMI-Erklärung Nur für Europäische Union
Allgemeiner Hinweis
DOC-Erklärung nur für Kanada
Anschlussbelegung, 33 Anzeige
Filter einstellen, 28 Monitor. Siehe auch Bildschirm
Revision # Printed 10/12/00 0307 PM
Revision # Printed 10/12/00 0307 PM