12 | Ceiling DocCam II — Operation |
Operation
Using your codec remote
The only function you can control on the Ceiling DocCam II from your codec remote is the zoom in or zoom out. All other functions must be performed using the ClearOne remote.
Using your ClearOne remote
The ClearOne remote will function in all DIP switch configurations. Please refer to Figure 4 on page 6 for a complete list of remote buttons.
Ceiling DocCam II — Operation |
| 13 |
|
Viewing areas
Viewing area depends on the distance between the ceiling and the table. Use the following tables to determine the maximum and minimum viewing areas of the Ceiling DocCam II for distances of 5.5', 6.5' and 7.5'. (Most tables are about 2.5' and ceiling heights vary between 8', 9' and 10'). If the distance differs from the examples given, use the table to estimate the viewing area. There is also a distance calculator available online at www.clearone.com.
Distance between the ceiling and table : 5.5'
| Height | Width | Diagonal |
Zoomed out max | 2.90' | 3.87' | 4.84' |
To zoom
1.Press the Zoom Out button to view large documents.
2.Press the Zoom In button to view documents up close.
Note: When the zoom indicator passes the divider on the display bar, the camera moves from optical zoom to digital zoom. Optical zoom uses the optical lens to enlarge the image. Digital zoom crops a small section of the picture and then enlarges it to screen size. This can leave the zoomed in image looking pixelated.
To focus an image
W |
| T |
Optical Zoom | Digital Zoom |
W | T |
Cursor | Divider |
| |
| Zoom switches |
| from optical zoom |
| to digital zoom |
| W = Wide |
| T = Telescopic |
Figure 13. Zoom display
Zoomed in optical 25x | .13' | .17' | .21' |
|
|
|
|
Zoomed in optical 25x digital 12x | .06' | .09' | .11' |
Distance between the ceiling and table : 6.5'
| Height | Width | Diagonal |
|
|
|
|
Zoomed out max | 3.43' | 4.58' | 5.72' |
|
|
|
|
Zoomed in optical 25x | .15' | .20' | .25' |
|
|
|
|
Zoomed in optical 25x digital 12x | .08' | .10' | .13' |
|
|
|
|
Distance between the ceiling and table : 7.5'
| Height | Width | Diagonal |
|
|
|
|
Zoomed out max | 3.96' | 5.28' | 6.60' |
|
|
|
|
Zoomed in optical 25x | .17' | .23' | .29' |
|
|
|
|
Zoomed in optical 25x digital 12x | .09' | .12' | .15' |
|
|
|
|
1.Press the Auto Focus button to automatically focus the camera.
2.Press the Focus Far button to manually focus a zoomed out view.
3.Press the Focus Near button to manually focus a zoomed in view.
To use the camera laser
1.Press the Cam Laser button.
2.Center document under laser.
The camera laser will turn off automatically after 5 seconds.
To adjust the brightness
1.Press the Auto button to have the camera automatically adjust the brightness of the
2.Press the - button to manually dim the
3.Press the + button to manually brighten the
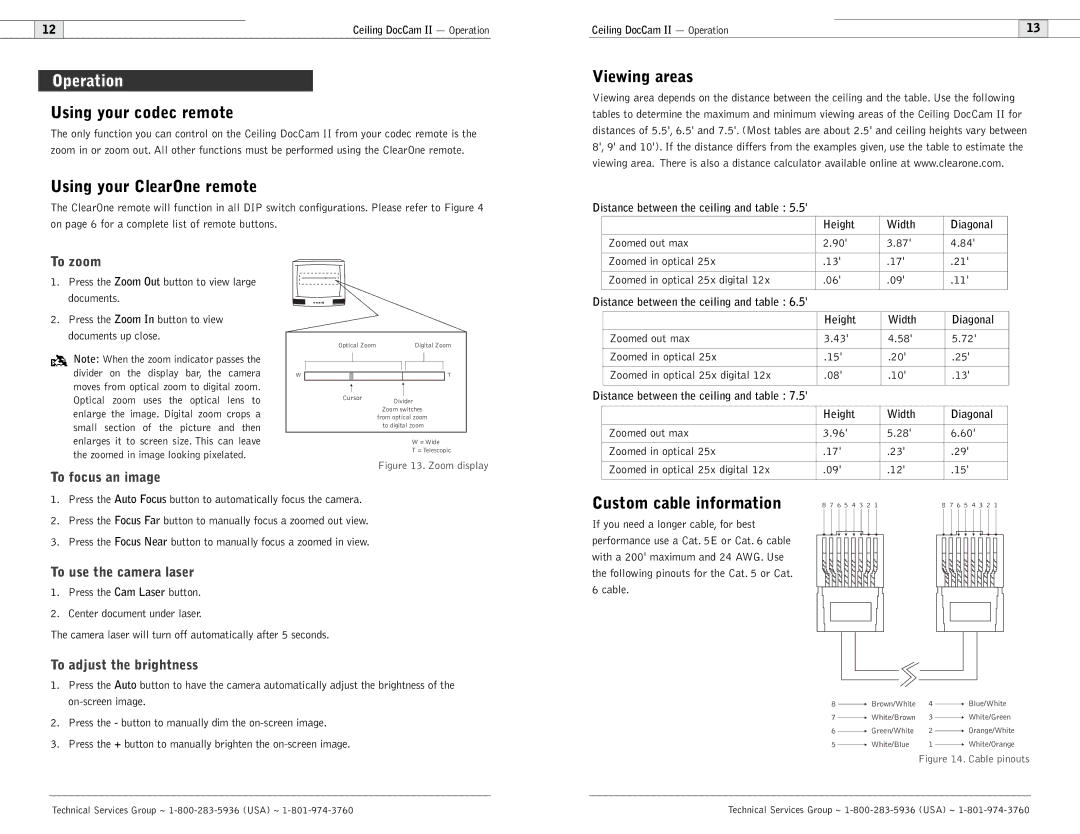
Custom cable information | 8 7 6 5 4 3 2 1 | 8 7 6 5 4 3 2 1 |
If you need a longer cable, for best performance use a Cat. 5E or Cat. 6 cable with a 200' maximum and 24 AWG. Use the following pinouts for the Cat. 5 or Cat. 6 cable.
8 |
| Brown/White | 4 |
| Blue/White |
|
| ||||
7 |
| White/Brown | 3 |
| White/Green |
6 |
| Green/White | 2 |
| Orange/White |
|
| ||||
5 |
| White/Blue | 1 |
| White/Orange |
|
|
Figure 14. Cable pinouts
Technical Services Group ~ | Technical Services Group ~ |