OPERATING YOUR HEATER

Slightly press in control knob and

Manual Control Models

nLIGHTINGn

INSTRUCTIONS

1.STOP! Read the safety information on the side of

heater.

2.Check that gas supply to heater is on.

3.Push in gas control knob

slightly and turn clockwise to the OFF position.

NOTE: Knob cannot be turned from “PILOT” to “OFF” unless knob is pushed in slightly. Do not force.

4.Wait five (5) minutes to clear out any air. Then smell for gas, including near the floor. If you smell gas,STOP! Follow “B” in the safety information on the side of the heater. If you do not smell gas, go to the next step.

5.Push in gas control slightly and turn counterclockwise

to “PILOT/IGN” and depress for five(5) seconds

NOTE: The first time that the heater is operated after connecting the gas supply , the control knob should be depressed for about thirty

(30)seconds. This will allow air to bleed from the gas system.

6.With control knob pressed in, push down and release the ignitor button. This will light pilot. If needed, keep pressing ignitor button until pilot lights.

7.Keep control knob depressed for ten (10) seconds after lighting pilot. If pilot goes out, repeat steps 5, 6 and 7.

8.To select the desired heating level, partially press down the control knob slightly and rotate

counterclockwise . Release the downward pressure on the knob while continuing to turn until the knob locks at the desired setting position. Do not operate between locked positions.

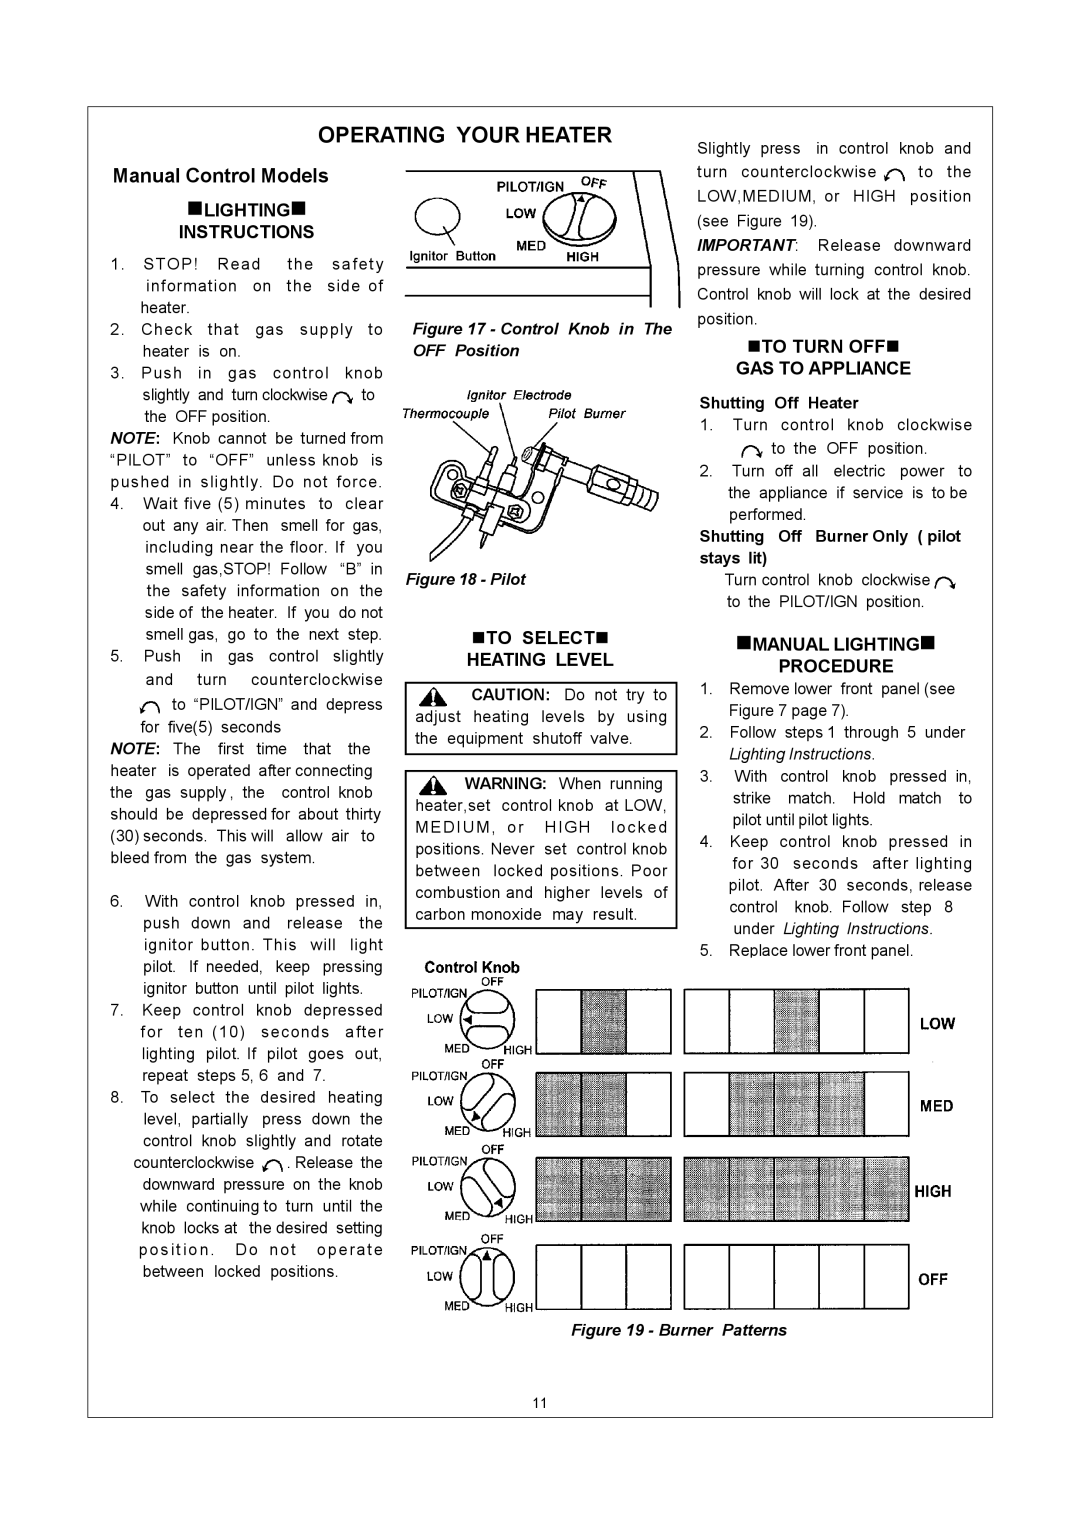
Figure 17 - Control Knob in The OFF Position

Figure 18 - Pilot

nTO SELECTn

HEATING LEVEL

CAUTION: Do not try to adjust heating levels by using the equipment shutoff valve.

WARNING: When running heater,set control knob at LOW, MEDIUM, or HIGH locked positions. Never set control knob between locked positions. Poor combustion and higher levels of carbon monoxide may result.

turn counterclockwise to the LOW,MEDIUM, or HIGH position (see Figure 19).

IMPORTANT: Release downward pressure while turning control knob. Control knob will lock at the desired position.

nTO TURN OFFn

GAS TO APPLIANCE

Shutting Off Heater

1.Turn control knob clockwise

to the OFF position.

2.Turn off all electric power to the appliance if service is to be performed.

Shutting Off Burner Only ( pilot stays lit)

Turn control knob clockwise to the PILOT/IGN position.

nMANUAL LIGHTINGn

PROCEDURE

1.Remove lower front panel (see Figure 7 page 7).

2.Follow steps 1 through 5 under Lighting Instructions.

3.With control knob pressed in, strike match. Hold match to pilot until pilot lights.

4.Keep control knob pressed in for 30 seconds after lighting pilot. After 30 seconds, release control knob. Follow step 8 under Lighting Instructions.

5.Replace lower front panel.

Figure 19 - Burner Patterns

11

Page 11
Image 11
Procom ML250HPA, ML150HPA, ML150TPA Operating Your Heater, Shutting Off Heater, Shutting Off Burner Only pilot stays lit

ML150TPA, ML250HPA, ML150HPA specifications

The Procom ML250HPA, ML150HPA, and ML150TPA represent the pinnacle of high-performance heating systems, tailored to meet diverse heating needs with efficiency and reliability. These models are known for their innovative technologies and robust characteristics, making them ideal choices for both residential and commercial applications.

The ML250HPA stands out with its impressive heating capacity, perfect for larger spaces. It incorporates advanced features for user convenience, including a fully programmable thermostat and remote control functionality. This model utilizes high-efficiency heating elements that not only provide powerful warmth but also help to keep energy consumption low. The integration of smart technology allows for real-time monitoring and adjustments, ensuring optimal comfort while minimizing energy use.

On the other hand, the ML150HPA is designed for medium-sized spaces, offering a balance of performance and efficiency. Like its bigger counterpart, it showcases energy-efficient heating elements. The model is equipped with built-in safety features such as overheat protection and tip-over switches, ensuring peace of mind during operation. Its compact design allows for versatile installation options, while the stylish finish makes it an attractive addition to any room.

The ML150TPA variant focuses on portability without sacrificing performance. This model is lightweight, making it easy to move from one location to another while still providing powerful heating capabilities. It features an adjustable heat output, allowing users to customize the temperature according to their immediate needs. The robust construction ensures durability, making it suitable for various environments, from workshops to temporary living spaces.

All three models emphasize energy efficiency and low operating costs, incorporating eco-friendly technologies that align with modern energy standards. The intelligent design of these units helps to reduce noise levels, providing a peaceful environment without disruptive sounds common in traditional heating systems.

In summary, the Procom ML250HPA, ML150HPA, and ML150TPA are exceptional heating solutions that cater to different requirements while ensuring energy-efficient and reliable performance. Their combination of advanced features, safety mechanisms, and user-friendly interfaces make them a smart investment for anyone looking to enhance their heating experience. Whether you prioritize capacity, portability, or a balance of both, Procom has a model designed to meet your specific needs.