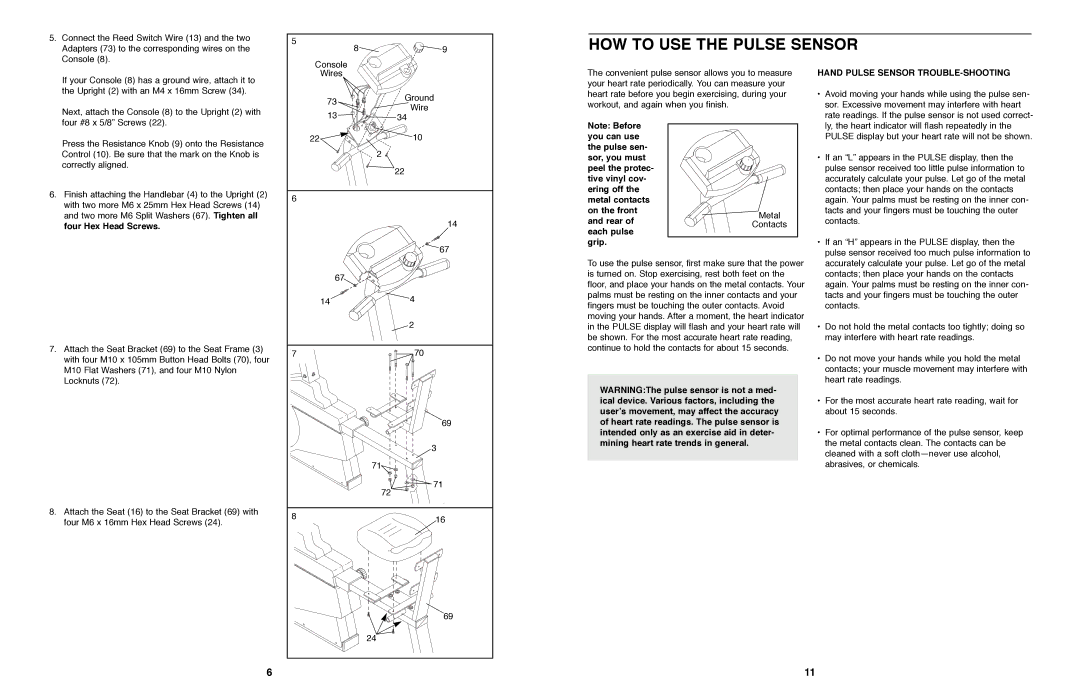
5. Connect the Reed Switch Wire (13) and the two |
Adapters (73) to the corresponding wires on the |
Console (8). |
5 |
|
8 | 9 |
Console |
|
HOW TO USE THE PULSE SENSOR
If your Console (8) has a ground wire, attach it to |
the Upright (2) with an M4 x 16mm Screw (34). |
Next, attach the Console (8) to the Upright (2) with |
four #8 x 5/8Ó Screws (22). |
Wires |
| |
73 | Ground | |
Wire | ||
13 | ||
34 |
The convenient pulse sensor allows you to measure your heart rate periodically. You can measure your heart rate before you begin exercising, during your workout, and again when you finish.
HAND PULSE SENSOR TROUBLE-SHOOTING
¥ Avoid moving your hands while using the pulse sen- |
sor. Excessive movement may interfere with heart |
rate readings. If the pulse sensor is not used correct- |
Press the Resistance Knob (9) onto the Resistance |
Control (10). Be sure that the mark on the Knob is |
correctly aligned. |
6. Finish attaching the Handlebar (4) to the Upright (2) |
with two more M6 x 25mm Hex Head Screws (14) |
and two more M6 Split Washers (67). Tighten all |
four Hex Head Screws. |
22 | 10 |
| 2 |
| 22 |
6 |
|
| 14 |
| 67 |
Note: Before you can use the pulse sen- sor, you must peel the protec- tive vinyl cov- ering off the metal contacts on the front and rear of each pulse grip.
Metal |
Contacts |
| ly, the heart indicator will flash repeatedly in the |
| PULSE display but your heart rate will not be shown. |
¥ | If an ÒLÓ appears in the PULSE display, then the |
| pulse sensor received too little pulse information to |
| accurately calculate your pulse. Let go of the metal |
| contacts; then place your hands on the contacts |
| again. Your palms must be resting on the inner con- |
| tacts and your fingers must be touching the outer |
| contacts. |
¥ | If an ÒHÓ appears in the PULSE display, then the |
| pulse sensor received too much pulse information to |
7.Attach the Seat Bracket (69) to the Seat Frame (3) with four M10 x 105mm Button Head Bolts (70), four M10 Flat Washers (71), and four M10 Nylon Locknuts (72).
8.Attach the Seat (16) to the Seat Bracket (69) with four M6 x 16mm Hex Head Screws (24).
| 67 |
14 | 4 |
| 2 |
7 | 70 |
| 69 |
| 3 |
| 71 |
| 71 |
| 72 |
8 | 16 |
| |
| 69 |
| 24 |
To use the pulse sensor, first make sure that the power is turned on. Stop exercising, rest both feet on the floor, and place your hands on the metal contacts. Your palms must be resting on the inner contacts and your fingers must be touching the outer contacts. Avoid moving your hands. After a moment, the heart indicator in the PULSE display will flash and your heart rate will be shown. For the most accurate heart rate reading, continue to hold the contacts for about 15 seconds.
WARNING:The pulse sensor is not a med- ical device. Various factors, including the userÕs movement, may affect the accuracy of heart rate readings. The pulse sensor is intended only as an exercise aid in deter- mining heart rate trends in general.
| accurately calculate your pulse. Let go of the metal |
| contacts; then place your hands on the contacts |
| again. Your palms must be resting on the inner con- |
| tacts and your fingers must be touching the outer |
| contacts. |
¥ | Do not hold the metal contacts too tightly; doing so |
| may interfere with heart rate readings. |
¥ | Do not move your hands while you hold the metal |
| contacts; your muscle movement may interfere with |
| heart rate readings. |
¥ | For the most accurate heart rate reading, wait for |
| about 15 seconds. |
¥ | For optimal performance of the pulse sensor, keep |
| the metal contacts clean. The contacts can be |
| cleaned with a soft clothÑnever use alcohol, |
| abrasives, or chemicals. |
6
11
