Manuals
/
Psion Teklogix
/
Computer Equipment
/
Printer
Psion Teklogix
MLP 3040 Series
manual
Getting Started, Battery Installation and Charging
Models:
MLP 3040 Series
1
9
65
65
Download
65 pages
57.94 Kb
6
7
8
9
10
11
12
13
Troubleshooting
Specification
Install
Bluetooth
MCR Indicator
Warranty
Printer Configuration
Other Problems
Supplies and Accessories
Host Interface Set Up
Page 9
Image 9
Page 8
Page 10
Page 9
Image 9
Page 8
Page 10
Contents
MLP3040 Series Operator’s Manual
Psion Teklogix Corporation 3000 Kustom Drive Hebron, KY
FCC Part 15 Class B
Battery Disposal
Do not operate near a heat source
Lesen Sie vor der Inbetriebnahme die Aufbau- und Bedienungsanleitung
Nehmen Sie den Drucker nicht in der Nähe einer Wärmequelle in Betrieb
Page
Power Considerations
Printer Configuration
Introduction
Getting Started
Maintenance and Troubleshooting
Table of Contents
Advanced Setup Features
Specifications
Introduction
Page
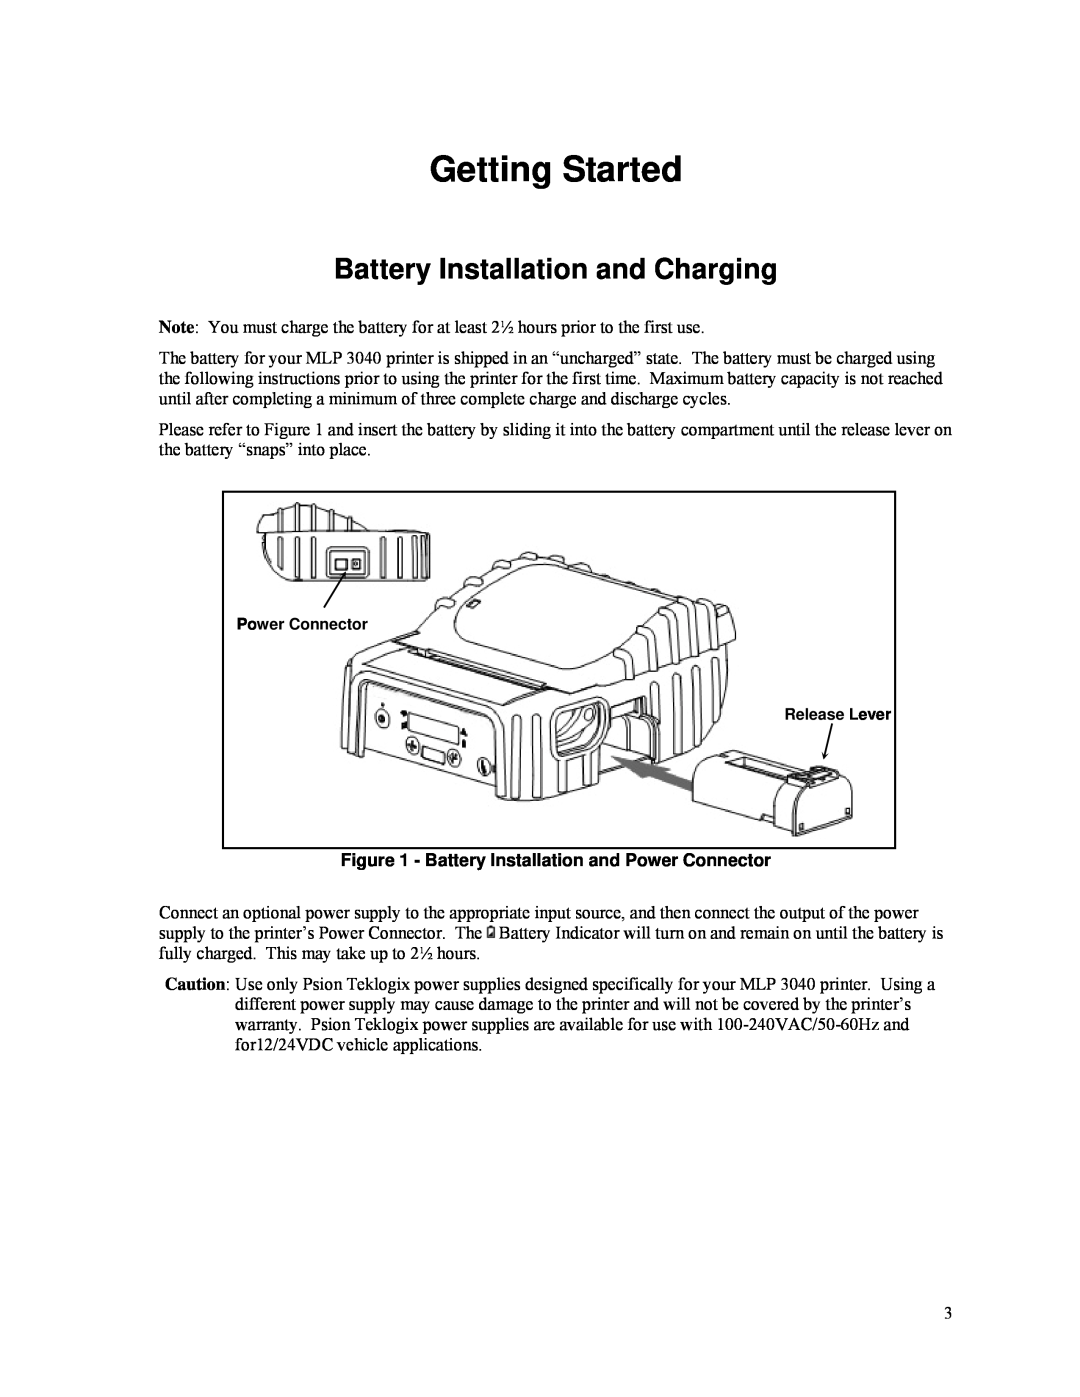
Battery Installation and Charging
Figure 1 - Battery Installation and Power Connector
Getting Started
Roll Media
Installing Media
Getting Started
Figure 2 - Opening Paper Door
Figure 3 - Media Support
Cassette Media
Figure 4 - Paper Laying Through Print Head
Movable Support
Turning the Printer On and Off
Performing A Printer Self Test
Figure 5 - Cassette In Printer
Host Interface Set Up
Factory Default Interface Settings
Interface
Belt Loop System
Introduction
Daily Operation
Control Panel
Figure 6 - Control Panel
Printer Configuration
Removing Printed Output
MLP 3040 and MLP 3040 LP Models
Battery Charging
Printer Configuration Figure 7 - Tearing Off Printed Output
MLP 3040 SL Models
Figure 8 - MLP 3040 Power Connector & Battery Indicator
Using the Magnetic Card Reader
Figure 9 - Using The Magnetic Card Reader
Power Connector Battery Indicator
Additional Messages
Check Paper
Paper Door Open
Introduction To Setup
Printer Configuration
Setup Basics
Figure 10 - MLP 3040 Control Panel
Entering Setup
Exiting Setup
Selecting Menus
Format Menu
Setup Menu Summary
Interface Menu
Options Menu
Format Menu
Current Format
Format Name
Font
Spacing
Left Margin
Print Contrast
Right Margin
Maximum Paper Speed
Form Feed Distance
Mark Sensitivity
Mark Sensing
Gap Sensitivity
Tear to Mark Distance
Serial Interface
Interface Menu
Present Distance
Current Host I/O
Baud Rate
Emulation
Data Bits
Stop Bits
XON/XOFF Handshaking
IrDA Interface
ETX/ACK Handshaking
RTS/CTS Handshaking
Pairing Mode
Bluetooth Interface
Role Policy Defer
Role Policy
Discoverability
Discoverability On
Wi-Fi Interface
Local Name
Address
WLAN Channel
WLAN Type
WLAN SSID
WLAN WEP Bits
WLAN Auth
WEP Key WEP Key WEP Key WEP Key
IP Address Assign
IP Address
IP Subnet Mask
Options Menu
IP Gateway
Tunnel Port Number
Maximum Format Number
Auto Power Down
User Language
Truncate Lines
Print Promo No
Print Promotion
Page
RS-232C Serial Interface
Interfacing To A Host Computer
Pin #
Description
Figure 12 - Wireless Indicator & IrDA Window
Bluetooth Interface
IrDA Interface
Interfacing to a Host Computer
Wi-Fi Interface
Page
Auto Power Down
Power Considerations
Operation Without A Battery
Standby Operation
Page
Maintenance and Troubleshooting
Cleaning
Figure 13 - Printer Cleaning Areas
Charging the Battery
Battery Care
Additional Battery and Safety Information
Maintenance and Troubleshooting
Testing the Power Supply and Battery
Error Messages
Troubleshooting
Solution
Message
Problem
Other Problems
Solution
Possible Cause
Obtaining Service
Format Menu
Advanced Setup Features
Interface Menu
Options Menu
Page
Print Samples
Print & Font Samples
Courier Font With International Extended Character Set
Courier Font PC Line Drawing Extended Character Set
Print & Font Samples
Sans Serif Font
Page
Printer Specifications
Specifications
Printing Specifications
Power Management
Physical Specifications
Specifications
Environmental Specifications
Operator Controls and Indicators
Media Specifications
Receipt Paper
Labels
Gap Sensing Specifications
Black Mark Position
Figure 14 - Black Mark Position
Supplies and Accessories
Accessories
Supplies
Page
Glossary of Terms
Glossary
Top
Page
Image
Contents