9.Press and lift out the handset hold- er, flip it over as shown, then snap it back into place so it holds the hand- set.
10.Lift the base’s antenna to a vertical position.
the compartment. The connector fits only one way.
3.Put the battery pack in the compart- ment and fasten the retainer strap.
4.Replace the cover.
Notes:
• When you first use the phone after |
charging or recharging the battery |
pack, the phone might not work and |
you might hear a |
nal when you press TALK. If this |
happens, return the handset to the |
base for about 5 seconds. This re- |
sets the security |
code. |
• If the CHARGE indicator does not |
light when you place the handset on |
the base, be sure the battery pack |
display. If this happens, you must re- charge the battery pack before you can make another call.
• If the battery pack is completely dis- |
charged or the base loses power |
while the handset is away from it, |
place the handset on the base to re- |
set the security |
code. If it was the handset that lost |
power, recharge the battery pack. |
• The supplied battery pack should |
last for about a year. When it loses |
its ability to fully recharge, order a |
CONNECTING AND CHARGING THE BATTERY PACK
The
1.Press down and slide off the battery pack compartment cover.
2.Unfasten the plastic retainer strap and lift the battery pack out of the compartment. Plug the battery pack’s connector into the socket in
12
5.To charge the battery pack, simply place the handset on the base, fac- ing either up or down. The CHARGE indicator on the base lights.
Recharge the battery pack when
RECHARGE NOW appears and ![]()
![]()
![]() flash- es on the handset display.
flash- es on the handset display.
and AC adapter are correctly and |
securely connected. |
Also, check the charging contacts |
on the handset and base. If the con- |
tacts are dirty or tarnished, clean |
them with a pencil eraser. |
•About once a month, fully discharge the battery by keeping the handset off the base until RECHARGE NOW
appears and ![]()
![]()
![]() flashes on the dis- play. Otherwise, the battery pack loses its ability to fully recharge.
flashes on the dis- play. Otherwise, the battery pack loses its ability to fully recharge.
•If the battery pack becomes weak during a call, the handset beeps ev- ery four seconds, and RECHARGE
NOW appears and ![]()
![]()
![]() flashes on the
flashes on the
replacement battery pack from your |
local RadioShack store (see “Re- |
placing the Battery Pack” on |
Page 37). |
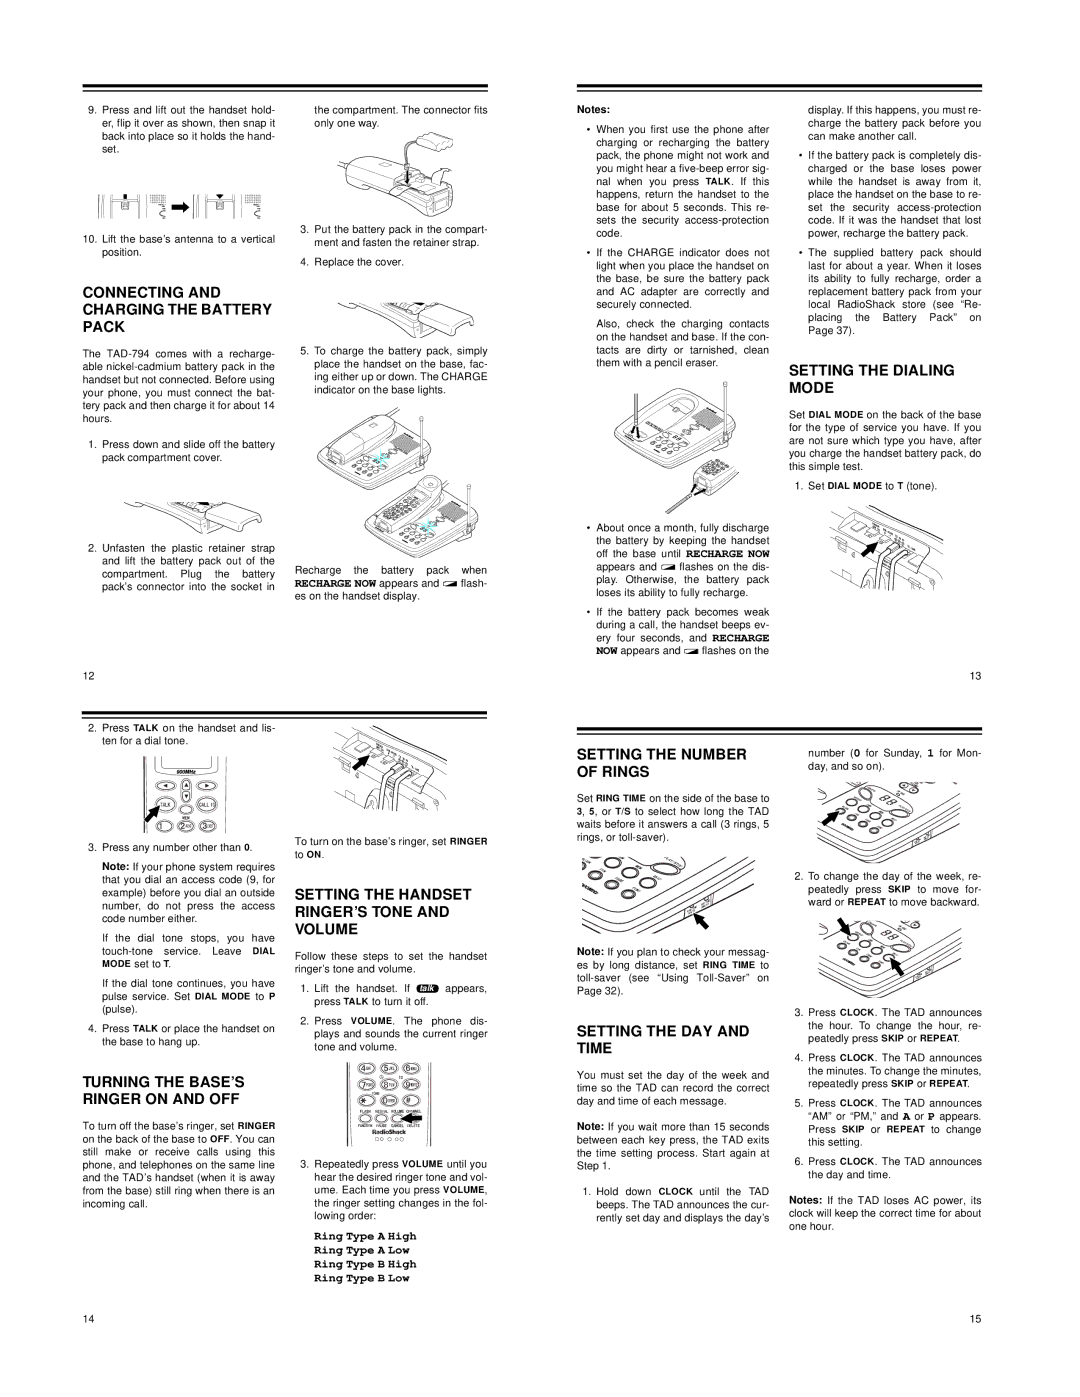
SETTING THE DIALING MODE
Set DIAL MODE on the back of the base for the type of service you have. If you are not sure which type you have, after you charge the handset battery pack, do this simple test.
1. Set DIAL MODE to T (tone).
13
2.Press TALK on the handset and lis- ten for a dial tone.
SETTING THE NUMBER OF RINGS
number (0 for Sunday, 1 for Mon- day, and so on).
3.Press any number other than 0.
Note: If your phone system requires that you dial an access code (9, for example) before you dial an outside number, do not press the access code number either.
If the dial tone stops, you have
If the dial tone continues, you have pulse service. Set DIAL MODE to P (pulse).
4.Press TALK or place the handset on the base to hang up.
To turn on the base’s ringer, set RINGER to ON.
SETTING THE HANDSET RINGER’S TONE AND VOLUME
Follow these steps to set the handset ringer’s tone and volume.
1.Lift the handset. If talk appears, press TALK to turn it off.
2.Press VOLUME. The phone dis- plays and sounds the current ringer tone and volume.
Set RING TIME on the side of the base to 3, 5, or T/S to select how long the TAD waits before it answers a call (3 rings, 5 rings, or
Note: If you plan to check your messag- es by long distance, set RING TIME to
SETTING THE DAY AND TIME
2.To change the day of the week, re- peatedly press SKIP to move for- ward or REPEAT to move backward.
3. | Press CLOCK. The TAD announces |
| the hour. To change the hour, re- |
| peatedly press SKIP or REPEAT. |
4. | Press CLOCK. The TAD announces |
| the minutes. To change the minutes, |
TURNING THE BASE’S RINGER ON AND OFF
To turn off the base’s ringer, set RINGER on the back of the base to OFF. You can still make or receive calls using this phone, and telephones on the same line and the TAD’s handset (when it is away from the base) still ring when there is an incoming call.
3.Repeatedly press VOLUME until you hear the desired ringer tone and vol- ume. Each time you press VOLUME, the ringer setting changes in the fol- lowing order:
Ring Type A High Ring Type A Low Ring Type B High Ring Type B Low
You must set the day of the week and time so the TAD can record the correct day and time of each message.
Note: If you wait more than 15 seconds between each key press, the TAD exits the time setting process. Start again at Step 1.
1.Hold down CLOCK until the TAD beeps. The TAD announces the cur- rently set day and displays the day’s
| repeatedly press SKIP or REPEAT. |
5. | Press CLOCK. The TAD announces |
| “AM” or “PM,” and A or P appears. |
| Press SKIP or REPEAT to change |
| this setting. |
6. | Press CLOCK. The TAD announces |
| the day and time. |
Notes: If the TAD loses AC power, its clock will keep the correct time for about one hour.
14 | 15 |