Digital Signal
Preamplifier
For Outdoor Antennas
TVPRAMP1R User’s Guide
The TVPRAMP1R is designed specifically to improve the performance of outdoor antennas in low signal strength areas, extending antenna range to give you the most channels and best reception possible. The TVPRAMP1R is engineered for digital signals, so it outperforms old preamps made for analog.
Preamplifier Installation
1.Set the VHF/UHF and FM TRAP switches on the bottom of the preamplifier.
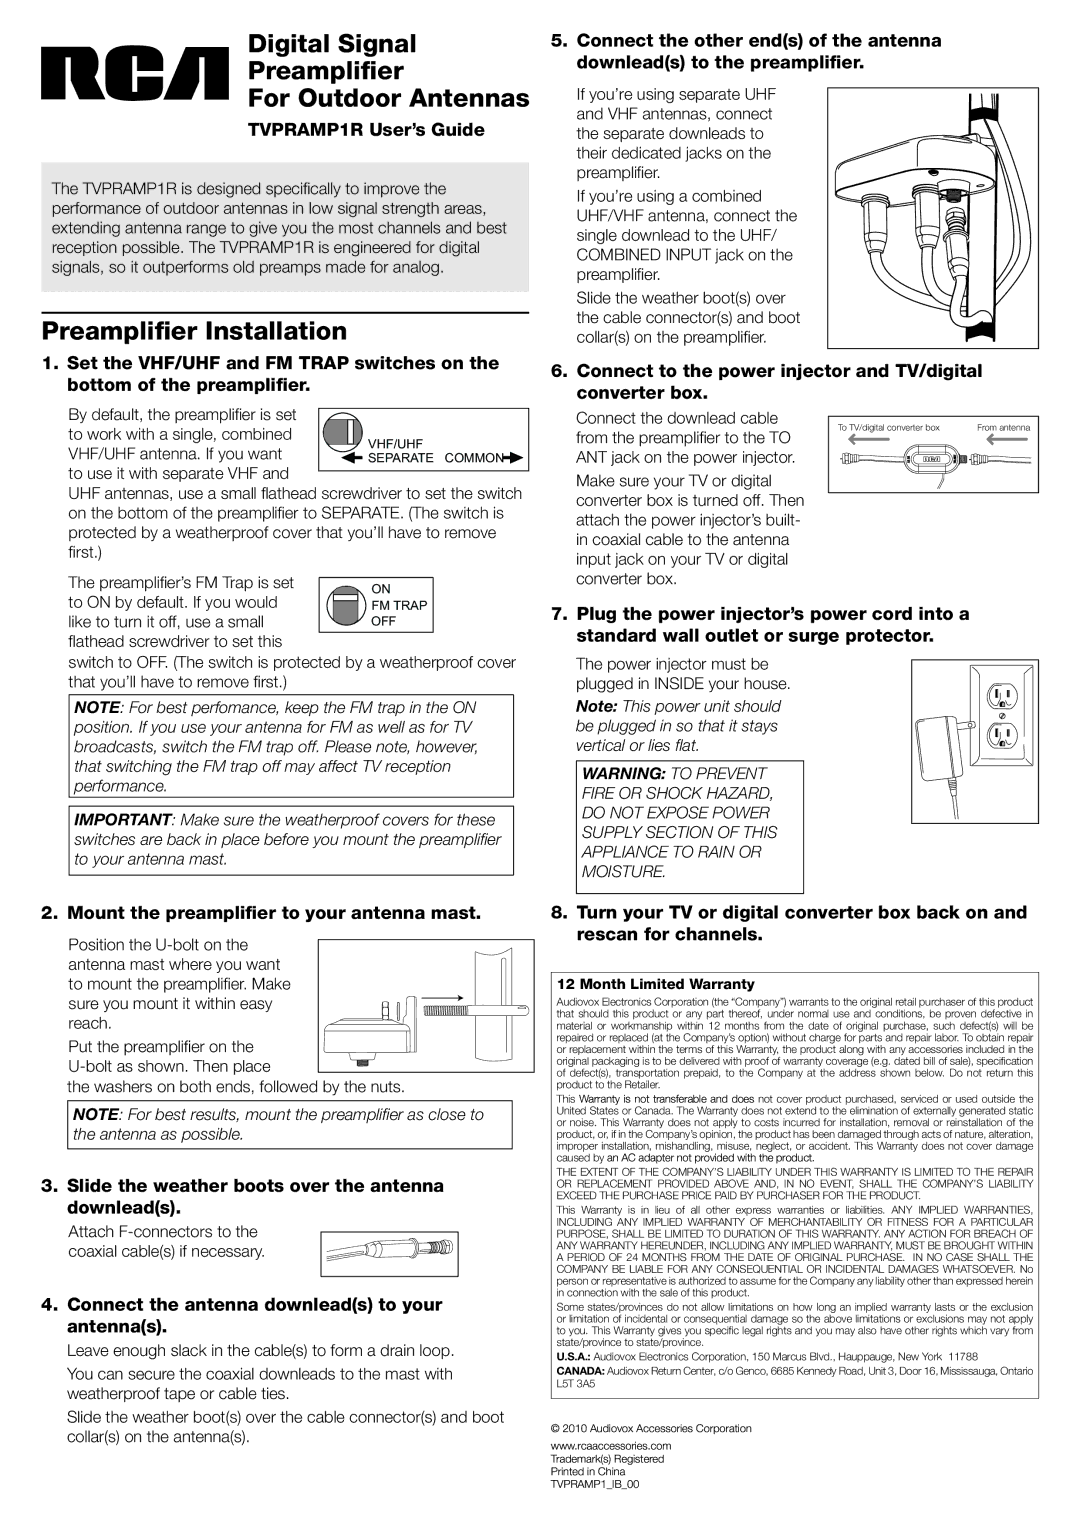
5.Connect the other end(s) of the antenna downlead(s) to the preamplifier.
If you’re using separate UHF and VHF antennas, connect the separate downleads to their dedicated jacks on the preamplifier.
If you’re using a combined UHF/VHF antenna, connect the single downlead to the UHF/ COMBINED INPUT jack on the preamplifier.
Slide the weather boot(s) over the cable connector(s) and boot collar(s) on the preamplifier.
6.Connect to the power injector and TV/digital converter box.
By default, the preamplifier is set
to work with a single, combined VHF/UHF antenna. If you want to use it with separate VHF and
UHF antennas, use a small flathead screwdriver to set the switch on the bottom of the preamplifier to SEPARATE. (The switch is protected by a weatherproof cover that you’ll have to remove first.)
The preamplifier’s FM Trap is set
Connect the downlead cable from the preamplifier to the TO ANT jack on the power injector.
Make sure your TV or digital converter box is turned off. Then attach the power injector’s built- in coaxial cable to the antenna input jack on your TV or digital converter box.
To TV/digital converter box | From antenna | ||||
|
|
|
|
|
|
|
|
|
|
|
|
to ON by default. If you would like to turn it off, use a small
flathead screwdriver to set this
switch to OFF. (The switch is protected by a weatherproof cover that you’ll have to remove first.)
NOTE: For best perfomance, keep the FM trap in the ON position. If you use your antenna for FM as well as for TV broadcasts, switch the FM trap off. Please note, however, that switching the FM trap off may affect TV reception performance.
IMPORTANT: Make sure the weatherproof covers for these switches are back in place before you mount the preamplifier to your antenna mast.
7.Plug the power injector’s power cord into a standard wall outlet or surge protector.
The power injector must be plugged in INSIDE your house.
Note: This power unit should be plugged in so that it stays vertical or lies flat.
WARNING: TO PREVENT
FIRE OR SHOCK HAZARD,
DO NOT EXPOSE POWER
SUPPLY SECTION OF THIS
APPLIANCE TO RAIN OR
MOISTURE.
2.Mount the preamplifier to your antenna mast.
Position the
to mount the preamplifier. Make sure you mount it within easy reach.
Put the preamplifier on the
the washers on both ends, followed by the nuts.
NOTE: For best results, mount the preamplifier as close to the antenna as possible.
3.Slide the weather boots over the antenna downlead(s).
Attach
4.Connect the antenna downlead(s) to your antenna(s).
Leave enough slack in the cable(s) to form a drain loop.
You can secure the coaxial downleads to the mast with weatherproof tape or cable ties.
Slide the weather boot(s) over the cable connector(s) and boot collar(s) on the antenna(s).
8.Turn your TV or digital converter box back on and rescan for channels.
12 Month Limited Warranty
Audiovox Electronics Corporation (the “Company”) warrants to the original retail purchaser of this product that should this product or any part thereof, under normal use and conditions, be proven defective in material or workmanship within 12 months from the date of original purchase, such defect(s) will be repaired or replaced (at the Company’s option) without charge for parts and repair labor. To obtain repair or replacement within the terms of this Warranty, the product along with any accessories included in the original packaging is to be delivered with proof of warranty coverage (e.g. dated bill of sale), specification of defect(s), transportation prepaid, to the Company at the address shown below. Do not return this product to the Retailer.
This Warranty is not transferable and does not cover product purchased, serviced or used outside the United States or Canada. The Warranty does not extend to the elimination of externally generated static or noise. This Warranty does not apply to costs incurred for installation, removal or reinstallation of the product, or, if in the Company’s opinion, the product has been damaged through acts of nature, alteration, improper installation, mishandling, misuse, neglect, or accident. This Warranty does not cover damage caused by an AC adapter not provided with the product.
THE EXTENT OF THE COMPANY’S LIABILITY UNDER THIS WARRANTY IS LIMITED TO THE REPAIR OR REPLACEMENT PROVIDED ABOVE AND, IN NO EVENT, SHALL THE COMPANY’S LIABILITY EXCEED THE PURCHASE PRICE PAID BY PURCHASER FOR THE PRODUCT.
This Warranty is in lieu of all other express warranties or liabilities. ANY IMPLIED WARRANTIES, INCLUDING ANY IMPLIED WARRANTY OF MERCHANTABILITY OR FITNESS FOR A PARTICULAR PURPOSE, SHALL BE LIMITED TO DURATION OF THIS WARRANTY. ANY ACTION FOR BREACH OF ANY WARRANTY HEREUNDER, INCLUDING ANY IMPLIED WARRANTY, MUST BE BROUGHT WITHIN A PERIOD OF 24 MONTHS FROM THE DATE OF ORIGINAL PURCHASE. IN NO CASE SHALL THE COMPANY BE LIABLE FOR ANY CONSEQUENTIAL OR INCIDENTAL DAMAGES WHATSOEVER. No person or representative is authorized to assume for the Company any liability other than expressed herein in connection with the sale of this product.
Some states/provinces do not allow limitations on how long an implied warranty lasts or the exclusion or limitation of incidental or consequential damage so the above limitations or exclusions may not apply to you. This Warranty gives you specific legal rights and you may also have other rights which vary from state/province to state/province.
U.S.A.: Audiovox Electronics Corporation, 150 Marcus Blvd., Hauppauge, New York 11788
CANADA: Audiovox Return Center, c/o Genco, 6685 Kennedy Road, Unit 3, Door 16, Mississauga, Ontario L5T 3A5
© 2010 Audiovox Accessories Corporation
www.rcaaccessories.com Trademark(s) Registered Printed in China TVPRAMP1_IB_00