6. MENU OPERATION

The main menu is classified into five sub menus which will carry out the various operation individually.

1.MAIN MENU

After installing your dish system and receiver with appropriate connectors, plug in the AC main power and turn on the receiver.

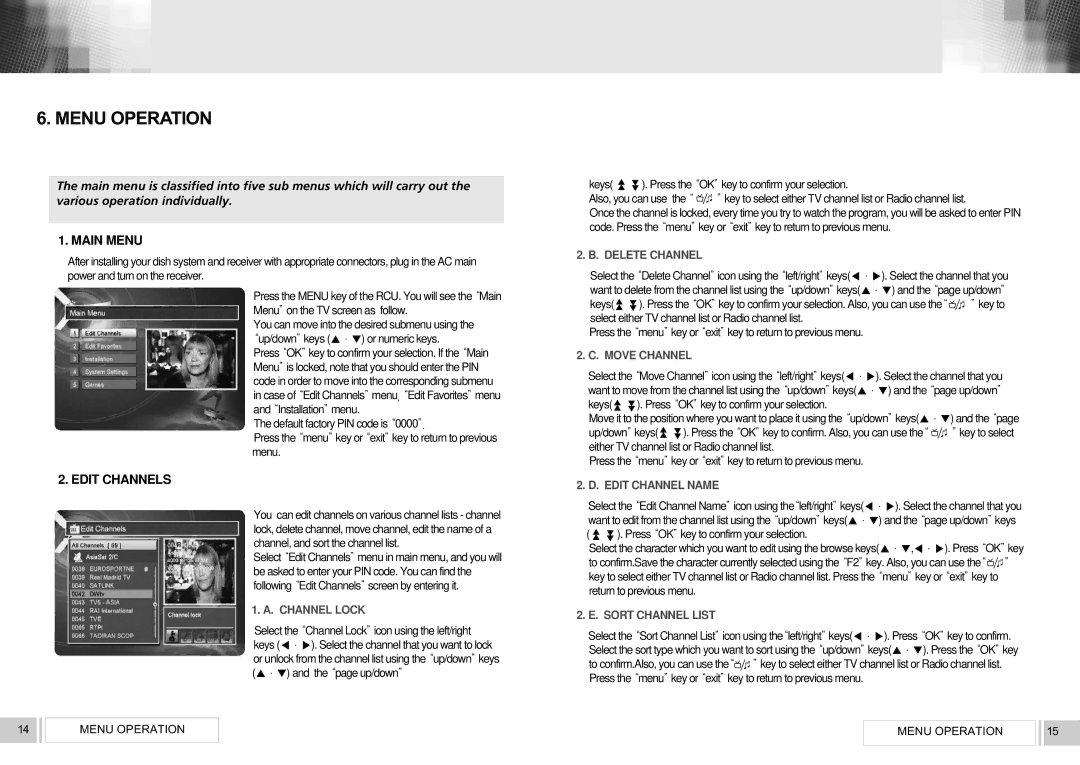
Press the MENU key of the RCU. You will see theMain Menuon the TV screen as follow.

You can move into the desired submenu using the up/downkeys (▲∙▼) or numeric keys. PressOKkey to confirm your selection. If theMain Menuis locked, note that you should enter the PIN code in order to move into the corresponding submenu in case ofEdit Channelsmenu“,Edit Favoritesmenu andInstallationmenu.

The default factory PIN code is0000”.

Press themenukey orexitkey to return to previous menu.

2. EDIT CHANNELS

You can edit channels on various channel lists - channel lock, delete channel, move channel, edit the name of a channel, and sort the channel list.

SelectEdit Channelsmenu in main menu, and you will be asked to enter your PIN code. You can find the followingEdit Channelsscreen by entering it.

1. A. CHANNEL LOCK

Select theChannel Lockicon using the left/right keys (). Select the channel that you want to lock or unlock from the channel list using theup/downkeys (▲∙▼) and thepage up/down

▲ ▲


keys( ▲ ▲ ). Press theOKkey to confirm your selection.

Also, you can use the

key to select either TV channel list or Radio channel list.

Once the channel is locked, every time you try to watch the program, you will be asked to enter PIN code. Press themenukey orexitkey to return to previous menu.

2. B. DELETE CHANNEL

Select theDelete Channelicon using theleft/rightkeys(). Select the channel that you want to delete from the channel list using theup/downkeys(▲∙▼) and thepage up/down

keys(▲ ▲ ). Press theOKkey to confirm your selection. Also, you can use the“ ”key to

▲ ▲

select either TV channel list or Radio channel list.

Press themenukey orexitkey to return to previous menu.

2. C. MOVE CHANNEL

Select theMove Channelicon using theleft/rightkeys(). Select the channel that you want to move from the channel list using theup/downkeys(▲∙▼) and thepage up/down

keys(▲ ▲). PressOKkey to confirm your selection.

▲ ▲

Move it to the position where you want to place it using theup/downkeys(▲∙▼) and thepage

▲ ▲

key to select

up/downkeys(▲ ▲). Press theOKkey to confirm. Also, you can use the

either TV channel list or Radio channel list.


Press themenukey orexitkey to return to previous menu.


2. D. EDIT CHANNEL NAME

Select theEdit Channel Nameicon using theleft/rightkeys(). Select the channel that you want to edit from the channel list using theup/downkeys(▲∙▼) and thepage up/downkeys

( ▲ ▲ ). PressOKkey to confirm your selection.

▲ ▲

Select the character which you want to edit using the browse keys(▲∙▼,). PressOKkey

to confirm.Save the character currently selected using theF2key. Also, you can use thekey to select either TV channel list or Radio channel list. Press themenukey orexitkey to return to previous menu.

2.E. SORT CHANNEL LIST

Select theSort Channel Listicon using theleft/rightkeys(). PressOKkey to confirm. Select the sort type which you want to sort using theup/downkeys(▲∙▼). Press theOKkey

to confirm.Also, you can use thekey to select either TV channel list or Radio channel list.

Press themenukey orexitkey to return to previous menu.

14

MENU OPERATION

MENU OPERATION

15

Page 9
Image 9
RCA VS2000 Menu Operation, Main Menu, Edit Channels, Keys . Press the OK key to confirm your selection, Also, you can use

VS2000 specifications

The RCA VS2000, introduced in the late 1970s, is a remarkable example of early video cassette recorder technology that has left a lasting impact on the home entertainment industry. This sophisticated device was among the first to utilize the Video Home System (VHS) format, revolutionizing how families enjoyed and stored their favorite television programs and movies.

One of the main features of the RCA VS2000 is its compact design, which allowed it to fit seamlessly into living room setups without taking up excessive space. The unit offered a user-friendly interface, making it accessible even to those who were not technologically savvy. The remote control functionality was also a significant advancement, enabling users to navigate their viewing experiences from a distance.

The VS2000 employed a unique helical scan system, which allowed for improved picture quality and longer recording times compared to its predecessors. This technology enabled the device to record up to four hours of video on a single tape, making it an ideal choice for capturing entire films or extended television events. The ability to program recordings added convenience, as users could set the machine to start and stop at specific times, ensuring they wouldn't miss their favorite shows.

Audio technology in the RCA VS2000 was notable for its time, featuring stereo sound capabilities that enhanced the viewing experience. The inclusion of various speed settings allowed for flexibility in recording, enabling users to choose between standard and extended play modes depending on their needs.

The durability and reliability of the RCA VS2000 contributed to its popularity. Constructed with high-quality materials, it was built to withstand years of usage, making it a staple in many homes throughout the early '80s. The device also had a broad compatibility range with various VHS tapes, which helped solidify its place in the market.

Overall, the RCA VS2000 was a pioneering machine that laid the groundwork for the home video revolution. Its innovative features and technologies set a standard for future generations of VCRs and home entertainment systems, making it a significant artifact of its time. As consumers transitioned from bulky film projectors to compact video recorders, the RCA VS2000 represented a key step in the evolution of how audiences consumed media.