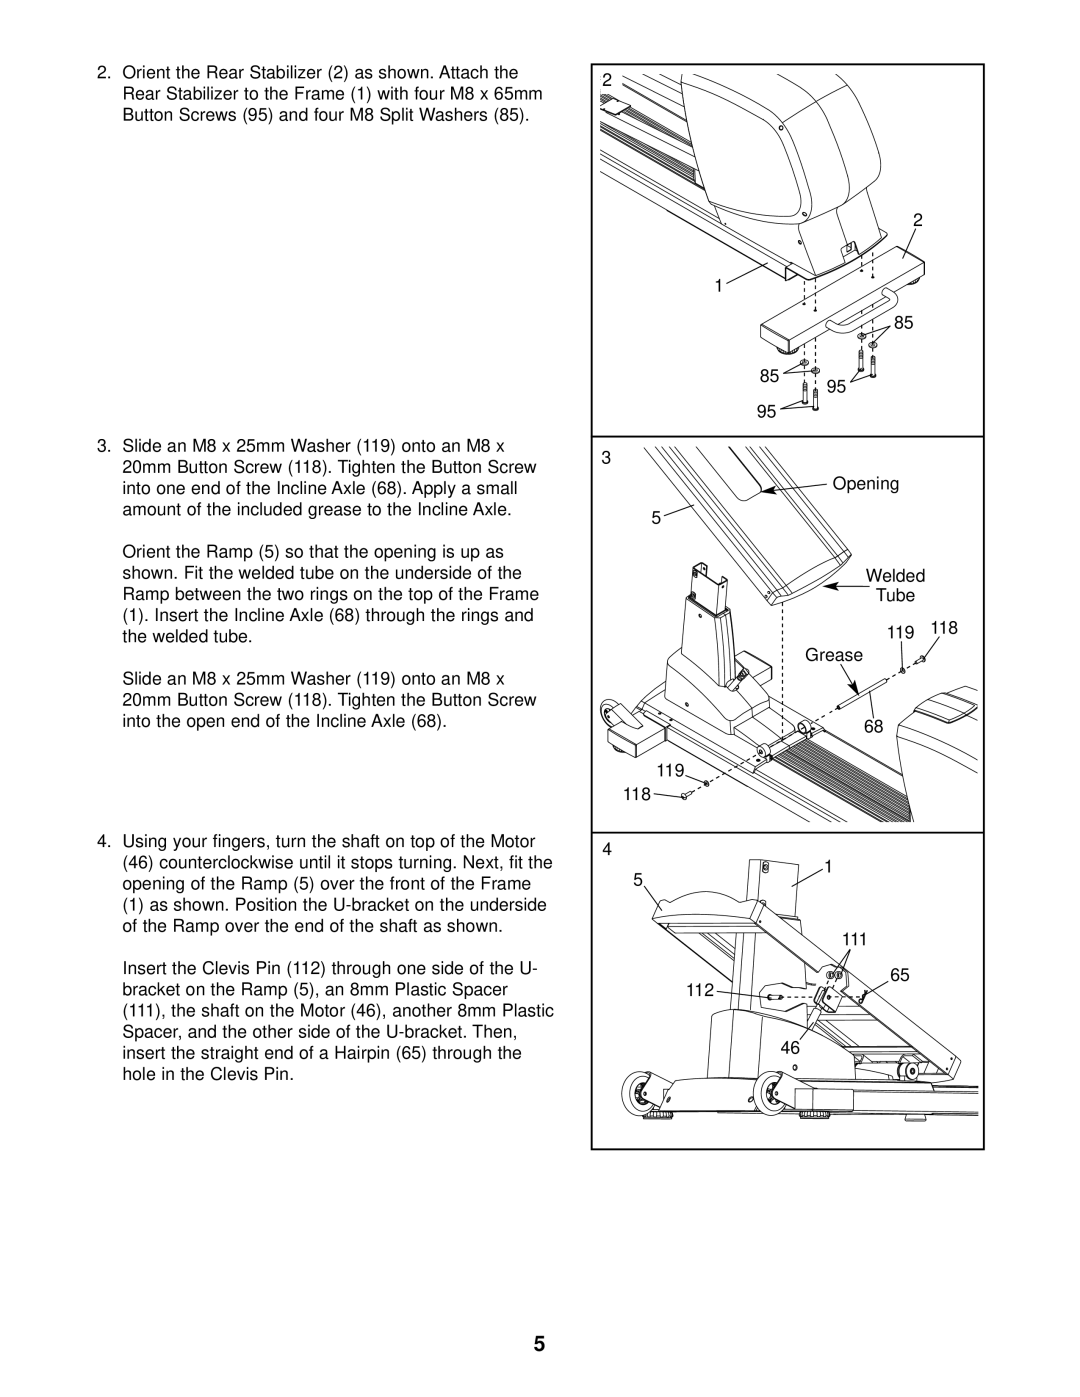
2. | Orient the Rear Stabilizer (2) as shown. Attach the | 2 |
|
|
| Rear Stabilizer to the Frame (1) with four M8 x 65mm |
|
| |
|
|
|
| |
| Button Screws (95) and four M8 Split Washers (85). |
|
|
|
|
|
| 2 |
|
|
| 1 |
|
|
|
|
| 85 |
|
|
| 85 | 95 |
|
|
|
|
| |
|
| 95 |
|
|
3. | Slide an M8 x 25mm Washer (119) onto an M8 x | 3 |
|
|
| 20mm Button Screw (118). Tighten the Button Screw |
|
| |
|
| Opening |
| |
| into one end of the Incline Axle (68). Apply a small |
|
| |
| amount of the included grease to the Incline Axle. | 5 |
|
|
|
|
|
| |
| Orient the Ramp (5) so that the opening is up as |
|
|
|
| shown. Fit the welded tube on the underside of the |
| Welded |
|
| Ramp between the two rings on the top of the Frame |
| Tube |
|
| (1). Insert the Incline Axle (68) through the rings and |
| 119 | 118 |
| the welded tube. |
| ||
|
|
| Grease |
|
| Slide an M8 x 25mm Washer (119) onto an M8 x |
|
|
|
| 20mm Button Screw (118). Tighten the Button Screw |
|
|
|
| into the open end of the Incline Axle (68). |
| 68 |
|
|
|
|
| |
|
| 119 |
|
|
|
| 118 |
|
|
4. Using your fingers, turn the shaft on top of the Motor | 4 |
|
| |
| (46) counterclockwise until it stops turning. Next, fit the | 1 |
| |
| 5 |
| ||
| opening of the Ramp (5) over the front of the Frame |
|
| |
| (1) as shown. Position the |
|
|
|
| of the Ramp over the end of the shaft as shown. |
| 111 |
|
|
|
|
| |
| Insert the Clevis Pin (112) through one side of the U- |
| 65 |
|
| bracket on the Ramp (5), an 8mm Plastic Spacer | 112 |
| |
|
|
| ||
| (111), the shaft on the Motor (46), another 8mm Plastic |
|
|
|
| Spacer, and the other side of the |
| 46 |
|
| insert the straight end of a Hairpin (65) through the |
|
| |
|
|
|
| |
| hole in the Clevis Pin. |
|
|
|
5